> ## Documentation Index
> Fetch the complete documentation index at: https://docs-staging-quickstart-revamp.mintlify.site/llms.txt
> Use this file to discover all available pages before exploring further.

> Describes troubleshooting for SAML configuration issues.

# Troubleshoot SAML Configurations

When troubleshooting, it's important to understand your configuration.

* **Is Auth0 serving as the <Tooltip tip="Security Assertion Markup Language (SAML): Standardized protocol allowing two parties to exchange authentication information without a password." cta="View Glossary" href="/docs/glossary?term=SAML">SAML</Tooltip> Service Provider (SP), the SAML <Tooltip tip="Security Assertion Markup Language (SAML): Standardized protocol allowing two parties to exchange authentication information without a password." cta="View Glossary" href="/docs/glossary?term=Identity+Provider">Identity Provider</Tooltip> (IdP), or both?**

  The SP redirects users elsewhere for authentication. The IdP authenticates the user by prompting them to log in and validating the information provided. If your application redirects the user to Auth0 for authentication via SAML, then Auth0 is the IdP. If Auth0 redirects users via a Connection to a remote IdP via SAML, then Auth0 is the SP to the remote IdP. Auth0 can act as the SP, IdP, or both.
* **Does your authentication flow use an SP-initiated model, an IdP-initiated model, or both?**

  SP-initiated authentication flows begin with the user navigating to the SP application and getting redirected to the IdP for login. An IdP-initiated flow means the user navigates to the IdP, logs in, and then gets redirected to the SP application.

  Within enterprise settings, the IdP-initiated flow is most common.
* **Which user profile attribute identifies the user at the IdP (during login) and within each application?**

  If the naming attribute differs between the IdP and the application(s), you'll need to configure the appropriate mappings within Auth0 so that it sends the correct user profile attributes to the application(s).

  * From our experience, using the email address as the unique identifier is the easiest option, though there are privacy concerns with this option.
  * Enterprise organizations often use an internal ID of some type with the IdP, which needs to be mapped to another attribute meaningful to outsourced SaaS applications.
* **Are your authentication requests signed?**
* **Are your authentication assertions encrypted?**

When troubleshooting, we recommend beginning by gathering information that helps answer the following questions:

1. How many users experience the issue? Just one user? All users?
2. Is this an issue with a new setup, or is this an existing integration that's stopped working?
3. How many applications does the issue affect?
4. What is the expected behavior? What is the behavior you're seeing?
5. How far through the login sequence does the user get?

## Check affected users

* Check the user's profile, browser, or device for any issues.
* Check to see if it happens in all browsers for the affected users (indicating a data issue) or just certain types of browsers (indicating a browser-specific issue).
* Check to see if the browser has enabled JavaScript and cookies.
* Check that the caps lock key is disabled.
* If the user is using a mobile device, check to see if there's any software that might impact authentication and/or authorization (such as not running some type of required software).
* Check to see if the user can access some of the app's key URLs, such as the IdP's <Tooltip tip="Single Sign-On (SSO): Service that, after a user logs into one applicaton, automatically logs that user in to other applications." cta="View Glossary" href="/docs/glossary?term=Single+Sign-on">Single Sign-on</Tooltip> (SSO) URL (indicating a network connectivity issue).

## Troubleshoot Auth0 as a service provider

### Common errors

Here are some common errors you might encounter when Auth0 acts as the service provider and the steps you should take to resolve them.

#### Error: Connection disabled

This message indicates that the Application doesn't have an active Connection associated:

`"error": "invalid_request",
"error_description": "the connection was disabled"`

1. Navigate to [Auth0 Dashboard > Authentication > Enterprise](https://manage.auth0.com/#/connections/enterprise), and select a connection type.
2. Select the name of your Connection.
3. Select the **Applications** view.
4. Enable at least one Application (if you don't see any in the list, you will need to create an application before proceeding).

#### Error: IdP-Initiated login not enabled

This error typically occurs because the ACS URL configured in the IdP used the default Auth0 tenant domain, whereas the authentication transaction was started by calling the <Tooltip tip="Custom Domain: Third-party domain with a specialized, or vanity, name." cta="View Glossary" href="/docs/glossary?term=Custom+Domain">Custom Domain</Tooltip> `/authorize` endpoint.

`"invalid_request": "IdP-Initiated login is not enabled for connection 'CONNECTION_NAME'."`

If you see this error when using an SP-initiated flow, one of the following is missing or empty:

* `RelayState` parameter
* `InResponseTo` attribute in the SAML response

If these are missing or empty, Auth0 treats the login as IdP-initiated. You can fix this error by checking your configuration to ensure that both fields are populated and returned appropriately.

To fix this:

1. Navigate to [Auth0 Dashboard > Authentication > Enterprise](https://manage.auth0.com/#/connections/enterprise), and select a connection type.
2. Select the name of your Connection.
3. Select the **IdP-Initiated SSO** view.
4. Locate **IdP-Initiated SSO Behavior**, and select **Accept Requests** to enable IdP-initiated logins.
5. Select the **Default Application** and the **Response Protocol** used by that application, and (optionally) specify any additional parameters you want to be passed to the application.

#### Error: InResponseTo attribute does not match the ID in AuthNRequest

This error occurs when the `InResponseTo` attribute in the SAML response is not recognized by the Auth0 tenant. This error could be caused by:

* blocked cookies
* mismatched IDs from the most recent SAML request
* inconsistent use of domains

If your tenant uses a custom domain, you could have a mismatch if the login flow begins on the custom domain and finishes on the canonical domain. For example, the user starts at the custom domain:

```http wrap lines
https://auth.{yourDomain}.com/authorize?client_id=abc123&redirect_uri=https://jwt.io&response_type=code&scope=openid&audience=https://example.com&connection=mysamlconnection
```

But the identity provider is configured to return the SAML response to the ACS URL at the canonical domain:

```http lines
https://{yourTenant}.auth0.com/login/callback
```

If the ID is returned to another domain in the `InResponseTo` attribute of a SAML response, your Auth0 tenant doesn’t have a record of it and returns the above error.

To fix this:

Use the same domain throughout the login flow. Change either the domain in the initial `/authorize` request or the ACS URL with your identity provider.

#### Error: IdP-Initiated Default App Not Configured

This error typically occurs have enabled IdP-Initiated flows but you haven't provided the necessary information to execute the flow.

`"invalid_request": "Default App for IdP-Initiated is not configured. Make sure to configure that from connection settings or include client_id in RelayState parameter."`

The ACS URL should use the same domain as the initial authentication request. If using custom domains, this should use the custom domain callback URL.

If you see this error when using an SP-initiated flow, one of the following is missing or empty:

* `RelayState` parameter
* `InResponseTo` attribute in the SAML response

If these are missing or empty, Auth0 treats the login as IdP-initiated. You can fix this error by checking your configuration to ensure that both fields are populated and returned appropriately.

To fix this:

1. Navigate to [Auth0 Dashboard > Authentication > Enterprise](https://manage.auth0.com/#/connections/enterprise), and select a connection type.
2. Select the name of your Connection.
3. Select the **IdP-Initiated SSO** view.
4. Select the **Default Application** and the **Response Protocol** used by that application, and (optionally) specify any additional parameters you want to be passed to the application.

#### Error: Missing RelayState

This error occurs when the identity provider doesn't return the `RelayState` parameter along with its response.

Work with the identity provider to ensure that it returns the `RelayState` parameter.

#### Error: Audience invalid

This error occurs if the value of the `audience` element from the identity provider's SAML response doesn't match the value expected by Auth0. Auth0 expects the value to be the Entity ID for the Connection.

Find your connection's entity ID:

1. Navigate to [Auth0 Dashboard > Authentication > Enterprise](https://manage.auth0.com/#/connections/enterprise), and select a connection type.
2. Select the name of your Connection.
3. Select the **Setup** view, and locate the **Common Settings** section; your **Entity ID** is the second parameter provided.

Make sure that the identity provider sends the correct `audience` value in the SAML response.

#### Incorrect protocol specified

One common error is specifying the incorrect response protocol on the IdP-Initiated tab. The response protocol is the one used between Auth0 and the Application (not the remote identity provider). For example, if you set this value to **SAML** when your Application expects **<Tooltip tip="OpenID: Open standard for authentication that allows applications to verify users' identities without collecting and storing login information." cta="View Glossary" href="/docs/glossary?term=OpenID">OpenID</Tooltip> Connect** or **<Tooltip tip="OpenID: Open standard for authentication that allows applications to verify users' identities without collecting and storing login information." cta="View Glossary" href="/docs/glossary?term=WS-Fed">WS-Fed</Tooltip>** results in errors due to the incorrect configuration.

1. Navigate to [Auth0 Dashboard > Authentication > Enterprise](https://manage.auth0.com/#/connections/enterprise), and select a connection type.
2. Select the name of your Connection.
3. Select the **IdP-Initiated SSO** view, locate **Response Protocol**, and check its value.

#### User isn't logged out of the IdP

When ADFS is configured as SAML IdP, if the ADFS is relaying party trust `Name ID` attribute isn't mapped the logout flow fails. For example, with the federated parameter `v2/logout?federated&...` user isn't redirected to the ADFS SAML logout endpoint but redirects back to application callback URL directly. As a consequence, the user isn't logged out from the IdP in that case.

Add the `Name ID` attribute as a rule on the SAML Relaying Party Trust.

### SAML login issues

When troubleshooting a SAML login, there are four primary stages to check:

* Stage 1: The user is successfully redirected to an identity provider (IdP) and is able to login.
* Stage 2: After login with the IdP, the user returns to Auth0 with a successful login event recorded.
* Stage 3: After a successful login event in Auth0, the user profile in Auth0 is correct.
* Stage 4: The user successfully redirects back to application and is able to access application.

The following sections describe how to check each stage and how to identify if there are any issues with a given stage.

#### IdP login page doesn't display

1. Navigate to [Auth0 Dashboard > Authentication > Enterprise](https://manage.auth0.com/#/connections/enterprise), and select **SAML**.
2. Locate your connection, and select its **Try** (triangle/play) icon to test the interaction between Auth0 and the remote IdP. If the Connection does **not** work, continue with the steps detailed in this section. If it does, proceed to the next section.
3. Next to the SAML connection, click **Settings** (represented by the gear icon).

   <Frame>
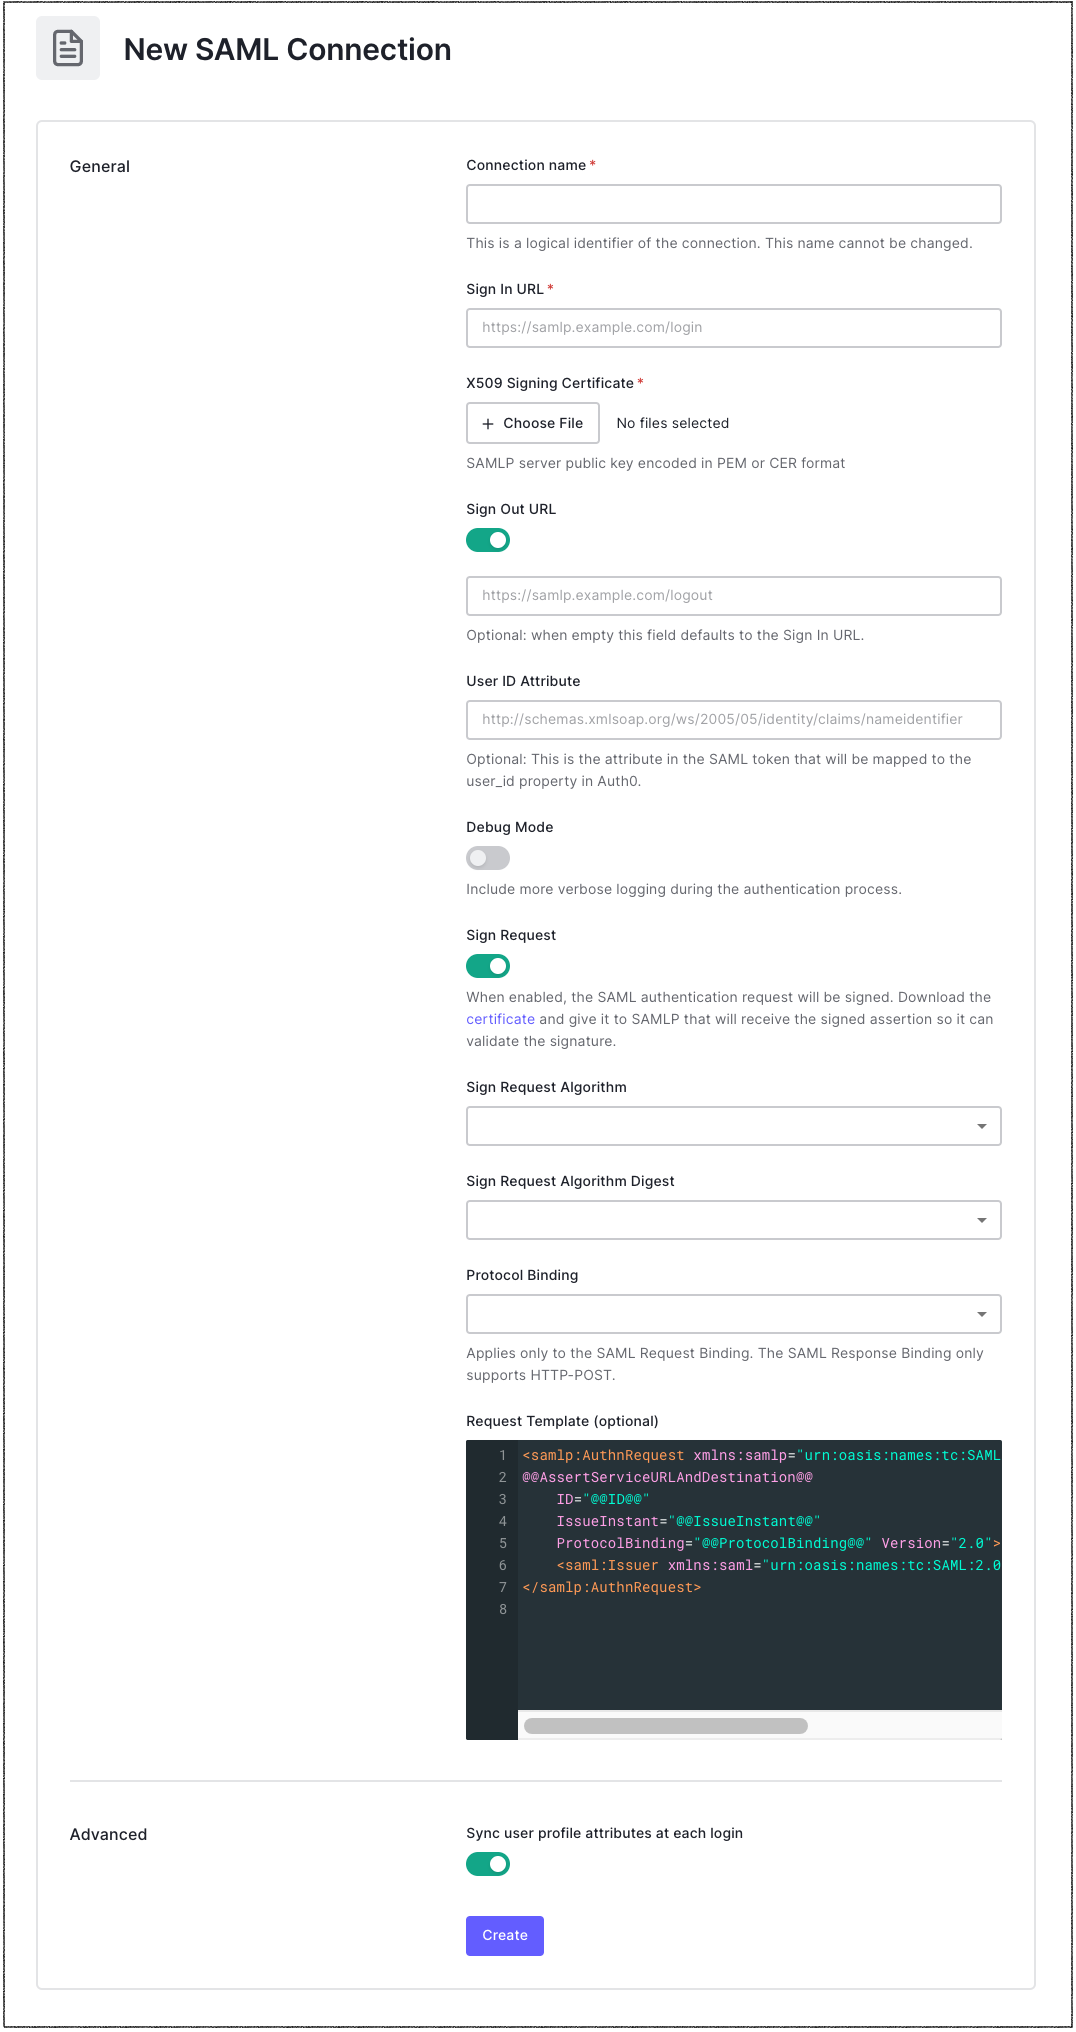
     <img src="https://mintcdn.com/docs-staging-quickstart-revamp/KCEsvkqT5-VRQ297/images/cdy7uua7fh8z/6s8p4aMck06YnPStr493sA/3e10e74fd75b504a04b0e3bb3dfb82f2/dashboard-authentication-enterprise-saml-connection-settings.png?fit=max&auto=format&n=KCEsvkqT5-VRQ297&q=85&s=5b0d4f0e68b73375a04fa5dd49b49a2d" alt="Dashboard Authentication Enterprise SAML Connection Settings" width="1076" height="2032" data-path="images/cdy7uua7fh8z/6s8p4aMck06YnPStr493sA/3e10e74fd75b504a04b0e3bb3dfb82f2/dashboard-authentication-enterprise-saml-connection-settings.png" />
   </Frame>
4. Check and confirm the following with the IdP administrator:

   1. That the Sign In URL is the correct Single Sign-on (SSO) URL. This is the URL that Auth0 will redirect the user to for authentication.
   2. If the IdP expects HTTP-POST binding or HTTP-Redirect binding. You can switch the default binding in the **Settings** tab.
   3. If your authentication requests should be signed. If so, which signing algorithm does the IdP expect you to use? (Note that authentication requests are not commonly signed.) If you're sending signed requests, enable the Connection Settings **Sign Request** toggle and make sure the **Signing Algorithm** value matches what the IdP expects.
   4. Ask the IdP administrator to check for log entries that might provide information on the problem.

#### Logs don't show successful login event

In this case, the user successfully logs in with the identity provider, but the Auth0 logs do not show a successful login event.

1. Check the [Logs](https://manage.auth0.com/#/logs) and [Users](https://manage.auth0.com/#/users) pages in the Auth0 Dashboard to see if Auth0 shows a successful login event. If Auth0's logs don't show a successful login event, there is probably an issue with the SAML Authentication Assertion returned by the IdP or Auth0 is unable to consume the assertion.
2. Check the information that Auth0 sends to the application by [capturing an HTTP trace of the login sequence](/docs/troubleshoot/troubleshooting-tools/generate-and-analyze-har-files) and analyzing the HTTP trace.

   <Warning>
     Before sharing a HAR file with anyone (including Auth0), ensure that you remove or obfuscate all sensitive data, such as:

     * Confidential user information
     * Personal identifiable information (PII)
     * Confidential application information

     To learn more, read the following articles on [Auth0 Community](https://community.auth0.com):

     * [Sanitizing HTTP Traces](https://community.auth0.com/t/sanitizing-http-traces/119488)
     * [How to Sanitize an HTTP Trace File Automatically](https://community.auth0.com/t/how-to-sanitize-a-http-trace-file-automatically/120583)
     * [How to Manually Redact Sensitive Information](https://community.auth0.com/t/how-to-manually-redact-sensitive-information/122554)
     * [HAR File is Too Large to Upload to the Support Case](https://community.auth0.com/t/har-file-is-too-large-to-upload-to-the-support-case/122488)
   </Warning>
3. You can view the HTTP trace in a HAR file analyzer, such as [Google's HAR Analyzer](https://toolbox.googleapps.com/apps/har_analyzer/).

   1. Scan through the sequence of URLs invoked in the HTTP trace.

      1. The first few will be URLs for your application.
      2. There will then be a redirect to an Auth0 URL (such as `{yourDomain}`).
   2. After one or more intervening URLs, there will be a POST back to Auth0 containing the SAML assertion with user information. The URL should be for the Assertion Consumer Service (ACS) of Auth0, which consumes the assertion and extracts the needed information.
   3. Click on the row for the POST call in the HAR analyzer.
   4. Switch to the POST Data tab, and look for the SAML response.
   5. Copy and paste the SAML response into a [SAML debugger](https://samltool.io/).
   6. Remove the "SAML response" at the beginning, as well as anything beginning with `&RelayState=` at the end.
4. After retrieving and decoding the SAML message, check the following fields:

<table class="table">
  <thead>
    <tr>
      <th>Field</th>
      <th>Description</th>
    </tr>
  </thead>

  <tbody>
    <tr>
      <td>Destination</td>
      <td>Check that the destination for the SAML response is the correct Auth0 Tenant and Connection (`https://{TENANT}.auth0.com/login/callback?connection={CONNECTION}`).</td>
    </tr>

    <tr>
      <td>Status Field</td>
      <td>This field should indicate success. (<code>\<samlp:StatusCode Value="urn:oasis:names:tc:SAML:2.0:status:Success"/></code>).</td>
    </tr>

    <tr>
      <td>Recipient</td>
      <td>Check that the <code>\<saml:SubjectConfirmation</code> Method element contains correct tenant and connection in the “Recipient” field (`https://{TENANT}.auth0.com/login/callback?connection={CONNECTION}`).</td>
    </tr>

    <tr>
      <td>Audience</td>
      <td>Check that the SAML Audience restriction field contains the correct tenant and connection information (`<saml:AudienceRestriction><saml:Audience>urn:auth0:{TENANT}:{CONNECTION}</saml:Audience>`).</td>
    </tr>

    <tr>
      <td>Naming</td>
      <td>The attribute identified by the <code>NameIdentifier</code> field should be known to the application. If it's not, the identifier should be some other attribute within the assertion (such as an internal IdP identifier for the user or an email address).</td>
    </tr>

    <tr>
      <td>Signature Key</td>
      <td>Check that the value indicated by the <code>X509Certificate</code> element matches the value provided to your connection.</td>
    </tr>

    <tr>
      <td>Certificate</td>
      <td>Compare the certificate sent to the one that you provided to the application</td>
    </tr>
  </tbody>
</table>

#### User profile attributes are incorrect

In this case, the user successfully logs in with the IdP, the Auth0 logs show a successful login event, but the user's profile attributes are **not** correct.

Check to see if the user's Auth0 profile populated correctly:

1. Go to the [Dashboard > User Management > Users](https://manage.auth0.com/#/users).
2. Find and click on the specific user to open up their profile. If there are multiple rows for a given user, be sure to open up the record associated with the SAML Connection.
3. On the user's profile, you can view their details in one of two ways. You can use the **Details** tab or the **Raw JSON** tab. This shows you what attributes Auth0 has received from the identity provider.
4. If the attribute is missing, check to see if the attribute was included in the assertion. You can do this by decoding the SAML assertion, or you can enable debugging for the connection.

   1. To enable debugging for the connection, navigate to [Authentication > Enterprise](https://manage.auth0.com/#/connections/enterprise).
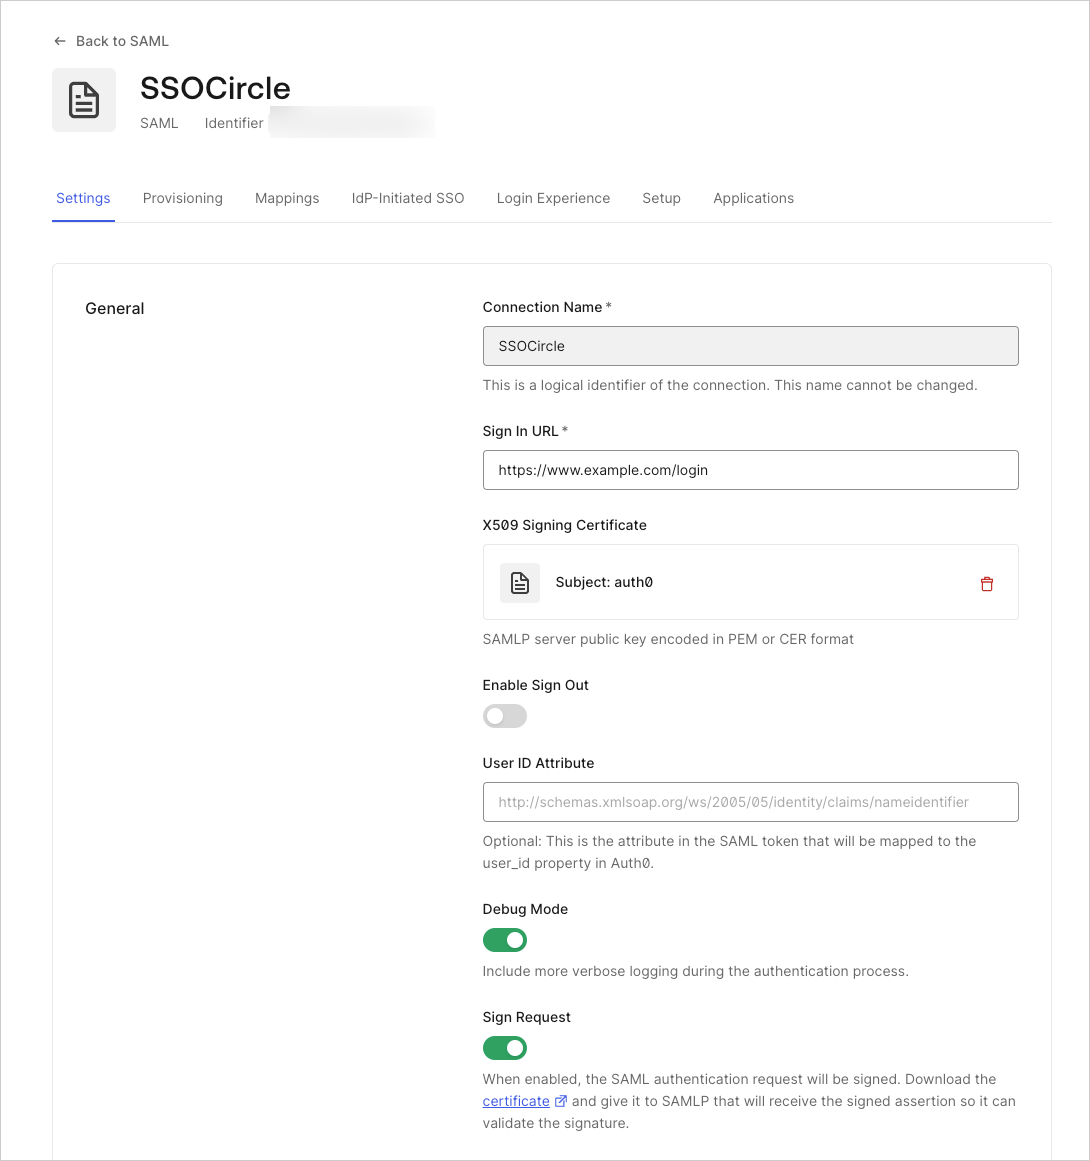
   2. Open the list of **SAML** IdP connections, click **Settings**, and enable **Debug Mode**.

      <Frame>
        <img src="https://mintcdn.com/docs-staging-quickstart-revamp/AmyDKn5Na0kFZtbL/images/cdy7uua7fh8z/1F6npTHy1P0c0ygXfbndBD/6185e73705d078e9bf458460000ee2ad/2025-02-27_15-32-02.png?fit=max&auto=format&n=AmyDKn5Na0kFZtbL&q=85&s=834d6afdbe1f09ca71b8f75487823a35" alt="Troubleshoot SAML Connections Enable Debug Mode screen" width="1090" height="1161" data-path="images/cdy7uua7fh8z/1F6npTHy1P0c0ygXfbndBD/6185e73705d078e9bf458460000ee2ad/2025-02-27_15-32-02.png" />
      </Frame>
   3. With **Debug Mode** enabled, **Warning During Login** log entries [in the Dashboard](https://manage.auth0.com/#/logs) have an `original_profile` property listing every attribute included in the SAML assertion by the Identity Provider. You can use this list to see the information that the IdP is sending and to help you create the mappings. If the missing attribute is not in the assertion at all, please work with the IdP to make sure it is included.
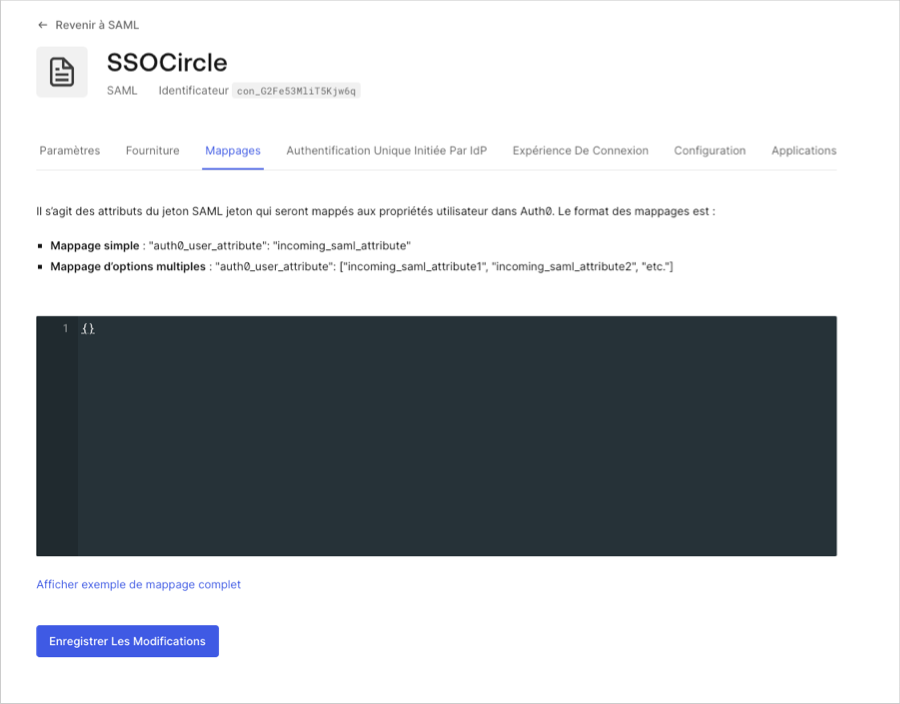
5. If an attribute value exists in the Auth0 user profile, but is not mapped to the right attribute, you can correct this via the Connection Mapping capability.

   1. You can do this by navigating to [Authentication > Enterprise](https://manage.auth0.com/#/connections/enterprise).
   2. Open the list of **SAML** IdP connections and go to the **Mappings** tab.
      <Frame>
        <img src="https://mintcdn.com/docs-staging-quickstart-revamp/cn1eMmAiJHX3hF4T/images/cdy7uua7fh8z/BPMjuhqE17E5vWcHukcKf/df55785b4874411199b8dd84f1576cad/2025-02-27_14-14-14.png?fit=max&auto=format&n=cn1eMmAiJHX3hF4T&q=85&s=c89edceecbd6d7ba50de98f744d26c03" alt="Troubleshoot SAML Connections Mappings Tab Screen" width="900" height="704" data-path="images/cdy7uua7fh8z/BPMjuhqE17E5vWcHukcKf/df55785b4874411199b8dd84f1576cad/2025-02-27_14-14-14.png" />
      </Frame>
   3. Within the provided editor, there is a JSON snippet you can edit to configure your mappings. The name on the left is the Auth0 user profile attribute to which the assertion value will be mapped. The value on the right is the identifier in the SAML assertion from which the attribute comes. When Auth0 incorporates unmapped SAML attributes into the user profile, attribute identifiers containing dots `.` are replaced with semicolons `:`. While configuring your mappings, ensure the identifiers you provide match those in the SAML assertion.

#### User cannot access the application

In this case, the user successfully logs in with the IdP, Auth0 logs show a successful login event, and the user's profile attributes are correct; but the user **cannot** access the application.

1. Check your application's log files to see if there are any error messages indicating why the user is unable to access the application. The two most common causes for this issue are:

   1. Missing user profile information.
   2. Incorrect or missing authorization information.
2. Check the information that Auth0 sends to the application by [capturing an HTTP trace of the login sequence](/docs/troubleshoot/troubleshooting-tools/generate-and-analyze-har-files) and analyzing the HTTP trace. You can view the HTTP trace in a HAR file analyzer, such as [Google's HAR Analyzer](https://toolbox.googleapps.com/apps/har_analyzer/).

   <Warning>
     Before sharing a HAR file with anyone (including Auth0), ensure that you remove or obfuscate all sensitive data, such as:

     * Confidential user information
     * Personal identifiable information (PII)
     * Confidential application information

     To learn more, read the following articles on [Auth0 Community](https://community.auth0.com):

     * [Sanitizing HTTP Traces](https://community.auth0.com/t/sanitizing-http-traces/119488)
     * [How to Sanitize an HTTP Trace File Automatically](https://community.auth0.com/t/how-to-sanitize-a-http-trace-file-automatically/120583)
     * [How to Manually Redact Sensitive Information](https://community.auth0.com/t/how-to-manually-redact-sensitive-information/122554)
     * [HAR File is Too Large to Upload to the Support Case](https://community.auth0.com/t/har-file-is-too-large-to-upload-to-the-support-case/122488)
   </Warning>

   1. Scan through the sequence of URLs invoked in the HTTP trace.

      1. The first few will be URLs for your application.
      2. There will then be a redirect to an Auth0 URL (such as `{yourDomain}`).
   2. After one or more intervening URLs, there will be a POST back to Auth0 containing the SAML assertion with user information. The URL should be for the Assertion Consumer Service (ACS) of Auth0, which consumes the assertion and extracts the needed information.
   3. Click on the row for the POST call in the HAR analyzer.
   4. Switch to the POST Data tab, and look for the SAML response.
   5. Copy and paste the SAML response into a [SAML debugger](https://samltool.io/).
   6. Remove the SAML response at the beginning, as well as anything beginning with `&RelayState=` at the end.
3. After retrieving and decoding the SAML message, check the following fields:

<table class="table">
  <thead>
    <tr>
      <th>Field</th>
      <th>Description</th>
    </tr>
  </thead>

  <tbody>
    <tr>
      <td>Destination</td>
      <td>Check that the destination for the SAML response is the correct Auth0 Tenant and Connection (`https://{TENANT}.auth0.com/login/callback?connection={CONNECTION}`).</td>
    </tr>

    <tr>
      <td>Status Field</td>
      <td>This field should indicate success. (<code>\<samlp:StatusCode Value="urn:oasis:names:tc:SAML:2.0:status:Success"/></code>).</td>
    </tr>

    <tr>
      <td>Recipient</td>
      <td>Check that the <code>\<saml:SubjectConfirmation</code> Method element contains correct tenant and connection in the “Recipient” field (`https://{TENANT}.auth0.com/login/callback?connection={CONNECTION}`).</td>
    </tr>

    <tr>
      <td>Audience</td>
      <td>Check that the SAML Audience restriction field contains the correct tenant and connection information (`<saml:AudienceRestriction><saml:Audience>urn:auth0:{TENANT}:{CONNECTION}</saml:Audience>`).</td>
    </tr>

    <tr>
      <td>Naming</td>
      <td>The attribute identified by the <code>NameIdentifier</code> field should be known to the application. If it's not, the identifier should be some other attribute within the assertion (such as an internal IdP identifier for the user or an email address).</td>
    </tr>

    <tr>
      <td>Signature Key</td>
      <td>Check that the value indicated by the <code>X509Certificate</code> element matches the value provided to your connection.</td>
    </tr>

    <tr>
      <td>Certificate</td>
      <td>Compare the certificate sent to the one that you provided to the application</td>
    </tr>
  </tbody>
</table>

4. If your authorization flow uses an OIDC-conformant protocol, you can capture a HAR trace and view it using [Google's HAR Analyzer](https://toolbox.googleapps.com/apps/har_analyzer/).

   1. Scan through the sequence of URLs in the trace, and look for the following:

      1. The first few will be URLs for your application.
      2. There will then be a redirect to an Auth0 URL (such as `{yourDomain}`).
   2. Further down is your application's callback URL. Make sure that it's correct.
   3. Retrieve the ID Token from this call, and paste it into [a JWT decoder](https://jwt.io/). Check that the claims in the token contain the information needed by the application.
5. If you're using an IdP-initiated flow (for example, the user starts at the identity provider in a portal application), be sure that:

   1. The Assertion Consumer Service (ACS) URL at the identity provider includes the connection name (for example `https://{yourDomain}/login/callback?connection=CONNECTION_NAME`)
   2. The IdP-initiated configuration tab for the Connection is properly filled in, including:

      1. The IdP-initiated SSO behavior is set to **Accept Requests**;
      2. The application to which the user should be sent;
      3. The protocol between the application and Auth0 (which is not necessarily **SAML** like the connection, and most likely is **OpenID Connect**);
      4. Any protocol-specific values to include in the query string, such as `scope`, `response_type`, `redirect_uri`, and `audience`. These values should match the ones expected by the application when using an SP-initiated flow.
   3. Disable your rules temporarily to make sure that nothing is interfering with the login process.
   4. If you've enabled multi-factor authentication (MFA), disable it temporarily to make sure that it is not interfering with the login process.
   5. Check that the SAML Connection works in an SP-Initiated flow by using **Try** to run a Connection test.

#### Request could not be performed due to an error on the part of the SAML responder or SAML authority

The error may appear as follows:

`<samlp:Status>
\<samlp:StatusCodeValue="urn:oasis:names:tc:SAML:2.0:status:Responder" /> </samlp:Status>`

1. Make sure that the signature algorithm on your Auth0 connection is the same as the configuration on the ADFS side: either `rsa-sha256` or `rsa-sha1`.
2. Alternatively, you can contact your ADFS administrator to learn the expected signing method or to see if their logs contain further information about the reason for the error.

## Troubleshoot Auth0 as identity provider

When troubleshooting a SAML login, there are four primary stages to check:

* Stage 1: The user is successfully redirected to IDP and is able to login.
* Stage 2: After login with the IDP, the user returns to Auth0 with a successful login event recorded.
* Stage 3: After a successful login event in Auth0, the user profile in Auth0 is correct.
* Stage 4: The user successfully redirects back to the application and is able to access the application.

### Successful login event does not show up in logs

In this case, the user successfully logs in with the idp, but a successful login event does not show up in Auth0 logs.

1. If you're using an Auth0 Database Connection:

   1. Check that the user exists and the entered password is correct.
   2. Disable your rules temporarily to make sure that nothing is interfering with the login process.
   3. If you've enabled multi-factor authentication (MFA), disable it temporarily to make sure that it is not interfering with the login process.
2. If you're using an Auth0 Database Connection or a remote SAML connection, check that the SAML Connection works by using **Try** to run a Connection test.

### User profile attributes are incorrect

In this case, the user successfully logs in with the IdP, a successful login event shows up in Auth0 logs, but the user's profile attributes are incorrect. If the user:

* Appears to log in successfully.
* The Logs and Users pages in the <Tooltip tip="Auth0 Dashboard: Auth0's main product to configure your services." cta="View Glossary" href="/docs/glossary?term=Auth0+Dashboard">Auth0 Dashboard</Tooltip> should successful login events

The next step is to check that the user's profile contains the necessary user profile attributes.

1. Go to the [Dashboard > User Management > Users](https://manage.auth0.com/#/users).
2. Find and click on the specific user to open up their profile. If there are multiple rows for a given user, be sure to open up the record associated with the SAML Connection.
3. On the user's profile, you can view their details in one of two ways. You can use the **Details** tab or the **Raw JSON** tab. This shows you what attributes Auth0 has received from the identity provider. If an attribute is missing, check with the identity provider to confirm that it has the attribute and that it is returning that attribute to Auth0.

### User cannot access the application

In this case, the user successfully logs in with the IdP, a successful login event shows up in Auth0 logs, and the user's profile attributes are correct, but the user cannot access the application.

1. Check to see if the user's Auth0 profile populated correctly:

   1. Go to [Dashboard > User Management > Users](https://manage.auth0.com/#/users).
   2. Find and click on the specific user to open up their profile. If there are multiple rows for a given user, be sure to open up the record associated with the SAML Connection.
   3. On the user's profile, view their details in one of two ways. You can use the **Details** tab or the **Raw JSON** tab. This shows you what attributes Auth0 has received from the identity provider. Ensure that the profile includes all of the details required by the application. If a user attribute is missing, check with the identity provider to confirm that it has the attribute and that it is returning that attribute to Auth0.
2. Check the application's log files to see if there are any error messages indicating why the user is unable to access the application. The two most common causes for this issue are missing user profile information or incorrect/missing authorization information.
3. Check the information that Auth0 sends to the application by [capturing an HTTP trace of the login sequence](/docs/troubleshoot/troubleshooting-tools/generate-and-analyze-har-files) and analyzing the HTTP trace. You can view the HTTP trace in a HAR file analyzer, such as [Google's HAR Analyzer](https://toolbox.googleapps.com/apps/har_analyzer/).

   <Warning>
     Before sharing a HAR file with anyone (including Auth0), ensure that you remove or obfuscate all sensitive data, such as:

     * Confidential user information
     * Personal identifiable information (PII)
     * Confidential application information

     To learn more, read the following articles on [Auth0 Community](https://community.auth0.com):

     * [Sanitizing HTTP Traces](https://community.auth0.com/t/sanitizing-http-traces/119488)
     * [How to Sanitize an HTTP Trace File Automatically](https://community.auth0.com/t/how-to-sanitize-a-http-trace-file-automatically/120583)
     * [How to Manually Redact Sensitive Information](https://community.auth0.com/t/how-to-manually-redact-sensitive-information/122554)
     * [HAR File is Too Large to Upload to the Support Case](https://community.auth0.com/t/har-file-is-too-large-to-upload-to-the-support-case/122488)
   </Warning>

   1. Scan through the sequence of URLs invoked in the HTTP trace.

      1. The first few will be URLs for your application.
      2. There will then be a redirect to an Auth0 URL (such as `{yourDomain}`).
   2. After one or more intervening URLs, there will be a POST back to Auth0 containing the SAML assertion with user information. The URL should be for the Assertion Consumer Service (ACS) of Auth0, which consumes the assertion and extracts the needed information.
   3. Click on the row for the POST call in the HAR analyzer.
   4. Switch to the POST Data tab, and look for the SAML response.
   5. Copy and paste the SAML response into a [SAML debugger](https://samltool.io/).
   6. Remove the SAML response at the beginning, as well as anything beginning with `&RelayState=` at the end.
4. After retrieving and decoding the SAML message, check the following fields:

<table class="table">
  <thead>
    <tr>
      <th>Field</th>
      <th>Description</th>
    </tr>
  </thead>

  <tbody>
    <tr>
      <td>Destination</td>
      <td>Check that the destination for the SAML response is the correct Auth0 Tenant and Connection (`https://{TENANT}.auth0.com/login/callback?connection={CONNECTION}`).</td>
    </tr>

    <tr>
      <td>Status Field</td>
      <td>This field should indicate success. (<code>\<samlp:StatusCode Value="urn:oasis:names:tc:SAML:2.0:status:Success"/></code>).</td>
    </tr>

    <tr>
      <td>Recipient</td>
      <td>Check that the <code>\<saml:SubjectConfirmation</code> Method element contains correct tenant and connection in the “Recipient” field (`https://{TENANT}.auth0.com/login/callback?connection={CONNECTION}`).</td>
    </tr>

    <tr>
      <td>Audience</td>
      <td>Check that the SAML Audience restriction field contains the correct tenant and connection information (`<saml:AudienceRestriction><saml:Audience>urn:auth0:{TENANT}:{CONNECTION}</saml:Audience>`).</td>
    </tr>

    <tr>
      <td>Naming</td>
      <td>The attribute identified by the <code>NameIdentifier</code> field should be known to the application. If it's not, the identifier should be some other attribute within the assertion (such as an internal IdP identifier for the user or an email address).</td>
    </tr>

    <tr>
      <td>Signature Key</td>
      <td>Check that the value indicated by the <code>X509Certificate</code> element matches the value provided to your connection.</td>
    </tr>

    <tr>
      <td>Certificate</td>
      <td>Compare the certificate sent to the one that you provided to the application</td>
    </tr>
  </tbody>
</table>

5. Ensure that the SAML assertion contains any additional information required by the application and that the information is present in the attributes expected by the application.

   1. If you need to alter the assertion sent from Auth0 to your application, you can add or map attributes using rules.

      1. Log into Auth0 and navigate to **Rules**.

      2. Click **Create Rule** and, on the next page, choose the **Change your SAML configuration** template.

      3. In the rules editor, uncomment the lines you want to use. Use lines 9-17 in the template to map attributes as needed. You can also add lines to implement mappings. The left side of each line specifies the identifier for the attribute in the assertion. The right side of each line references the Auth0 user profile attribute whose value will be used to populate the outgoing assertion sent to the application.

         ```text lines
         //context.samlConfiguration.mappings = {    
             // "http://schemas.xmlsoap.org/ws/2005/05/identity/claims/nameidentifier":      "user_id",    
             // "http://schemas.xmlsoap.org/ws/2005/05/identity/claims/emailaddress":        "email",    
             // "http://schemas.xmlsoap.org/ws/2005/05/identity/claims/name":                "name",    
             // "http://schemas.xmlsoap.org/ws/2005/05/identity/claims/givenname":           "given_name",    
             // "http://schemas.xmlsoap.org/ws/2005/05/identity/claims/surname":             "family_name",    
             // "http://schemas.xmlsoap.org/ws/2005/05/identity/claims/upn":                 "upn",    
             // "http://schemas.xmlsoap.org/claims/Group":                                   "groups"    
             // };
         ```

### No active session(s) found matching LogoutRequest error

The `SessionIndex` and `NameID` values in the SAML Logout request need to match the ones received by the service provider in the original SAML assertion.

## Contact support

If the troubleshooting steps listed above don't solve the issues, please request assistance from Auth0 by opening up a ticket in the Support Center. Be sure to include the following information:

1. The number of users experiencing this issue. One? All?
2. Whether this issue involves a new setup or if it involves an existing integration that suddenly stopped working
3. The number of applications affected
4. What the expected behavior is, as well as what the current behavior is
5. How far through the login sequence the user gets
6. The name of the application registered in Auth0 and the identity protocol it uses
7. The name of the Connection involved
8. Whether or not you're using the Auth0 Lock widget (if so, what version?)
9. Is a customized version of Lock used?
10. An HTTP trace of the SSO interaction in [a .har file](/docs/troubleshoot/troubleshooting-tools/generate-and-analyze-har-files)

    <Warning>
      Before sharing a HAR file with anyone (including Auth0), ensure that you remove or obfuscate all sensitive data, such as:

      * Confidential user information
      * Personal identifiable information (PII)
      * Confidential application information

      To learn more, read the following articles on [Auth0 Community](https://community.auth0.com):

      * [Sanitizing HTTP Traces](https://community.auth0.com/t/sanitizing-http-traces/119488)
      * [How to Sanitize an HTTP Trace File Automatically](https://community.auth0.com/t/how-to-sanitize-a-http-trace-file-automatically/120583)
      * [How to Manually Redact Sensitive Information](https://community.auth0.com/t/how-to-manually-redact-sensitive-information/122554)
      * [HAR File is Too Large to Upload to the Support Case](https://community.auth0.com/t/har-file-is-too-large-to-upload-to-the-support-case/122488)
    </Warning>
11. An Auth0 log entry for the failed authentication
12. An authentication log file from any third-party applications (such as Sharepoint) involved

## Learn more

* [SAML Single Sign-On Integrations](/docs/authenticate/protocols/saml/saml-sso-integrations)
* [Test SAML SSO with Auth0 as Service Provider and Identity Provider](/docs/authenticate/protocols/saml/saml-configuration/configure-auth0-as-service-and-identity-provider)