> ## Documentation Index
> Fetch the complete documentation index at: https://docs-staging-quickstart-revamp.mintlify.site/llms.txt
> Use this file to discover all available pages before exploring further.
> Learn how to configure Token Vault.
# Configure Token Vault
Token Vault is currently available in Early Access for public cloud tenants. To enable Token Vault, contact your Auth0 representative.
Auth0 supports Token Vault for the following social and enterprise identity providers:
* Google
* Microsoft
* Box
* Slack
* GitHub
* OpenID Connect
* Custom social connection
Once a user authenticates with a supported external provider and authorizes the federated connection, you can get an access token to call third-party APIs on the user’s behalf. To learn more, read [Call APIs with Token Vault](/docs/secure/tokens/token-vault/call-apis-with-token-vault).
To configure Token Vault, you need to:
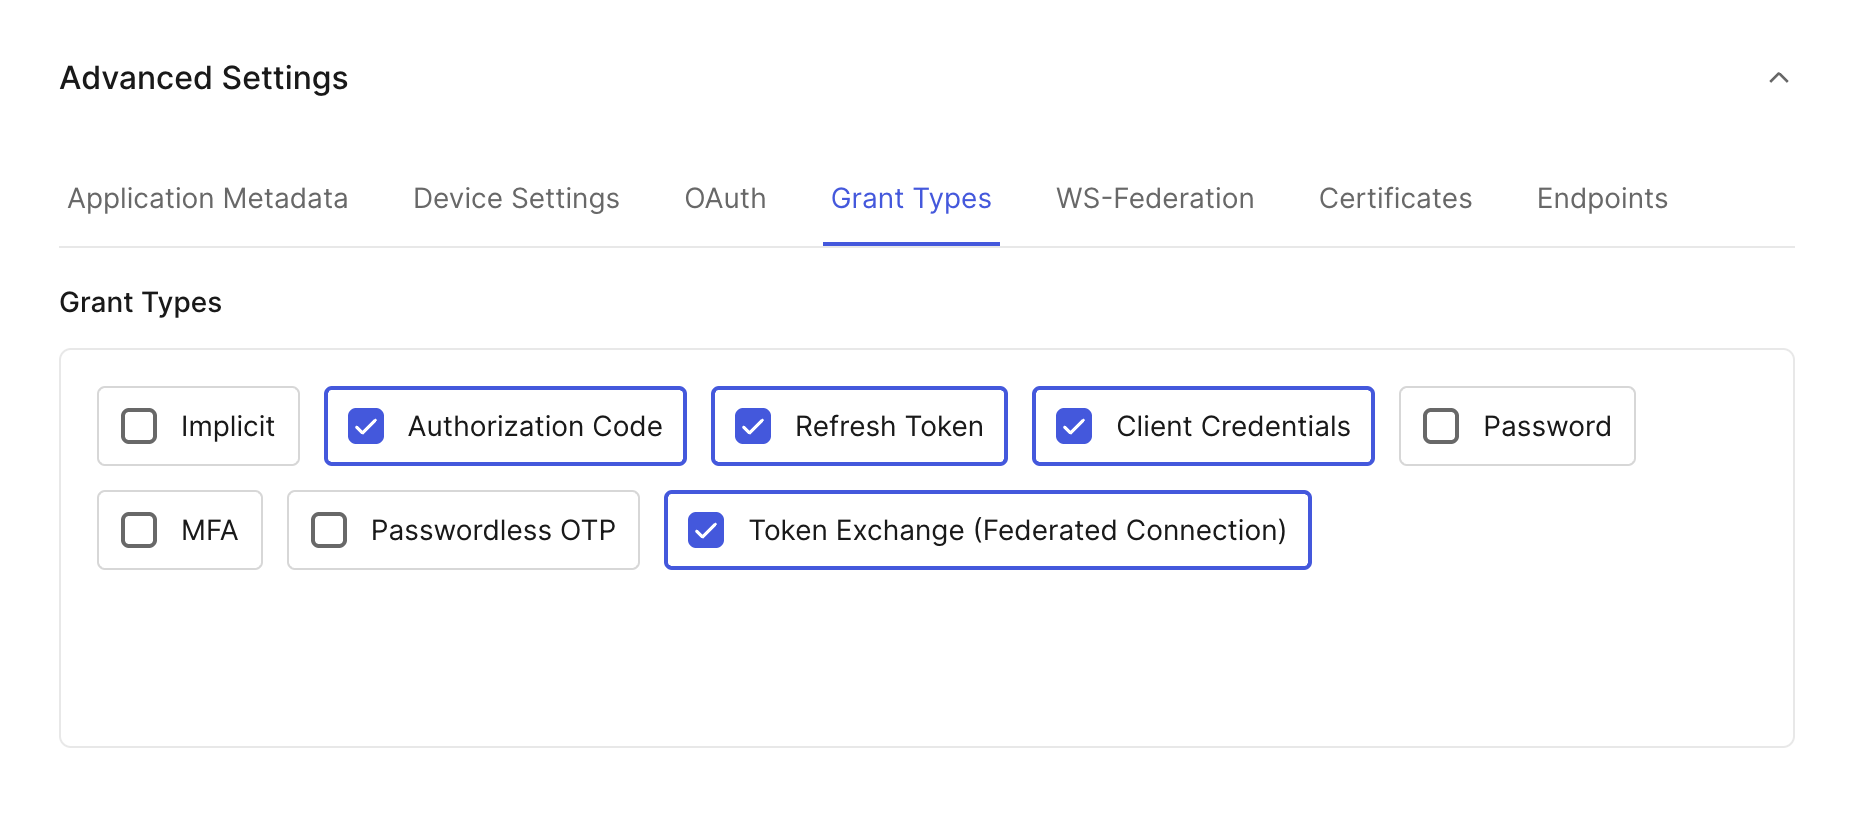
1. Configure your application with the Token Exchange (Federated Connection) grant type.
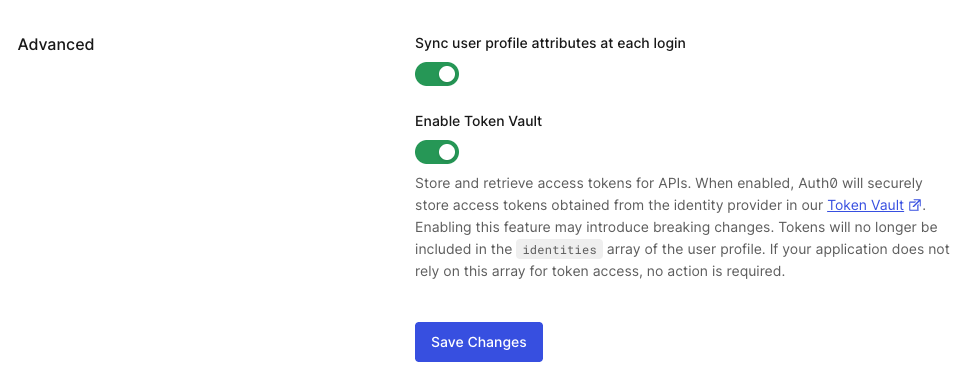
2. Enable Token Vault for a federated connection.
3. Manage tokensets within the Token Vault for your federated connection.
If you have previously set your MFA policy to **Always** in the Auth0 Dashboard, you need to set it to **Never** to retrieve an access token from Token Vault. Otherwise, you will receive an error. To learn more about the different MFA policies, read [Enable MFA in the Auth0 Dashboard](/docs/secure/multi-factor-authentication/enable-mfa#enable-mfa-in-the-auth0-dashboard).
If you need to trigger MFA challenges for interactive flows, enable **Customize MFA Factors using Actions** when [setting up MFA for your tenant](/docs/secure/multi-factor-authentication/customize-mfa/customize-mfa-selection-universal-login#prepare-your-tenant). You can then use an Action to trigger an MFA challenge based on the `event.transaction.protocol` property. To learn more, read [Customize MFA selection for Universal Login](/docs/secure/multi-factor-authentication/customize-mfa/customize-mfa-selection-universal-login).
## Configure application
Configure your application with the Token Exchange (Federated Connection) grant type using the Auth0 Dashboard or Management API.
Only certain types of clients can use the Token Exchange (Federated Connection) grant type:
1. The client must be a first-party client, i.e. the `is_first_party` property is `true`.
2. The client must be a confidential client with a valid authentication mechanism, i.e. the `token_endpoint_auth_method` property must not be set to `none`.
3. The client must be OIDC conformant, i.e. the `oidc_conformant` must be `true`.
1) Navigate to **Applications > Applications**.
2) Select the application you want to configure.
3) Under **Advanced Settings > Grant Types**, select the **Token Exchange (Federated Connection)** grant type.
4) Select **Save Changes**.
 To enable Token Vault for an application, make a `PATCH` call to the [Update a Client](https://auth0.com/docs/api/management/v2/clients/patch-clients-by-id) endpoint to add the `urn:auth0:params:oauth:grant-type:token-exchange:federated-connection-access-token` grant type to the client JSON object:
```bash lines
curl --location --request PATCH 'https://{tenantDomain}/api/v2/clients/{clientId}' \
--header 'Content-Type: application/json' \
--header 'Authorization: Bearer {your_management_api_access_token}' \
--data '{
"grant_types": [
"authorization_code",
"refresh_token",
"urn:auth0:params:oauth:grant-type:token-exchange:federated-connection-access-token"
]
}'
```
## Configure federated connection
Use the Auth0 Dashboard or Management API to configure a federated connection to retrieve and store access tokens for third-party APIs in the Token Vault.
Once you enable Token Vault for your connection, access and refresh tokens will no longer be stored in the user’s `identities` array. Instead, they will be stored in a secure tokenset within the Token Vault. To learn more, read [Manage tokensets](#manage-tokensets).
To enable Token Vault for a supported social and enterprise/custom connection:
1. Navigate to **Authentication > Social Connections** or **Enterprise Connections**.
2. Select **Create Connection** or select an existing connection.
3. In **Permissions**, select the desired scopes for your connection. You can filter by scope name or keywords. Whenever the user is redirected to authorize this connection, Auth0 always requests the scopes you selected. At runtime, this list is automatically completed with any additional scopes included in the `connection_scope` parameter of the authorization request.
4. In **Advanced**, toggle **Enable Token Vault**.
5. Select **Save Changes**.
To enable Token Vault for an application, make a `PATCH` call to the [Update a Client](https://auth0.com/docs/api/management/v2/clients/patch-clients-by-id) endpoint to add the `urn:auth0:params:oauth:grant-type:token-exchange:federated-connection-access-token` grant type to the client JSON object:
```bash lines
curl --location --request PATCH 'https://{tenantDomain}/api/v2/clients/{clientId}' \
--header 'Content-Type: application/json' \
--header 'Authorization: Bearer {your_management_api_access_token}' \
--data '{
"grant_types": [
"authorization_code",
"refresh_token",
"urn:auth0:params:oauth:grant-type:token-exchange:federated-connection-access-token"
]
}'
```
## Configure federated connection
Use the Auth0 Dashboard or Management API to configure a federated connection to retrieve and store access tokens for third-party APIs in the Token Vault.
Once you enable Token Vault for your connection, access and refresh tokens will no longer be stored in the user’s `identities` array. Instead, they will be stored in a secure tokenset within the Token Vault. To learn more, read [Manage tokensets](#manage-tokensets).
To enable Token Vault for a supported social and enterprise/custom connection:
1. Navigate to **Authentication > Social Connections** or **Enterprise Connections**.
2. Select **Create Connection** or select an existing connection.
3. In **Permissions**, select the desired scopes for your connection. You can filter by scope name or keywords. Whenever the user is redirected to authorize this connection, Auth0 always requests the scopes you selected. At runtime, this list is automatically completed with any additional scopes included in the `connection_scope` parameter of the authorization request.
4. In **Advanced**, toggle **Enable Token Vault**.
5. Select **Save Changes**.
 To enable Token Vault for a supported social and enterprise connection, make a `PATCH` call to the [Update a connection](https://auth0.com/docs/api/management/v2/connections/patch-connections-by-id) endpoint and set `federated_connections_access_tokens` to `true` in the `options` object:
When you use the `options` parameter when making a `PATCH` call to the [Update a connection](https://auth0.com/docs/api/management/v2/connections/patch-connections-by-id) endpoint, you override the existing `options` object with the `options` object in your request body. As a result, make sure you include your entire `options` object in your request body.
```bash lines
curl --location --request PATCH 'https://{tenantDomain}/api/v2/connections/{connectionId}' \
--header 'Content-Type: application/json' \
--header 'Authorization: Bearer {your_management_api_access_token}' \
--header 'Accept: application/json' \
--data '{
"options": {
"federated_connections_access_tokens": {
"active": true
},
...
}
}'
```
## Manage tokensets
The Auth0 Authorization Server securely stores the user's access and refresh token in the Token Vault, which maintains one tokenset per authorized connection.
To manage tokensets for a user, use the Management API:
* [Get user's tokensets](#get-user-s-tokensets)
* [Delete a tokenset](#delete-a-tokenset)
### Get user’s tokensets
To get a user's tokensets, you need a [Management API access token](/docs/secure/tokens/access-tokens/management-api-access-tokens) with the `read:federated_connections_tokensets` scope.
Make a `GET` request to the `/federated-connections-tokensets` endpoint:
```bash lines
curl --request GET \
--url 'https://{tenantDomain}/api/v2/users/{user_id}/federated-connections-tokensets' \
--header 'Authorization: Bearer {your_management_api_access_token}'
```
If successful, you should receive a list of tokensets for the user:
```json lines
Status Code: 200
[{
"connection": "google-oauth2",
"id": "some-unique-tokenset-id1",
"issued_at": 1733455897,
"expires_at": 1733455897,
"last_used_at": 1733453897,
"scope": "https://www.googleapis.com/auth/calendar https://www.googleapis.com/auth/calendar.events",
},{
"id": "some-unique-tokenset-id2",
"connection": "google-oauth2",
"issued_at": 1733455897,
"expires_at": 1733455897,
"last_used_at": 1733453897,
"scope": "https://www.googleapis.com/auth/calendar https://www.googleapis.com/auth/calendar.events",
},{
"connection": "google-oauth2",
"issued_at": 1733455897,
"id": "some-unique-tokenset-id3",
"expires_at": 1733455897,
"last_used_at": 1733453897,
"scope": "Calendar.Read Calendar.Write",
}]
```
**Note:** The value for `last_used_at` is updated max once per day.
### Delete a tokenset
To delete a tokenset, you need a [Management API access token](/docs/secure/tokens/access-tokens/management-api-access-tokens) with the `update:federated_connections_tokensets` scope.
Make a `DELETE` request to the `/tokensets` endpoint:
```bash lines
curl --request DELETE \
--url 'https://{tenantDomain}/api/v2/users/{user_id}/federated-connections-tokensets/{tokenset_id}' \
--header 'Authorization: Bearer {your_management_api_access_token}'
```
If successful, you should receive the following response:
```json lines
Response: 204 No-Content
```
To enable Token Vault for a supported social and enterprise connection, make a `PATCH` call to the [Update a connection](https://auth0.com/docs/api/management/v2/connections/patch-connections-by-id) endpoint and set `federated_connections_access_tokens` to `true` in the `options` object:
When you use the `options` parameter when making a `PATCH` call to the [Update a connection](https://auth0.com/docs/api/management/v2/connections/patch-connections-by-id) endpoint, you override the existing `options` object with the `options` object in your request body. As a result, make sure you include your entire `options` object in your request body.
```bash lines
curl --location --request PATCH 'https://{tenantDomain}/api/v2/connections/{connectionId}' \
--header 'Content-Type: application/json' \
--header 'Authorization: Bearer {your_management_api_access_token}' \
--header 'Accept: application/json' \
--data '{
"options": {
"federated_connections_access_tokens": {
"active": true
},
...
}
}'
```
## Manage tokensets
The Auth0 Authorization Server securely stores the user's access and refresh token in the Token Vault, which maintains one tokenset per authorized connection.
To manage tokensets for a user, use the Management API:
* [Get user's tokensets](#get-user-s-tokensets)
* [Delete a tokenset](#delete-a-tokenset)
### Get user’s tokensets
To get a user's tokensets, you need a [Management API access token](/docs/secure/tokens/access-tokens/management-api-access-tokens) with the `read:federated_connections_tokensets` scope.
Make a `GET` request to the `/federated-connections-tokensets` endpoint:
```bash lines
curl --request GET \
--url 'https://{tenantDomain}/api/v2/users/{user_id}/federated-connections-tokensets' \
--header 'Authorization: Bearer {your_management_api_access_token}'
```
If successful, you should receive a list of tokensets for the user:
```json lines
Status Code: 200
[{
"connection": "google-oauth2",
"id": "some-unique-tokenset-id1",
"issued_at": 1733455897,
"expires_at": 1733455897,
"last_used_at": 1733453897,
"scope": "https://www.googleapis.com/auth/calendar https://www.googleapis.com/auth/calendar.events",
},{
"id": "some-unique-tokenset-id2",
"connection": "google-oauth2",
"issued_at": 1733455897,
"expires_at": 1733455897,
"last_used_at": 1733453897,
"scope": "https://www.googleapis.com/auth/calendar https://www.googleapis.com/auth/calendar.events",
},{
"connection": "google-oauth2",
"issued_at": 1733455897,
"id": "some-unique-tokenset-id3",
"expires_at": 1733455897,
"last_used_at": 1733453897,
"scope": "Calendar.Read Calendar.Write",
}]
```
**Note:** The value for `last_used_at` is updated max once per day.
### Delete a tokenset
To delete a tokenset, you need a [Management API access token](/docs/secure/tokens/access-tokens/management-api-access-tokens) with the `update:federated_connections_tokensets` scope.
Make a `DELETE` request to the `/tokensets` endpoint:
```bash lines
curl --request DELETE \
--url 'https://{tenantDomain}/api/v2/users/{user_id}/federated-connections-tokensets/{tokenset_id}' \
--header 'Authorization: Bearer {your_management_api_access_token}'
```
If successful, you should receive the following response:
```json lines
Response: 204 No-Content
```