> ## Documentation Index
> Fetch the complete documentation index at: https://docs-staging-quickstart-revamp.mintlify.site/llms.txt
> Use this file to discover all available pages before exploring further.
> Describes how you can use either auth0.js or the Auth0 APIs to capture consent information when you use your own custom UI for logins.
# GDPR: Track Consent with Custom UI
In this tutorial we will see how you can use auth0.js or the Auth0 APIs to ask for consent information and save the input at the user's metadata. To learn more, read [Understand How Metadata Works in User Profiles](/docs/manage-users/user-accounts/metadata).
If you would instead like to track consent using Lock, see [GDPR: Track Consent with Lock](/docs/secure/data-privacy-and-compliance/gdpr/gdpr-track-consent-with-lock).
The contents of this document are **not** intended to be legal advice, nor should they be considered a substitute for legal assistance. The final responsibility for understanding and complying with GDPR resides with you, though Auth0 will assist you in meeting GDPR requirements where possible.
The contents of these documents are not intended to be legal advice, nor should they be considered a substitute for legal assistance. The final responsibility for understanding and complying with GDPR resides with you, though Auth0 will assist you in meeting GDPR requirements where possible.
## Overview
We will capture consent information, under various scenarios, and save this in the user's metadata.
All scenarios will save the following properties in the user's metadata:
* `consentGiven` (true/false) shows if the user has provided consent (true) or not (false)
* `consentTimestamp` (Unix timestamp) indicates when the user-provided consent
For example:
```json lines
{
"consentGiven": "true"
"consentTimestamp": "1525101183"
}
```
We will see four different implementations for this:
1. one that displays a flag, works for database connections, and uses the auth0.js library to create the user (used by Single-Page Applications). To learn more, read [Auth0.js v9 Reference](/docs/libraries/auth0js).
2. one that displays a flag, works for database connections, and uses the Authentication API to create the user (used by Regular Web Apps)
3. one that displays a flag, works for social connections, and uses the Management API to update the user's information (used either by SPAs or Regular Web Apps)
4. one that redirects to another page where the Terms & Conditions and/or privacy policy information can be reviewed and consent info can be provided (used either by SPAs or Regular Web Apps)
## Option 1: Use auth0.js
In this section, we will use a simple Single-Page Application and customize the login widget to add a flag which users can use to provide consent information. Instead of building an app from scratch, we will [use Auth0's JavaScript Quickstart sample](/docs/quickstart/spa/vanillajs). We will also use Auth0's Universal Login pages so we can implement Universal Login, instead of embedding the login in our app. To learn more about Universal Login, read [Auth0 Universal Login](/docs/authenticate/login/auth0-universal-login). To learn more about the differences between Universal Login and embedded login, read [Centralized Universal Login vs. Embedded Login](/docs/authenticate/login/universal-vs-embedded-login).
This works **only** for database connections (we will use Auth0's infrastructure, instead of setting up our own database).
1. Go to [Auth0 Dashboard > Applications > Applications](https://manage.auth0.com/#/applications) and create a new application. Choose `Single Web Page Applications` as type. Go to **Settings** and set the **Allowed Callback URLs** to `http://localhost:3000`.
This field holds the set of URLs to which Auth0 is allowed to redirect the users after they authenticate. Our sample app will run at `http://localhost:3000` hence we set this value.
2. Copy the **Client Id** and **Domain** values. You will need them in a while.
3. Go to [Auth0 Dashboard > Authentication > Database](https://manage.auth0.com/#/connections/database) and create a new connection. Click **Create DB Connection**, set a name for the new connection, and click **Save**. Go to the connection's **Applications** tab and make sure your newly created application is enabled.
4. [Download the JavaScript SPA Sample](/docs/quickstart/spa/vanillajs).
5. [Set the Client ID and Domain values](https://github.com/auth0-samples/auth0-javascript-samples/tree/master/01-Login#set-the-client-id-and-domain).
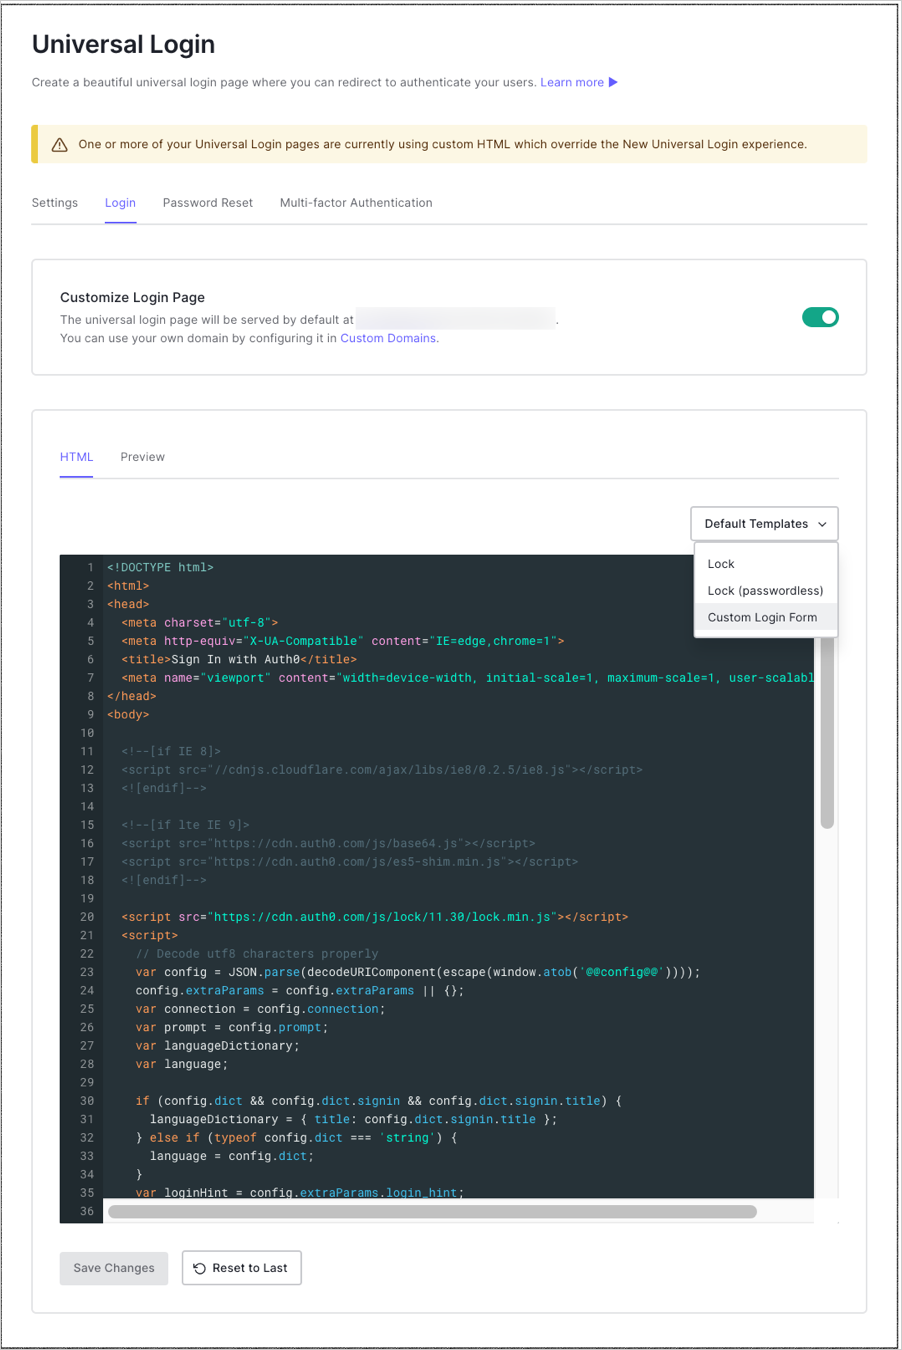
6. Go to [Auth0 Dashboard > Branding > Universal Login](https://manage.auth0.com/#/login_settings). At the **Login** tab enable the toggle.
7. At the **Default Templates** dropdown make sure that `Custom Login Form` is picked. The code is pre-populated for you.
8. Set the value of the `databaseConnection` variable to the name of the database connection your app is using.
```javascript lines
//code reducted for simplicity
var databaseConnection = 'test-db';
//code reducted for simplicity
```
9. To add a field for the `consentGiven` metadata, add a checkbox at the form. For our example, we will configure the checkbox as checked by default and disabled so the user cannot uncheck it. You can adjust this according to your business needs.
```javascript lines
//code reducted for simplicity
//code reducted for simplicity
```
10. Edit the signup function to set the metadata. Note that we set the value of the metadata to a string with the value `true` and not to a boolean value, and we are using `toString` to convert the number to a string. This is due to a restriction of the Authentication API [**Signup** endpoint](https://auth0.com/docs/api/authentication#signup) which only accepts strings as values.
```text lines
//code reducted for simplicity
webAuth.redirect.signupAndLogin({
connection: databaseConnection,
email: email,
password: password,
user_metadata: { consentGiven: 'true', consentTimestamp: Date.now().toString() }
}, function(err) {
if (err) displayError(err);
});
//code reducted for simplicity
```
11. To see what the login widget will look like, click the **Preview** tab.
1. To test this configuration run the application and go to `http://localhost:3000`. Sign up with a new user. Then go to [Auth0 Dashboard > User Management > Users](https://manage.auth0.com/#/users) and search for your new user. Go to **User Details** and scroll down to the **Metadata** section. At the **user\_metadata** text area, you should see the `consentGiven` metadata set to `true`.
## Option 2: Use the API (database)
If you serve your login page from your own server, then you can call the Authentication API [**Signup** endpoint](https://auth0.com/docs/api/authentication#signup) directly once the user signs up.
For the same scenario we have been discussing so far, once you sign up a new user, you can use the following snippet to create the user at Auth0 and set the metadata. Remember to replace the value of the `consentTimestamp` request parameter with the timestamp of when the user provided consent.
```bash cURL lines
curl --request POST \
--url 'https://{yourDomain}/dbconnections/signup' \
--header 'content-type: application/json' \
--data '{"client_id": "{yourClientId}","email": "YOUR_USER_EMAIL","password": "YOUR_USER_PASSWORD","user_metadata": {"consentGiven": "true", "consentTimestamp": "1525101183" }}'
```
```csharp C# lines
var client = new RestClient("https://{yourDomain}/dbconnections/signup");
var request = new RestRequest(Method.POST);
request.AddHeader("content-type", "application/json");
request.AddParameter("application/json", "{\"client_id\": \"{yourClientId}\",\"email\": \"YOUR_USER_EMAIL\",\"password\": \"YOUR_USER_PASSWORD\",\"user_metadata\": {\"consentGiven\": \"true\", \"consentTimestamp\": \"1525101183\" }}", ParameterType.RequestBody);
IRestResponse response = client.Execute(request);
```
```go Go lines expandable
package main
import (
"fmt"
"strings"
"net/http"
"io/ioutil"
)
func main() {
url := "https://{yourDomain}/dbconnections/signup"
payload := strings.NewReader("{\"client_id\": \"{yourClientId}\",\"email\": \"YOUR_USER_EMAIL\",\"password\": \"YOUR_USER_PASSWORD\",\"user_metadata\": {\"consentGiven\": \"true\", \"consentTimestamp\": \"1525101183\" }}")
req, _ := http.NewRequest("POST", url, payload)
req.Header.Add("content-type", "application/json")
res, _ := http.DefaultClient.Do(req)
defer res.Body.Close()
body, _ := ioutil.ReadAll(res.Body)
fmt.Println(res)
fmt.Println(string(body))
}
```
```java Java lines
HttpResponse response = Unirest.post("https://{yourDomain}/dbconnections/signup")
.header("content-type", "application/json")
.body("{\"client_id\": \"{yourClientId}\",\"email\": \"YOUR_USER_EMAIL\",\"password\": \"YOUR_USER_PASSWORD\",\"user_metadata\": {\"consentGiven\": \"true\", \"consentTimestamp\": \"1525101183\" }}")
.asString();
```
```javascript Node.JS lines
var axios = require("axios").default;
var options = {
method: 'POST',
url: 'https://{yourDomain}/dbconnections/signup',
headers: {'content-type': 'application/json'},
data: {
client_id: '{yourClientId}',
email: 'YOUR_USER_EMAIL',
password: 'YOUR_USER_PASSWORD',
user_metadata: {consentGiven: 'true', consentTimestamp: '1525101183'}
}
};
axios.request(options).then(function (response) {
console.log(response.data);
}).catch(function (error) {
console.error(error);
});
```
```obj-c Obj-C lines expandable
#import
NSDictionary *headers = @{ @"content-type": @"application/json" };
NSDictionary *parameters = @{ @"client_id": @"{yourClientId}",
@"email": @"YOUR_USER_EMAIL",
@"password": @"YOUR_USER_PASSWORD",
@"user_metadata": @{ @"consentGiven": @"true", @"consentTimestamp": @"1525101183" } };
NSData *postData = [NSJSONSerialization dataWithJSONObject:parameters options:0 error:nil];
NSMutableURLRequest *request = [NSMutableURLRequest requestWithURL:[NSURL URLWithString:@"https://{yourDomain}/dbconnections/signup"]
cachePolicy:NSURLRequestUseProtocolCachePolicy
timeoutInterval:10.0];
[request setHTTPMethod:@"POST"];
[request setAllHTTPHeaderFields:headers];
[request setHTTPBody:postData];
NSURLSession *session = [NSURLSession sharedSession];
NSURLSessionDataTask *dataTask = [session dataTaskWithRequest:request
completionHandler:^(NSData *data, NSURLResponse *response, NSError *error) {
if (error) {
NSLog(@"%@", error);
} else {
NSHTTPURLResponse *httpResponse = (NSHTTPURLResponse *) response;
NSLog(@"%@", httpResponse);
}
}];
[dataTask resume];
```
```php PHP lines expandable
$curl = curl_init();
curl_setopt_array($curl, [
CURLOPT_URL => "https://{yourDomain}/dbconnections/signup",
CURLOPT_RETURNTRANSFER => true,
CURLOPT_ENCODING => "",
CURLOPT_MAXREDIRS => 10,
CURLOPT_TIMEOUT => 30,
CURLOPT_HTTP_VERSION => CURL_HTTP_VERSION_1_1,
CURLOPT_CUSTOMREQUEST => "POST",
CURLOPT_POSTFIELDS => "{\"client_id\": \"{yourClientId}\",\"email\": \"YOUR_USER_EMAIL\",\"password\": \"YOUR_USER_PASSWORD\",\"user_metadata\": {\"consentGiven\": \"true\", \"consentTimestamp\": \"1525101183\" }}",
CURLOPT_HTTPHEADER => [
"content-type: application/json"
],
]);
$response = curl_exec($curl);
$err = curl_error($curl);
curl_close($curl);
if ($err) {
echo "cURL Error #:" . $err;
} else {
echo $response;
}
```
```python Python lines
import http.client
conn = http.client.HTTPSConnection("")
payload = "{\"client_id\": \"{yourClientId}\",\"email\": \"YOUR_USER_EMAIL\",\"password\": \"YOUR_USER_PASSWORD\",\"user_metadata\": {\"consentGiven\": \"true\", \"consentTimestamp\": \"1525101183\" }}"
headers = { 'content-type': "application/json" }
conn.request("POST", "/{yourDomain}/dbconnections/signup", payload, headers)
res = conn.getresponse()
data = res.read()
print(data.decode("utf-8"))
```
```ruby Ruby lines
require 'uri'
require 'net/http'
require 'openssl'
url = URI("https://{yourDomain}/dbconnections/signup")
http = Net::HTTP.new(url.host, url.port)
http.use_ssl = true
http.verify_mode = OpenSSL::SSL::VERIFY_NONE
request = Net::HTTP::Post.new(url)
request["content-type"] = 'application/json'
request.body = "{\"client_id\": \"{yourClientId}\",\"email\": \"YOUR_USER_EMAIL\",\"password\": \"YOUR_USER_PASSWORD\",\"user_metadata\": {\"consentGiven\": \"true\", \"consentTimestamp\": \"1525101183\" }}"
response = http.request(request)
puts response.read_body
```
```swift Swift lines expandable
import Foundation
let headers = ["content-type": "application/json"]
let parameters = [
"client_id": "{yourClientId}",
"email": "YOUR_USER_EMAIL",
"password": "YOUR_USER_PASSWORD",
"user_metadata": [
"consentGiven": "true",
"consentTimestamp": "1525101183"
]
] as [String : Any]
let postData = JSONSerialization.data(withJSONObject: parameters, options: [])
let request = NSMutableURLRequest(url: NSURL(string: "https://{yourDomain}/dbconnections/signup")! as URL,
cachePolicy: .useProtocolCachePolicy,
timeoutInterval: 10.0)
request.httpMethod = "POST"
request.allHTTPHeaderFields = headers
request.httpBody = postData as Data
let session = URLSession.shared
let dataTask = session.dataTask(with: request as URLRequest, completionHandler: { (data, response, error) -> Void in
if (error != nil) {
print(error)
} else {
let httpResponse = response as? HTTPURLResponse
print(httpResponse)
}
})
dataTask.resume()
```
Note that we set the value of the metadata to a string with the value `true` and not to a boolean value due to the API restriction that accepts strings as values, not booleans.
If setting boolean values is a requirement for you, you can use the Management API instead. In this scenario you sign up your user as usual, and then you call the Management API [**Update User** endpoint](https://auth0.com/docs/api/management/v2#!/Users/patch_users_by_id) to set the required metadata after the user has been created. For details on how to do that keep reading, the next paragraph uses that endpoint.
## Option 3: Use the API (social)
If you use social connections, then you cannot use the Authentication API to create the user at Auth0, since that endpoint works only for database connections.
What you have to do instead is let your user sign up with the social provider (which will create a user record at Auth0) and then use the Management API to update the user's information.
Before you call the Management API you need to get a valid token. To learn more, read [Get Management API Access Tokens for Production](/docs/secure/tokens/access-tokens/management-api-access-tokens/get-management-api-access-tokens-for-production).
The linked article uses the Client Credentials Flow to get a token, which you cannot use from an app running on the browser. What you can use instead is the Implicit Flow. To learn more about the Client Credentials Flow, read [Client Credentials Flow](/docs/get-started/authentication-and-authorization-flow/client-credentials-flow). To learn more about the Implicit Flow, read [Implicit Flow](/docs/get-started/authentication-and-authorization-flow/implicit-flow-with-form-post).
Set the **audience** request parameter to `https://YOUR_DOMAIN/api/v2/` and the **scope** parameter to the scope `create:current_user_metadata`. You can use the Access Token you will get at the response to call the Management API [**Update User** endpoint](https://auth0.com/docs/api/management/v2#!/Users/patch_users_by_id).
Once you have a valid token, use the following snippet to update the user's metadata.
```bash cURL lines
curl --request POST \
--url 'https://{yourDomain}/api/v2/users/%7BUSER_ID%7D' \
--header 'authorization: Bearer YOUR_ACCESS_TOKEN' \
--header 'content-type: application/json' \
--data '{"user_metadata": {"consentGiven":true, "consentTimestamp": "1525101183"}}'
```
```csharp C# lines
var client = new RestClient("https://{yourDomain}/api/v2/users/%7BUSER_ID%7D");
var request = new RestRequest(Method.POST);
request.AddHeader("authorization", "Bearer YOUR_ACCESS_TOKEN");
request.AddHeader("content-type", "application/json");
request.AddParameter("application/json", "{\"user_metadata\": {\"consentGiven\":true, \"consentTimestamp\": \"1525101183\"}}", ParameterType.RequestBody);
IRestResponse response = client.Execute(request);
```
```go Go lines expandable
package main
import (
"fmt"
"strings"
"net/http"
"io/ioutil"
)
func main() {
url := "https://{yourDomain}/api/v2/users/%7BUSER_ID%7D"
payload := strings.NewReader("{\"user_metadata\": {\"consentGiven\":true, \"consentTimestamp\": \"1525101183\"}}")
req, _ := http.NewRequest("POST", url, payload)
req.Header.Add("authorization", "Bearer YOUR_ACCESS_TOKEN")
req.Header.Add("content-type", "application/json")
res, _ := http.DefaultClient.Do(req)
defer res.Body.Close()
body, _ := ioutil.ReadAll(res.Body)
fmt.Println(res)
fmt.Println(string(body))
}
```
```java Java lines
HttpResponse response = Unirest.post("https://{yourDomain}/api/v2/users/%7BUSER_ID%7D")
.header("authorization", "Bearer YOUR_ACCESS_TOKEN")
.header("content-type", "application/json")
.body("{\"user_metadata\": {\"consentGiven\":true, \"consentTimestamp\": \"1525101183\"}}")
.asString();
```
```javascript Node.JS lines
var axios = require("axios").default;
var options = {
method: 'POST',
url: 'https://{yourDomain}/api/v2/users/%7BUSER_ID%7D',
headers: {authorization: 'Bearer YOUR_ACCESS_TOKEN', 'content-type': 'application/json'},
data: {user_metadata: {consentGiven: true, consentTimestamp: '1525101183'}}
};
axios.request(options).then(function (response) {
console.log(response.data);
}).catch(function (error) {
console.error(error);
});
```
```obj-c Obj-C lines expandable
#import
NSDictionary *headers = @{ @"authorization": @"Bearer YOUR_ACCESS_TOKEN",
@"content-type": @"application/json" };
NSDictionary *parameters = @{ @"user_metadata": @{ @"consentGiven": @YES, @"consentTimestamp": @"1525101183" } };
NSData *postData = [NSJSONSerialization dataWithJSONObject:parameters options:0 error:nil];
NSMutableURLRequest *request = [NSMutableURLRequest requestWithURL:[NSURL URLWithString:@"https://{yourDomain}/api/v2/users/%7BUSER_ID%7D"]
cachePolicy:NSURLRequestUseProtocolCachePolicy
timeoutInterval:10.0];
[request setHTTPMethod:@"POST"];
[request setAllHTTPHeaderFields:headers];
[request setHTTPBody:postData];
NSURLSession *session = [NSURLSession sharedSession];
NSURLSessionDataTask *dataTask = [session dataTaskWithRequest:request
completionHandler:^(NSData *data, NSURLResponse *response, NSError *error) {
if (error) {
NSLog(@"%@", error);
} else {
NSHTTPURLResponse *httpResponse = (NSHTTPURLResponse *) response;
NSLog(@"%@", httpResponse);
}
}];
[dataTask resume];
```
```php PHP lines expandable
$curl = curl_init();
curl_setopt_array($curl, [
CURLOPT_URL => "https://{yourDomain}/api/v2/users/%7BUSER_ID%7D",
CURLOPT_RETURNTRANSFER => true,
CURLOPT_ENCODING => "",
CURLOPT_MAXREDIRS => 10,
CURLOPT_TIMEOUT => 30,
CURLOPT_HTTP_VERSION => CURL_HTTP_VERSION_1_1,
CURLOPT_CUSTOMREQUEST => "POST",
CURLOPT_POSTFIELDS => "{\"user_metadata\": {\"consentGiven\":true, \"consentTimestamp\": \"1525101183\"}}",
CURLOPT_HTTPHEADER => [
"authorization: Bearer YOUR_ACCESS_TOKEN",
"content-type: application/json"
],
]);
$response = curl_exec($curl);
$err = curl_error($curl);
curl_close($curl);
if ($err) {
echo "cURL Error #:" . $err;
} else {
echo $response;
}
```
```python Python lines
import http.client
conn = http.client.HTTPSConnection("")
payload = "{\"user_metadata\": {\"consentGiven\":true, \"consentTimestamp\": \"1525101183\"}}"
headers = {
'authorization': "Bearer YOUR_ACCESS_TOKEN",
'content-type': "application/json"
}
conn.request("POST", "/{yourDomain}/api/v2/users/%7BUSER_ID%7D", payload, headers)
res = conn.getresponse()
data = res.read()
print(data.decode("utf-8"))
```
```ruby Ruby lines
require 'uri'
require 'net/http'
require 'openssl'
url = URI("https://{yourDomain}/api/v2/users/%7BUSER_ID%7D")
http = Net::HTTP.new(url.host, url.port)
http.use_ssl = true
http.verify_mode = OpenSSL::SSL::VERIFY_NONE
request = Net::HTTP::Post.new(url)
request["authorization"] = 'Bearer YOUR_ACCESS_TOKEN'
request["content-type"] = 'application/json'
request.body = "{\"user_metadata\": {\"consentGiven\":true, \"consentTimestamp\": \"1525101183\"}}"
response = http.request(request)
puts response.read_body
```
```swift Swift lines expandable
import Foundation
let headers = [
"authorization": "Bearer YOUR_ACCESS_TOKEN",
"content-type": "application/json"
]
let parameters = ["user_metadata": [
"consentGiven": true,
"consentTimestamp": "1525101183"
]] as [String : Any]
let postData = JSONSerialization.data(withJSONObject: parameters, options: [])
let request = NSMutableURLRequest(url: NSURL(string: "https://{yourDomain}/api/v2/users/%7BUSER_ID%7D")! as URL,
cachePolicy: .useProtocolCachePolicy,
timeoutInterval: 10.0)
request.httpMethod = "POST"
request.allHTTPHeaderFields = headers
request.httpBody = postData as Data
let session = URLSession.shared
let dataTask = session.dataTask(with: request as URLRequest, completionHandler: { (data, response, error) -> Void in
if (error != nil) {
print(error)
} else {
let httpResponse = response as? HTTPURLResponse
print(httpResponse)
}
})
dataTask.resume()
```
Note that in order to make this call you need to know the unique `user_id`. You can retrieve this from the `sub` claim of the ID Token, if you got one from the response. To learn more, read [ID Tokens](/docs/secure/tokens/id-tokens). Alternatively, if all you have is the email, you can retrieve the Id by calling another endpoint of the Management API. To learn more, read [User Search Best Practices](/docs/manage-users/user-search/user-search-best-practices).
## Option 4: Redirect to another page
If you want to display more information to your user, then upon signup you can redirect to another page where you ask for consent and any additional info, and then redirect back to finish the authentication transaction. This can be done with redirect rules. That same rule can be used to save the consent information at the user's metadata so you can track this information and not ask for consent upon next login. To learn more, read [Redirect Users from Within Rules](/docs/customize/rules/redirect-users).
You will need to host this form, and the URL for the form must be publicly-accessible. You'll need to provide the URL where the form can be accessed to Auth0 at a later step of this tutorial.
1. Add the redirect rule. Go to [Auth0 Dashboard > Auth Pipeline > Rules](https://manage.auth0.com/#/rules), and click **Create Rule**. At **Rules Templates**, select **empty rule**. Change the default rule's name from `empty rule` to something descriptive (e.g., `Redirect to consent form`).
2. Add the following JavaScript code to the script editor, and **Save** your changes.
```js lines
exports.onExecutePostLogin = async (event, api) => {
const { consentGiven } = event.user.user_metadata || {};
// redirect to consent form if user has not yet consented
if (!consentGiven && api.redirect.canRedirect()) {
const options = {
query: {
auth0_domain: `${event.tenant.id}.auth0.com`,
},
};
api.redirect.sendUserTo(event.secrets.CONSENT_FORM_URL, options);
}
};
// if user clicks 'I agree' on the consent form, save it to their profile so they don't get prompted again
exports.onContinuePostLogin = async (event, api) => {
if (event.request.body.confirm === "yes") {
api.user.setUserMetadata("consentGiven", true);
api.user.setUserMetadata("consentTimestamp", Date.now());
return;
} else {
return api.access.deny("User did not consent");
}
};
```
3. Return to [Auth0 Dashboard > Auth0 Pipeline > Rules](https://manage.auth0.com/#/rules) and scroll down to the bottom of the page where the **Settings** section is. Create a key/value pair as follows:
1. **Key**: `CONSENT_FORM_URL`
2. **Value**: `your-consent-form-url.com`
Be sure to provide the publicly-accessible URL where your consent form can be found.
When setting up redirection to your consent form for use in a Production environment, be sure to review [Trusted Callback URLs](https://github.com/auth0/rules/tree/master/redirect-rules/simple#trusted-callback-urls) and [Data Integrity](https://github.com/auth0/rules/tree/master/redirect-rules/simple#data-integrity) regarding security concerns.
If you require a specialized consent prompt, for example a parental consent, you need to build your own custom consent form. Be aware that laws vary according to country.
We are done with the configuration part, let's test!
## Test the configuration
1. Run the application and go to `https://localhost:3000`.
2. Sign up with a new user. You will be redirected to the consent form.
3. Check the **I agree** flag, and click **Submit**.
4. Go to [Auth0 Dashboard > User Management > Users](https://manage.auth0.com/#/users), and search for your new user.
5. Go to **User Details**, and scroll down to the **Metadata** section.
6. At the **user\_metadata** text area, you should see the `consentGiven` metadata set to `true` and the `consentTimestamp` set to the Unix timestamp of the moment the user consented.
That's it, you are done!
 1. To test this configuration run the application and go to `http://localhost:3000`. Sign up with a new user. Then go to [Auth0 Dashboard > User Management > Users](https://manage.auth0.com/#/users) and search for your new user. Go to **User Details** and scroll down to the **Metadata** section. At the **user\_metadata** text area, you should see the `consentGiven` metadata set to `true`.
## Option 2: Use the API (database)
If you serve your login page from your own server, then you can call the Authentication API [**Signup** endpoint](https://auth0.com/docs/api/authentication#signup) directly once the user signs up.
For the same scenario we have been discussing so far, once you sign up a new user, you can use the following snippet to create the user at Auth0 and set the metadata. Remember to replace the value of the `consentTimestamp` request parameter with the timestamp of when the user provided consent.
1. To test this configuration run the application and go to `http://localhost:3000`. Sign up with a new user. Then go to [Auth0 Dashboard > User Management > Users](https://manage.auth0.com/#/users) and search for your new user. Go to **User Details** and scroll down to the **Metadata** section. At the **user\_metadata** text area, you should see the `consentGiven` metadata set to `true`.
## Option 2: Use the API (database)
If you serve your login page from your own server, then you can call the Authentication API [**Signup** endpoint](https://auth0.com/docs/api/authentication#signup) directly once the user signs up.
For the same scenario we have been discussing so far, once you sign up a new user, you can use the following snippet to create the user at Auth0 and set the metadata. Remember to replace the value of the `consentTimestamp` request parameter with the timestamp of when the user provided consent.