> ## Documentation Index
> Fetch the complete documentation index at: https://docs-staging-quickstart-revamp.mintlify.site/llms.txt
> Use this file to discover all available pages before exploring further.
# Node (Express) API: Authorization
##### By David Patrick
This tutorial demonstrates how to add authorization to an Express.js API.We recommend that you log in to follow this quickstart with examples configured for your account.
{/*
System requirements: express-oauth2-jwt-bearer 1.0.0
*/}
**New to Auth0?** Learn [how Auth0 works](/docs/get-started/auth0-overview) and read about [implementing API authentication and authorization](/docs/get-started/authentication-and-authorization-flow) using the OAuth 2.0 framework.
## Configure Auth0 APIs
### Create an API
In the [APIs](https://manage.auth0.com/#/apis) section of the Auth0 dashboard, click **Create API**. Provide a name and an identifier for your API, for example, `https://quickstarts/api`. You will use the identifier as an `audience` later, when you are configuring the Access Token verification. Leave the **Signing Algorithm** as **RS256**.
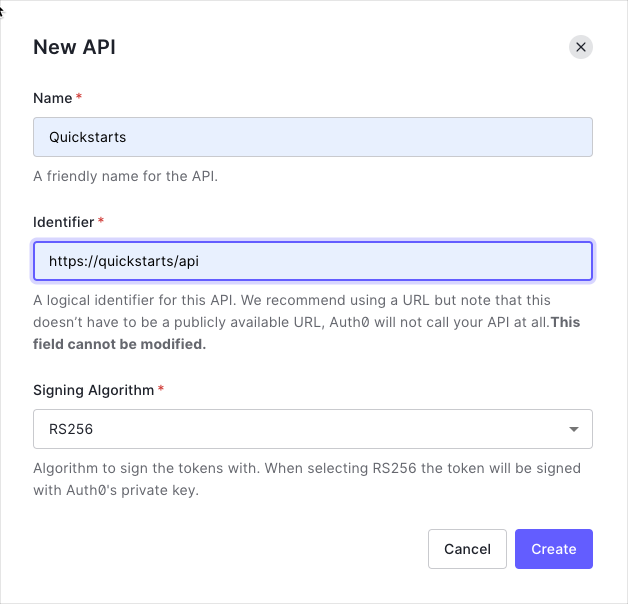
By default, your API uses RS256 as the algorithm for signing tokens. Since RS256 uses a private/public keypair, it verifies the tokens against the public key for your Auth0 account. The public key is in the [JSON Web Key Set (JWKS)](/docs/secure/tokens/json-web-tokens/json-web-key-sets) format, and can be accessed [here](https://\{yourDomain}/.well-known/jwks.json).
We recommend using the default RS256 [signing algorithm](/docs/get-started/applications/signing-algorithms) for your API. If you need to use the HS256 algorithm, see the [HS256 integration sample](https://github.com/auth0-samples/auth0-express-api-samples/tree/master/02-Authorization-HS256).
### Define permissions
Permissions let you define how resources can be accessed on behalf of the user with a given access token. For example, you might choose to grant read access to the `messages` resource if users have the manager access level, and a write access to that resource if they have the administrator access level.
You can define allowed permissions in the **Permissions** view of the Auth0 Dashboard's [APIs](https://manage.auth0.com/#/apis) section.
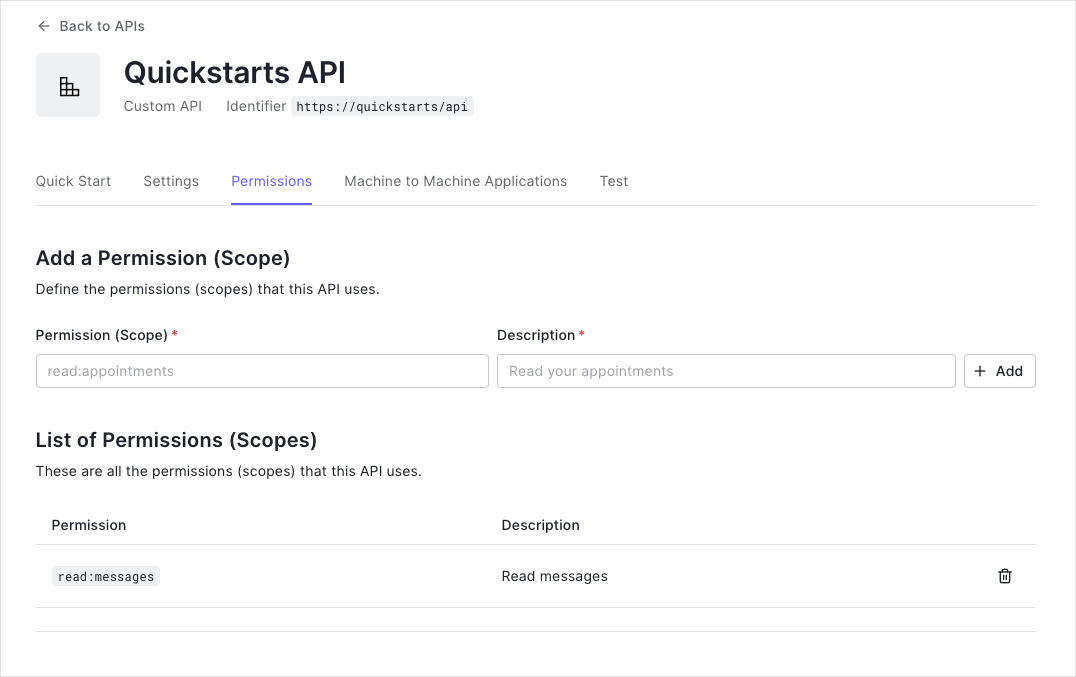
This example uses the `read:messages` scope.
This example demonstrates:
* How to check for a JSON Web Token (JWT) in the `Authorization` header of an incoming HTTP request.
* How to check if the token is valid, using the [JSON Web Key Set (JWKS)](/docs/secure/tokens/json-web-tokens/json-web-key-sets) for your Auth0 account. To learn more about validating Access Tokens, see [Validate Access Tokens](/docs/secure/tokens/access-tokens/validate-access-tokens).
## Validate Access Tokens
### Install dependencies
This guide shows you how to protect an Express API using the [express-oauth2-jwt-bearer](https://github.com/auth0/node-oauth2-jwt-bearer/tree/main/packages/express-oauth2-jwt-bearer) middleware.
First install the SDK using npm.
```bash
npm install --save express-oauth2-jwt-bearer
```
### Configure the middleware
Configure `express-oauth2-jwt-bearer` with your Domain and API Identifier.
```javascript lines
// server.js
const express = require('express');
const app = express();
const { auth } = require('express-oauth2-jwt-bearer');
// Authorization middleware. When used, the Access Token must
// exist and be verified against the Auth0 JSON Web Key Set.
const checkJwt = auth({
audience: '{yourApiIdentifier}',
issuerBaseURL: `https://{yourDomain}/`,
});
```
The `checkJwt` middleware shown above checks if the user's Access Token included in the request is valid. If the token is not valid, the user gets a 401 Authorization error when they try to access the endpoints. The middleware doesn't check if the token has the sufficient scope to access the requested resources.
## Protect API Endpoints
The routes shown below are available for the following requests:
* `GET /api/public`: available for non-authenticated requests
* `GET /api/private`: available for authenticated requests containing an access token with no additional scopes
* `GET /api/private-scoped`: available for authenticated requests containing an access token with the `read:messages` scope granted
To protect an individual route that requires a valid JWT, configure the route with the `checkJwt` `express-oauth2-jwt-bearer` middleware.
```javascript lines
// server.js
// This route doesn't need authentication
app.get('/api/public', function(req, res) {
res.json({
message: 'Hello from a public endpoint! You don\'t need to be authenticated to see this.'
});
});
// This route needs authentication
app.get('/api/private', checkJwt, function(req, res) {
res.json({
message: 'Hello from a private endpoint! You need to be authenticated to see this.'
});
});
```
You can configure individual routes to look for a particular scope. To achieve that, set up another middleware with the `requiresScope` method. Provide the required scopes and apply the middleware to any routes you want to add authorization to.
Pass the `checkJwt` and `requiredScopes` middlewares to the route you want to protect.
```javascript lines
// server.js
const { requiredScopes } = require('express-oauth2-jwt-bearer');
const checkScopes = requiredScopes('read:messages');
app.get('/api/private-scoped', checkJwt, checkScopes, function(req, res) {
res.json({
message: 'Hello from a private endpoint! You need to be authenticated and have a scope of read:messages to see this.'
});
});
```
In this configuration, only Access Tokens with the `read:messages` scope can access the endpoint.
##### What can you do next?