> ## Documentation Index
> Fetch the complete documentation index at: https://docs-staging-quickstart-revamp.mintlify.site/llms.txt
> Use this file to discover all available pages before exploring further.
# ASP.NET Core Web API: Authorization
##### By Damien Guard
This tutorial demonstrates how to add authorization to an ASP.NET Core Web API application using the standard JWT middleware.We recommend that you log in to follow this quickstart with examples configured for your account.
{/*
System requirements: .NET 6.0 | .NET 7.0 | .NET 8.0
*/}
**New to Auth0?** Learn [how Auth0 works](/docs/get-started/auth0-overview) and read about [implementing API authentication and authorization](/docs/get-started/authentication-and-authorization-flow) using the OAuth 2.0 framework.
## Configure Auth0 APIs
### Create an API
In the [APIs](https://manage.auth0.com/#/apis) section of the Auth0 dashboard, click **Create API**. Provide a name and an identifier for your API, for example, `https://quickstarts/api`. You will use the identifier as an `audience` later, when you are configuring the Access Token verification. Leave the **Signing Algorithm** as **RS256**.
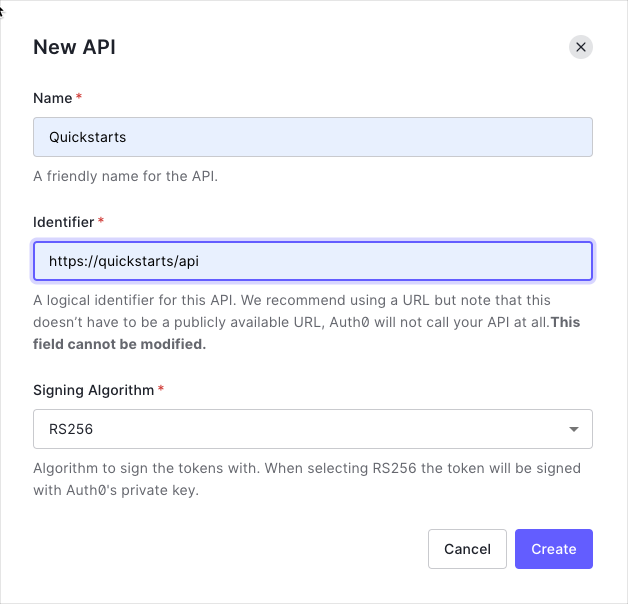
By default, your API uses RS256 as the algorithm for signing tokens. Since RS256 uses a private/public keypair, it verifies the tokens against the public key for your Auth0 account. The public key is in the [JSON Web Key Set (JWKS)](/docs/secure/tokens/json-web-tokens/json-web-key-sets) format, and can be accessed [here](https://\{yourDomain}/.well-known/jwks.json).
### Define permissions
Permissions let you define how resources can be accessed on behalf of the user with a given access token. For example, you might choose to grant read access to the `messages` resource if users have the manager access level, and a write access to that resource if they have the administrator access level.
You can define allowed permissions in the **Permissions** view of the Auth0 Dashboard's [APIs](https://manage.auth0.com/#/apis) section.
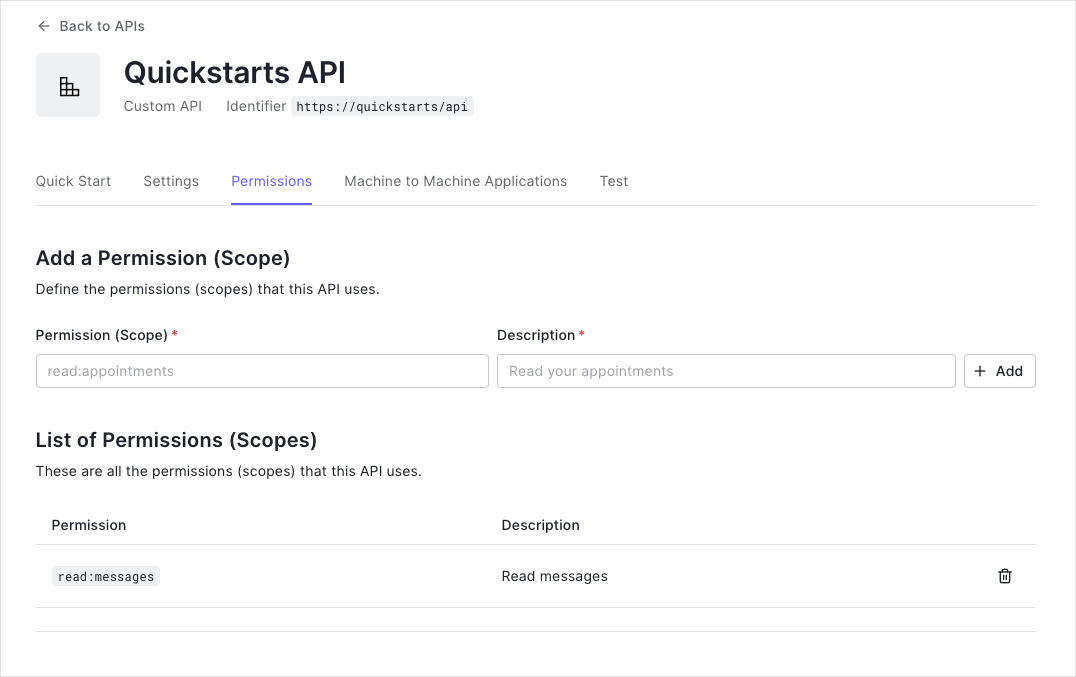
This example uses the `read:messages` scope.
This example demonstrates:
* How to check for a JSON Web Token (JWT) in the `Authorization` header of an incoming HTTP request.
* How to check if the token is valid, using the [JSON Web Key Set (JWKS)](/docs/secure/tokens/json-web-tokens/json-web-key-sets) for your Auth0 account. To learn more about validating Access Tokens, see [Validate Access Tokens](/docs/secure/tokens/access-tokens/validate-access-tokens).
## Configure the Sample Project
The sample code has an `appsettings.json` file which configures it to use the correct Auth0 **Domain** and **API Identifier** for your API. If you download the code from this page while logged in, it will be automatically filled. If you use the example from Github, you will need to fill it yourself.
```json lines
{
"Auth0": {
"Domain": "{yourDomain}",
"Audience": "{yourApiIdentifier}"
}
}
```
## Validate Access Tokens
### Install dependencies
The seed project already contains a reference to the `Microsoft.AspNetCore.Authentication.JwtBearer`, which is needed in order to validate Access Tokens.
However, if you are not using the seed project, add the package to your application by installing it using Nuget:
```
Install-Package Microsoft.AspNetCore.Authentication.JwtBearer
```
### Configure the middleware
The ASP.NET Core JWT Bearer authentication handler downloads the JSON Web Key Set (JWKS) file with the public key. The handler uses the JWKS file and the public key to verify the Access Token's signature.
In your application, register the authentication services:
1. Make a call to the `AddAuthentication` method. Configure `JwtBearerDefaults.AuthenticationScheme` as the default schemes.
2. Make a call to the `AddJwtBearer` method to register the JWT Bearer authentication scheme. Configure your Auth0 domain as the authority, and your Auth0 API identifier as the audience. In some cases the access token will not have a `sub` claim which will lead to `User.Identity.Name` being `null`. If you want to map a different claim to `User.Identity.Name` then add it to `options.TokenValidationParameters` within the `AddAuthentication()` call.
```cs lines
// Program.cs
var builder = WebApplication.CreateBuilder(args);
var domain = $"https://{builder.Configuration["Auth0:Domain"]}/";
builder.Services.AddAuthentication(JwtBearerDefaults.AuthenticationScheme)
.AddJwtBearer(options =>
{
options.Authority = domain;
options.Audience = builder.Configuration["Auth0:Audience"];
options.TokenValidationParameters = new TokenValidationParameters
{
NameClaimType = ClaimTypes.NameIdentifier
};
});
```
To add the authentication and authorization middleware to the middleware pipeline, add a call to the `UseAuthentication` and `UseAuthorization` methods in your Program.cs file:
```cs lines
// Program.cs
var app = builder.Build();
app.UseAuthentication();
app.UseAuthorization();
app.UseEndpoints(endpoints =>
{
endpoints.MapControllers();
});
```
### Validate scopes
To make sure that an Access Token contains the correct scope, use the [Policy-Based Authorization](https://docs.microsoft.com/en-us/aspnet/core/security/authorization/policies) in ASP.NET Core.
Create a new authorization requirement called `HasScopeRequirement`. This requirement checks if the `scope` claim issued by your Auth0 tenant is present. If the `scope` claim exists, the requirement checks if the `scope` claim contains the requested scope.
```cs lines
// HasScopeRequirement.cs
public class HasScopeRequirement : IAuthorizationRequirement
{
public string Issuer { get; }
public string Scope { get; }
public HasScopeRequirement(string scope, string issuer)
{
Scope = scope ?? throw new ArgumentNullException(nameof(scope));
Issuer = issuer ?? throw new ArgumentNullException(nameof(issuer));
}
}
```
```cs lines
// HasScopeHandler.cs
public class HasScopeHandler : AuthorizationHandler
{
protected override Task HandleRequirementAsync(AuthorizationHandlerContext context, HasScopeRequirement requirement)
{
// If user does not have the scope claim, get out of here
if (!context.User.HasClaim(c => c.Type == "scope" && c.Issuer == requirement.Issuer))
return Task.CompletedTask;
// Split the scopes string into an array
var scopes = context.User.FindFirst(c => c.Type == "scope" && c.Issuer == requirement.Issuer).Value.Split(' ');
// Succeed if the scope array contains the required scope
if (scopes.Any(s => s == requirement.Scope))
context.Succeed(requirement);
return Task.CompletedTask;
}
}
```
In your Program.cs file, add a call to the `AddAuthorization` method. To add policies for the scopes, call `AddPolicy` for each scope. Also ensure that you register the `HasScopeHandler` as a singleton:
```cs lines
// Program.cs
builder.Services.AddAuthorization(options =>
{
options.AddPolicy("read:messages", policy => policy.Requirements.Add(new
HasScopeRequirement("read:messages", domain)));
});
builder.Services.AddSingleton();
```
## Protect API Endpoints
The JWT middleware integrates with the standard ASP.NET Core [Authentication](https://docs.microsoft.com/en-us/aspnet/core/security/authentication/) and [Authorization](https://docs.microsoft.com/en-us/aspnet/core/security/authorization/) mechanisms.
To secure an endpoint, you need to add the `[Authorize]` attribute to your controller action:
```cs lines
// Controllers/ApiController.cs
[Route("api")]
[ApiController]
public class ApiController : ControllerBase
{
[HttpGet("private")]
[Authorize]
public IActionResult Private()
{
return Ok(new
{
Message = "Hello from a private endpoint! You need to be authenticated to see this."
});
}
}
```
To secure endpoints that require specific scopes, we need to make sure that the correct scope is present in the `access_token`. To do that, add the `Authorize` attribute to the `Scoped` action and pass `read:messages` as the `policy` parameter.
```cs lines
// Controllers/ApiController.cs
[Route("api")]
public class ApiController : Controller
{
[HttpGet("private-scoped")]
[Authorize("read:messages")]
public IActionResult Scoped()
{
return Ok(new
{
Message = "Hello from a private endpoint! You need to be authenticated and have a scope of read:messages to see this."
});
}
}
```
##### What can you do next?