> ## Documentation Index
> Fetch the complete documentation index at: https://docs-staging-quickstart-revamp.mintlify.site/llms.txt
> Use this file to discover all available pages before exploring further.

> Learn how to authenticate users with the Client-Initiated Backchannel Authentication Flow.

# User Authentication with CIBA

Client-Initiated Backchannel Authentication (CIBA) does not rely on a client application redirecting the user via the browser to perform the login/authentication process. Instead, the client application directly calls the <Tooltip tip="OpenID: Open standard for authentication that allows applications to verify users' identities without collecting and storing login information." cta="View Glossary" href="/docs/glossary?term=OpenID">OpenID</Tooltip> Provider via a backchannel request to initiate the authentication flow.

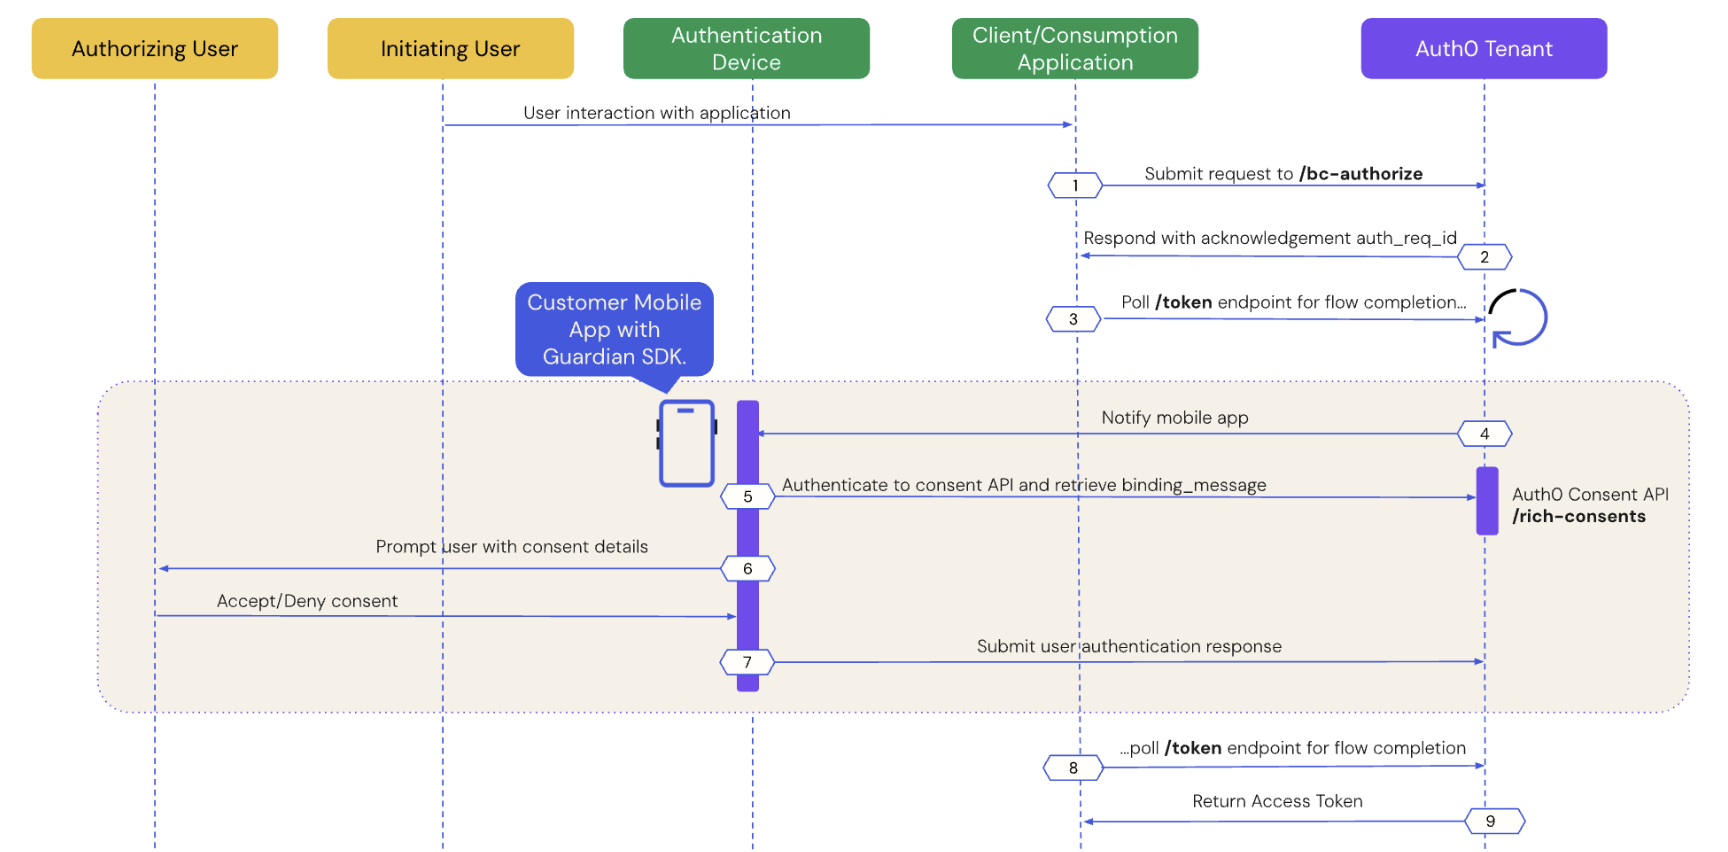
The following sequence diagram illustrates an implementation of the CIBA Flow:

<Frame>
  <img src="https://mintcdn.com/docs-staging-quickstart-revamp/95MUIRU4PPeO3xcE/images/cdy7uua7fh8z/2Q0CVn6C9pjoxx9pG10Kqi/9333a725fafbb4b5a5d27b0e73451ab3/Screenshot_2025-01-16_at_10.11.19_AM.png?fit=max&auto=format&n=95MUIRU4PPeO3xcE&q=85&s=47a59b98412dbabbf96fd262586ef649" alt="" width="1728" height="852" data-path="images/cdy7uua7fh8z/2Q0CVn6C9pjoxx9pG10Kqi/9333a725fafbb4b5a5d27b0e73451ab3/Screenshot_2025-01-16_at_10.11.19_AM.png" />
</Frame>

The sequence diagram defines two actors: an authorizing user and an initiating user. The authorizing and initiating user can be two different entities, such as an AI agent performing a task on a user's behalf. In other use cases, they can be the same entity, such as a user authenticating to a retail kiosk or another connected device.

The following sections dive step-by-step into how user authentication works with the CIBA Flow:

* [Prerequisites](#prerequisites)
* [Step 1: Client application initiates a CIBA request](#step-1-client-application-initiates-a-ciba-request)
* [Step 2: Auth0 tenant acknowledges the CIBA request](#step-2-auth0-tenant-acknowledges-the-ciba-request)
* [Step 3: Client application polls for a response](#step-3-client-application-polls-for-a-response)
* [Step 4: Mobile application receives the push notification](#step-4-mobile-application-receives-the-push-notification)
* [Step 5: Mobile application retrieves the consent details](#step-5-mobile-application-retrieves-the-consent-details)
* [Step 6: Mobile application presents the consent details to the user](#step-6-mobile-application-presents-the-consent-details-to-the-user)
* [Step 7: Mobile application sends the user response back to Auth0](#step-7-mobile-application-sends-the-user-response-back-to-auth0)
* [Step 8: Auth0 receives user response after the flow completes](#step-8-auth0-receives-user-response-after-the-flow-completes)
* [Step 9: Auth0 returns access token to client application](#step-9-auth0-returns-access-token-to-client-application)

## Prerequisites

To initiate a CIBA push request using Auth0, you must complete the following prerequisites:

* Integrate your custom mobile application with the [Guardian SDK](/docs/secure/multi-factor-authentication/auth0-guardian#enroll-in-push-notifications). To learn more, read [Configure Client-Initiated Backchannel Authentication](/docs/get-started/applications/configure-client-initiated-backchannel-authentication).
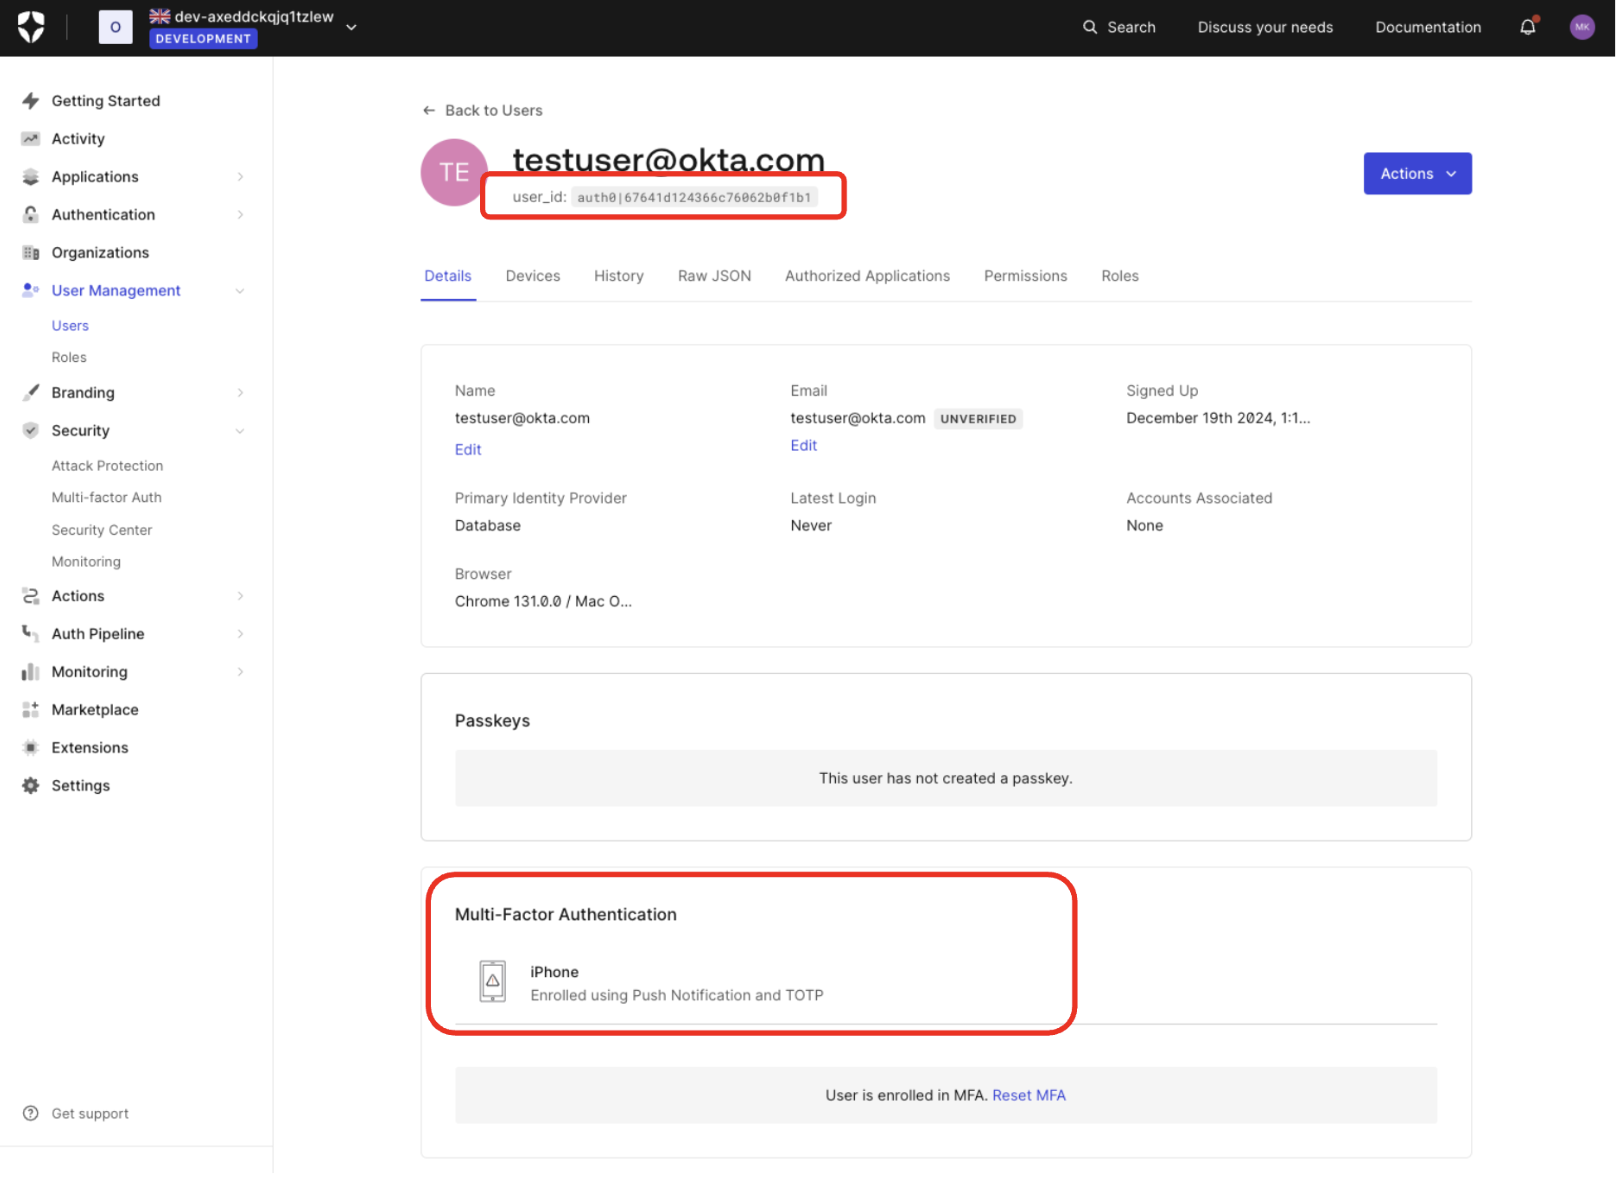
* [Enroll the authorizing user in MFA using push notifications via the Guardian SDK](/docs/secure/multi-factor-authentication/auth0-guardian#enroll-in-push-notifications). To verify in the <Tooltip tip="Auth0 Dashboard: Auth0's main product to configure your services." cta="View Glossary" href="/docs/glossary?term=Auth0+Dashboard">Auth0 Dashboard</Tooltip>, navigate to **User Management > Users** and click on the user:
<Frame>
  <img src="https://mintcdn.com/docs-staging-quickstart-revamp/fNPG21NgQLCA0axA/images/cdy7uua7fh8z/21qtk4F1cOQHMpbXxXYu75/51ba9c5fd1457ffee3f73893acf3c97f/Screenshot_2025-01-13_at_4.13.44_PM.png?fit=max&auto=format&n=fNPG21NgQLCA0axA&q=85&s=33add3bc312b732169eafc1106e0cebc" alt="" width="1616" height="1180" data-path="images/cdy7uua7fh8z/21qtk4F1cOQHMpbXxXYu75/51ba9c5fd1457ffee3f73893acf3c97f/Screenshot_2025-01-13_at_4.13.44_PM.png" />
</Frame>

If you have set <Tooltip tip="Multi-factor authentication (MFA): User authentication process that uses a factor in addition to username and password such as a code via SMS." cta="View Glossary" href="/docs/glossary?term=Multi-factor+Authentication">Multi-factor Authentication</Tooltip> as always required for your tenant, users are prompted to enroll for MFA at their next login. You can also use [Actions](https://auth0.com/blog/using-actions-to-customize-your-mfa-factors/) to prompt for MFA enrollment.

* [Configure Client-Initiated Backchannel Authentication](/docs/get-started/applications/configure-client-initiated-backchannel-authentication) for your tenant and application.

## Step 1: Client application initiates a CIBA request

Use the [User Search APIs](/docs/manage-users/user-search) to find the authorizing user for whom you’d like to initiate a CIBA request and obtain their user ID.

Once you have a user ID for the authorizing user, use the Authentication API or our [SDKs](/docs/libraries) to send a CIBA request to the `/bc-authorize` endpoint:

<Tabs>
  <Tab title="cURL">
    ```bash lines
    curl --location 'https://$tenant.auth0.com/bc-authorize' \
      --header 'Content-Type: application/x-www-form-urlencoded' \
      --data-urlencode 'client_id=$client_id' \
      --data-urlencode 'client_secret=$client_secret' \
      --data-urlencode 'login_hint={ "format": "iss_sub", "iss": "https://$tenant.auth0.com/", "sub": "$user_id" }' \
      --data-urlencode 'scope=$scope' \
      --data-urlencode 'binding_message=$binding_message'
    ```
  </Tab>

  <Tab title="C#">
    ```csharp lines
    var response = await authenticationApiClient.ClientInitiatedBackchannelAuthorization(
                new ClientInitiatedBackchannelAuthorizationRequest()
                {
                    ClientId = "your-client-id",
                    Scope = "openid",
                    ClientSecret = "your-client-secret",
                    BindingMessage = "your-binding-message",
                    LoginHint = new LoginHint()
                    {
                        Format = "iss_sub",
                        Issuer = "your-issuer-domain",
                        Subject = "auth0|user-id-here"
                    }
                }
            );
    ```
  </Tab>

  <Tab title="Go">
    ```go lines
    resp, err := authAPI.CIBA.Initiate(context.Background(), ciba.Request{
    		ClientID:     mgmtClientID,
    		ClientSecret: mgmtClientSecret,
    		Scope:        "openid",
    		LoginHint: map[string]string{
    			"format": "iss_sub",
    			"iss":    "your-issuer-domain",
    			"sub":    "auth0|user-id-here",
    		},
    		BindingMessage: "TEST-BINDING-MESSAGE",
    	})
    ```
  </Tab>

  <Tab title="Java">
    ```java lines
    //Creating AuthClient Instance
    AuthAPI auth = AuthAPI.newBuilder(domain, clientId, clientSecret).build();

    //Authorize
    Map<String, Object> loginHint = new HashMap<>();
            loginHint.put("format", "iss_sub");
            loginHint.put("iss", "your-issuer-domain");
            loginHint.put("sub", "auth0|user-id-here");

    Request<BackChannelAuthorizeResponse> request = auth.authorizeBackChannel("openid", "your-binding-message", loginHint);

    BackChannelAuthorizeResponse resp = request.execute().getBody();
    ```
  </Tab>
</Tabs>

<table class="table">
  <thead>
    <tr>
      <th><strong>Parameters</strong></th>
      <th><strong>Description</strong></th>
    </tr>
  </thead>

  <tbody>
    <tr>
      <td><code>tenant</code></td>
      <td>Tenant name. It can also be a custom domain.</td>
    </tr>

    <tr>
      <td><code>client\_id</code></td>
      <td>Client application identifier.</td>
    </tr>

    <tr>
      <td><code>client\_secret</code></td>
      <td>Client authentication method used for user authentication with CIBA, such as Client Secret, Private Key JWT, or mTLS Authentication. If you're using Private Key JWT or mTLS, you don't need to include the client secret.</td>
    </tr>

    <tr>
      <td><code>scope</code></td>
      <td>Must include <code>openid</code>.<br /><br />The scope can optionally include <code>offline\_access</code> to request a refresh token. However, for one-time authorization of a transaction with the CIBA Flow, a refresh token is not needed and does not have any meaning in this context.<br /></td>
    </tr>

    <tr>
      <td><code>user\_id</code></td>
      <td>User ID for the authorizing user that is passed within the <code>login\_hint</code> structure. If <code>iss\_sub</code> format is used, then the user ID is passed within the <code>sub</code> claim.<br /><br />The user ID for a federated connection may have a different format.<br /></td>
    </tr>

    <tr>
      <td><code>request\_expiry</code></td>
      <td>The CIBA flow's requested expiry is between 1 and 300 seconds, and it defaults to 300 seconds. Include the <code>request\_expiry</code> parameter to set a custom expiry for the CIBA flow.</td>
    </tr>

    <tr>
      <td><code>binding\_message</code></td>
      <td>Human-readable message used to bind the CIBA flow across the authentication and consumption devices. The binding message is required and up to 64 characters. Use only alphanumeric and <code>+-\_.,:#</code> characters.</td>
    </tr>
  </tbody>
</table>

<Callout icon="file-lines" color="#0EA5E9" iconType="regular">
  There is a user-specific rate limit where the authorizing user will not be sent more than 5 requests per minute.
</Callout>

## Step 2: Auth0 tenant acknowledges the CIBA request

If the Auth0 tenant successfully receives the `POST` request, you should receive a response containing an `auth-req-id` that references the request:

```json lines
{
    "auth_req_id": "eyJh...",
    "expires_in": 300,
    "interval": 5
}
```

The `auth_req_id` value is passed to the `/token` endpoint to poll for the completion of the CIBA flow.

## Step 3: Client application polls for a response

Use the Authentication API or our [SDKs](/docs/libraries) to call the `/token` endpoint using the `urn:openid:params:grant-type:ciba` grant type and the `auth_req_id` you received from the `/bc-authorize` endpoint:

<Tabs>
  <Tab title="cURL">
    ```bash lines
    curl --location 'https://$tenant.auth0.com/oauth/token' \
      --header 'Content-Type: application/x-www-form-urlencoded' \
      --data-urlencode 'client_id=$client_id' \
      --data-urlencode 'client_secret=$client_secret' \
      --data-urlencode 'auth_req_id=$auth_req_id' \
      --data-urlencode 'grant_type=urn:openid:params:grant-type:ciba'
    ```
  </Tab>

  <Tab title="C#">
    ```csharp lines
    var token = await authenticationApiClient.GetTokenAsync(
                new ClientInitiatedBackchannelAuthorizationTokenRequest()
                {
                    AuthRequestId = response.AuthRequestId,
                    ClientId = "your-client-id",
                    ClientSecret = "your-client-secret"
                }
            );
    ```
  </Tab>

  <Tab title="Go">
    ```go lines
    token, err := authAPI.OAuth.LoginWithGrant(context.Background(),
    			"urn:openid:params:grant-type:ciba",
    			url.Values{
    				"auth_req_id":   []string{resp.AuthReqID},
    				"client_id":     []string{clientID},
    				"client_secret": []string{clientSecret},
    			},
    			oauth.IDTokenValidationOptions{})
    ```
  </Tab>

  <Tab title="Java">
    ```java lines
    Request<BackChannelTokenResponse> tokenRequest = auth.getBackChannelLoginStatus(authReqId, "grant-type");

    BackChannelTokenResponse tokenResponse = tokenRequest.execute().getBody();
    ```
  </Tab>
</Tabs>

Until the authorizing user approves the transaction, you should receive the following response:

```json lines
{
    "error": "authorization_pending",
    "error_description": "The end-user authorization is pending"
}
```

There is approximately a five-second wait interval for polling. If you poll too frequently, you will receive the following response, where the description varies depending on the backoff interval:

```json lines
{
"error": "slow_down",
"error_description": "You are polling faster than allowed. Try again in 10 seconds."
"interval": 10
}
```

To resolve the error, wait until the next interval (in seconds) to poll the `/token` endpoint.

## Step 4: Mobile application receives the push notification

Auth0 sends a push notification to the user's registered mobile app or device. The [Guardian SDK](/docs/secure/multi-factor-authentication/auth0-guardian) provides methods to parse the data received from the push notification and return a ready-to-use `Notification` instance. The `Notification` instance includes a transaction linking ID, or `txlinkid`, that the mobile application uses to retrieve the consent details from Auth0.

The following code samples are example iOS and Android mobile push notification implementations using the Guardian SDK:

<Tabs>
  <Tab title="iOS">
    ```swift lines
    //implementing UNUserNotificationCenterDelegate
    func userNotificationCenter(_ center: UNUserNotificationCenter, willPresent notification: UNNotification, withCompletionHandler completionHandler: (UNNotificationPresentationOptions) -> Void) {
        let userInfo = notification.request.content.userInfo
        if let notification = Guardian.notification(from: userInfo) {
             // Implement this function to display the prompt and handle user's consent/rejection.
             handleGuardianNotification(notification: notification)
        }
    }
    ```
  </Tab>

  <Tab title="Android">
    ```kotlin lines
    // at the FCM listener you receive a RemoteMessage
    @Override
    public void onMessageReceived(RemoteMessage message) {
        Notification notification = Guardian.parseNotification(message.getData());
        if (notification != null) {
            // you received a Guardian notification, handle it
            handleGuardianNotification(notification);
            return;
        }
        /* handle other push notifications you might be using ... */
    }
    ```
  </Tab>
</Tabs>

## Step 5: Mobile application retrieves the consent details

Call the Guardian SDK from your mobile application to retrieve the consent details i.e. the contents of the `binding_message` from the Auth0 Consent API.

The following code samples are example iOS and Android implementations that retrieve data from the Auth0 Consent API:

<Tabs>
  <Tab title="iOS">
    ```swift lines
    let device: AuthenticationDevice = // the object you obtained during the initial Guardian SDK enrollment process and stored locally
    if let consentId = notification.transactionLinkingId {
        Guardian
            .consent(forDomain: {yourTenantDomain}, device: device)
            .fetch(consentId: consentId, notificationToken: notification.transactionToken)
            .start{result in
                switch result {
                case .success(let payload):
                    // present consent details to the user
                case .failure(let cause):
                    // something went wrong
            }
        }
    }
    ```
  </Tab>

  <Tab title="Android">
    ```kotlin lines
    Enrollment enrollment = // the object you obtained during the initial Guardian SDK enrollment process and stored locally
    if (notification.getTransactionLinkingId() != null) {
        guardian
          .fetchConsent(notification, enrollment)
          .start(new Callback<Enrollment> {
            @Override
            void onSuccess(RichConsent consentDetails) {
                // present consent details to the user 
            }
            @Override
            void onFailure(Throwable exception) {
                // something went wrong 
            }
          });
    }
    ```
  </Tab>
</Tabs>

## Step 6: Mobile application presents the consent details to the user

The Auth0 Consent API responds to the mobile application with the consent details, including the `binding_message`, `scope`, and `audience`. The scopes returned to the mobile application are filtered according to your RBAC policy. To learn more, read [Role-Based Access Control](/docs/manage-users/access-control/rbac).

The mobile application presents the authentication request and/or the consent details to the user.

The following code sample is an example response from the Auth0 Consent API:

```json lines
{
  "id": "cns_abc123",
  "requested_details": {
    "audience": "https://$tenant.auth0.com/userinfo",
    "scope": ["openid"],
    "binding_message": "21-49-38"
  },
  "created_at": 1746693720
  "expires_at": 1746693750
}
```

The user can accept or decline the authentication request at this point.

## Step 7: Mobile application sends the user response back to Auth0

Depending on whether the user accepts or rejects the authentication request, the mobile application sends the user response back to Auth0.

The following code samples are example iOS and Android implementations that handle the user response:

### User accepts the authentication request

<Tabs>
  <Tab title="iOS">
    ```swift lines
    Guardian
        .authentication(forDomain: "{yourTenantDomain}", device: device)
        .allow(notification: notification)
        // or reject(notification: notification, withReason: "hacked")
        .start { result in
            switch result {
            case .success:
                // the auth request was successfully rejected
            case .failure(let cause):
                // something failed, check cause to see what went wrong
            }
        }
    ```
  </Tab>

  <Tab title="Android">
    ```kotlin lines
    guardian
        .allow(notification, enrollment)
        .execute(); // or start(new Callback<> ...)
    ```
  </Tab>
</Tabs>

### User rejects the authentication request

<Tabs>
  <Tab title="iOS">
    ```swift lines
    Guardian
            .authentication(forDomain: "{yourTenantDomain}", device: device)
            .reject(notification: notification)
            // or reject(notification: notification, withReason: "hacked")
            .start { result in
                switch result {
                case .success:
                    // the auth request was successfully rejected
                case .failure(let cause):
                    // something failed, check cause to see what went wrong
                }
            }
    ```
  </Tab>

  <Tab title="Android">
    ```kotlin lines
    guardian
        .reject(notification, enrollment) // or reject(notification, enrollment, reason)
        .execute(); // or start(new Callback<> ...)
    ```
  </Tab>
</Tabs>

## Step 8: Auth0 receives user response after the flow completes

The client application completes the polling upon receiving a response from the `/token` endpoint. A CIBA flow always requires a response, either an approval or decline, from the authorizing user, and existing grants are not checked.

## Step 9: Auth0 returns access token to client application

 If the user rejects the push request, Auth0 returns an error response like the following to the client application:

```json lines
{
    "error": "access_denied",
    "error_description": "The end-user denied the authorization request or it has been expired"
}
```

If the user approves the push request, Auth0 returns an <Tooltip tip="Access Token: Authorization credential, in the form of an opaque string or JWT, used to access an API." cta="View Glossary" href="/docs/glossary?term=access+token">access token</Tooltip> like the following to the client application:

```json lines
{
    "access_token": "eyJh...",
    "id_token": "eyJh...",
    "expires_in": 86400,
    "scope": "openid",
    "token_type": "Bearer"
}
```

**Note:** The `id_token` will only be present if the `openid` scope was included in the initial `/bc-authorize` request.

## Learn more

* [Client-Initiated Backchannel Authentication Flow](/docs/get-started/authentication-and-authorization-flow/client-initiated-backchannel-authentication-flow)
* [Configure Client-Initiated Backchannel Authentication](/docs/get-started/applications/configure-client-initiated-backchannel-authentication)
