> ## Documentation Index
> Fetch the complete documentation index at: https://docs-staging-quickstart-revamp.mintlify.site/llms.txt
> Use this file to discover all available pages before exploring further.

> Learn how to configure Rich Authorization Requests (RAR) for a resource server.

# Configure Rich Authorization Requests (RAR)

<Callout icon="file-lines" color="#0EA5E9" iconType="regular">
  To use Highly Regulated Identity features, you must have an Enterprise Plan with the Highly Regulated Identity add-on. Refer to [Auth0 Pricing](https://auth0.com/pricing/) for details.
</Callout>

Using [Rich Authorization Requests (RAR)](https://datatracker.ietf.org/doc/html/draft-ietf-oauth-rar), clients can request and obtain <Tooltip tip="Fine-grained Authorization (FGA): Auth0 product allowing individual users access to specific objects or resources." cta="View Glossary" href="/docs/glossary?term=fine-grained+authorization">fine-grained authorization</Tooltip> data from <Tooltip tip="Resource Owner: Entity (such as a user or application) capable of granting access to a protected resource." cta="View Glossary" href="/docs/glossary?term=resource+owners">resource owners</Tooltip>, such as end users, during the [Authorization Code Flow](/docs/get-started/authentication-and-authorization-flow/authorization-code-flow) and [Client-Initiated Backchannel Authentication Flow](/docs/get-started/authentication-and-authorization-flow/client-initiated-backchannel-authentication-flow).

In a Rich Authorization Request, the `authorization_details` parameter is a JSON array of objects. You can render the `authorization_details`, containing transaction details, in a consent prompt to the user in <Tooltip tip="Multi-factor authentication (MFA): User authentication process that uses a factor in addition to username and password such as a code via SMS." cta="View Glossary" href="/docs/glossary?term=Multi-factor+Authentication">Multi-factor Authentication</Tooltip> challenges.

To configure Rich Authorization Requests for a <Tooltip tip="Resource Server: Server hosting protected resources. Resource servers accept and respond to protected resource requests." cta="View Glossary" href="/docs/glossary?term=resource+server">resource server</Tooltip>, you must:

1. Configure the consent policy for the resource server.
2. Register `authorization_details` types for the resource server.
3. Configure the resource server to accept Rich Authorization Requests.

## Configure consent policy for the resource server

The resource server’s consent policy determines when and how Auth0 renders the Rich Authorization Request and shows the consent prompt to the user.

The table below summarizes Auth0's `standard` consent policy behavior for a resource server that accepts Rich Authorization Requests:

<table class="table">
  <thead>
    <tr>
      <th><strong>Is it a Rich Authorization Request?</strong></th>
      <th><strong>MFA Required?</strong></th>
      <th><strong>Consent policy is <code>standard</code> or undefined</strong></th>
    </tr>
  </thead>

  <tbody>
    <tr>
      <td>No</td>
      <td>No</td>
      <td>Standard consent is shown unless there is a grant that includes the requested access.</td>
    </tr>

    <tr>
      <td>Yes</td>
      <td>No</td>
      <td>Customized consent is shown.</td>
    </tr>

    <tr>
      <td>Yes</td>
      <td>Yes, with an authentication factor that is not a push notification</td>
      <td>Customized consent is shown after the user fulfills the MFA challenge.</td>
    </tr>

    <tr>
      <td>Yes</td>
      <td>Yes, with a push notification factor</td>
      <td>No consent is shown. The consent is handled in the mobile application that receives the push notification challenge.</td>
    </tr>
  </tbody>
</table>

<Tabs>
  <Tab title="Auth0 Dashboard">
    Set the consent policy in your API settings using the Auth0 Dashboard.

    1. Navigate to [Auth0 Dashboard > Applications > APIs](https://manage.auth0.com/#/apis).
    2. Select the **Settings** tab.
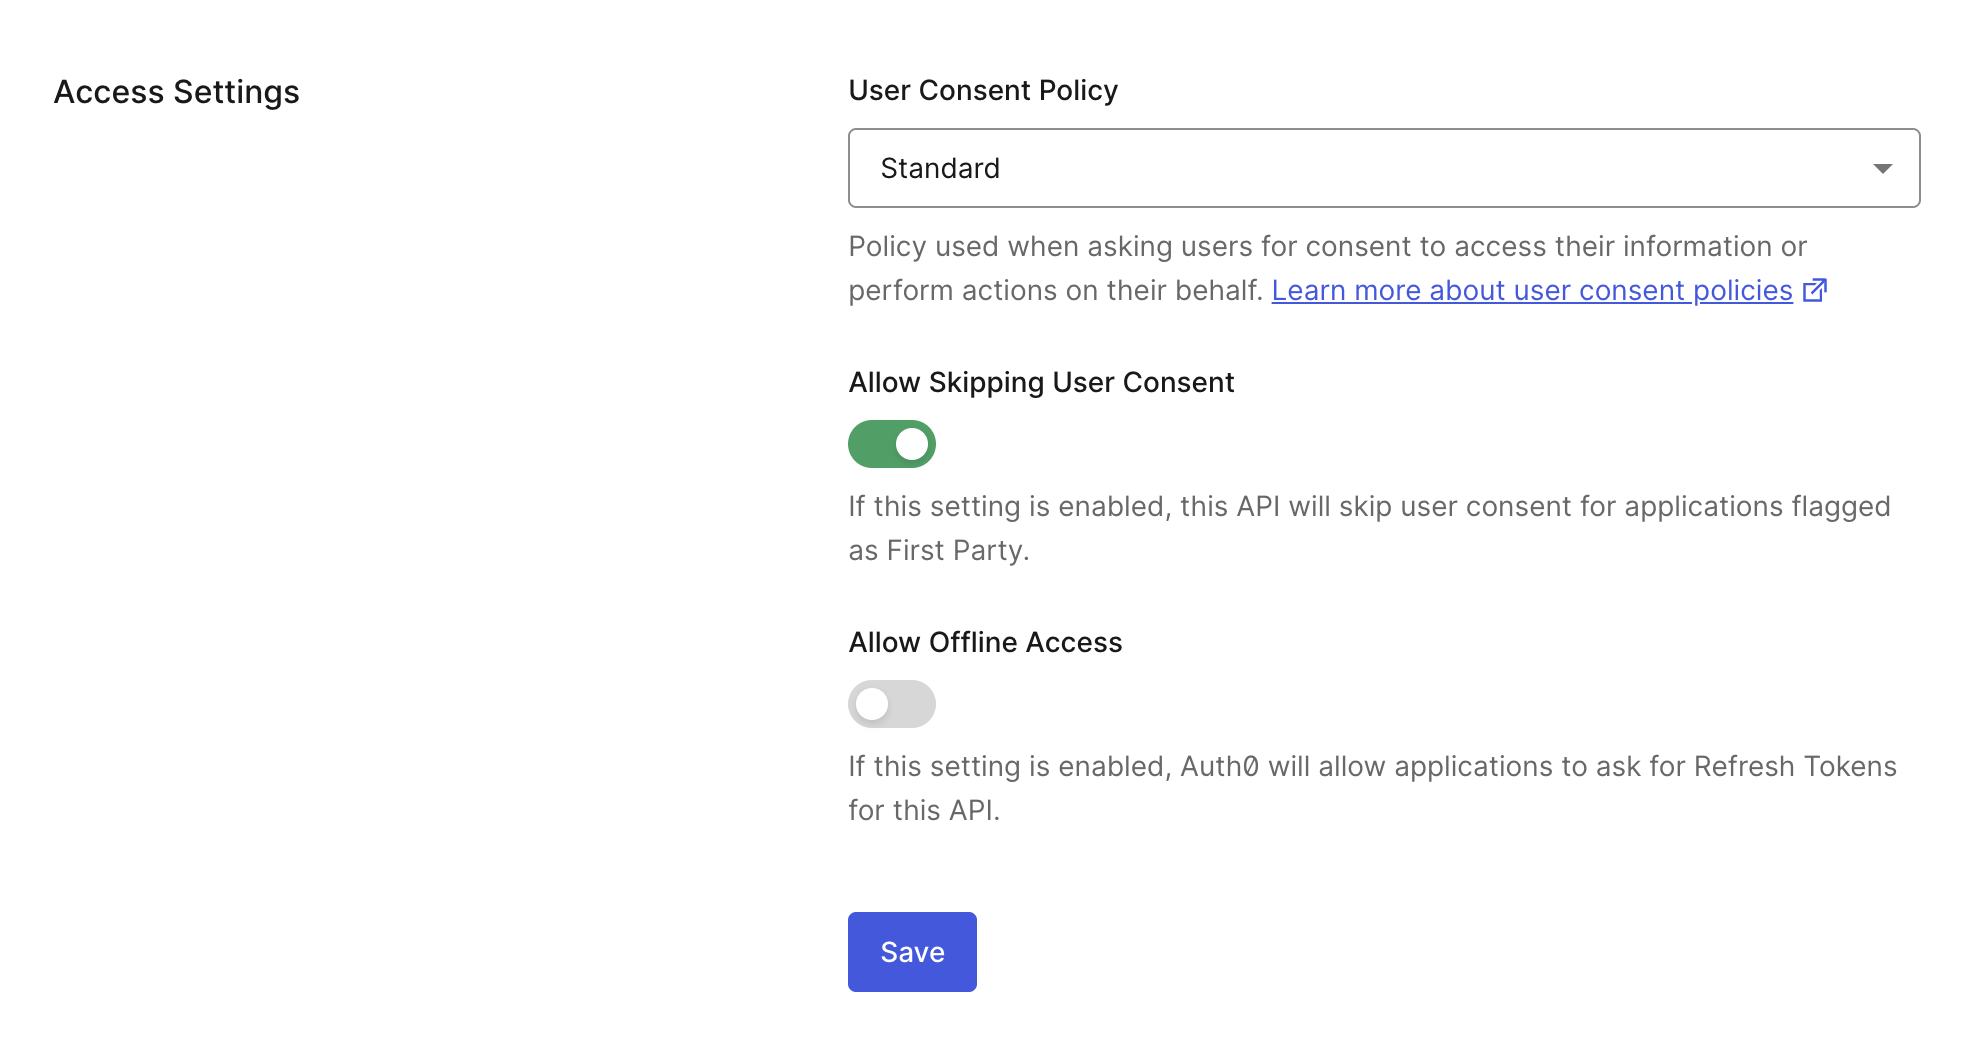
    3. Under **Access Settings**, choose the **Standard** consent policy.
    4. Save your changes.

    <Frame>
      <img src="https://mintcdn.com/docs-staging-quickstart-revamp/d9I4PO9-WombE4fE/images/cdy7uua7fh8z/3gr8Sf98gh8CUkjnlodNk/cf33985b1e5b62082d46e4f5c8bbed6f/Screenshot_2025-03-31_at_8.22.45_PM.png?fit=max&auto=format&n=d9I4PO9-WombE4fE&q=85&s=f563bd2a0375460c0f3167d784541672" alt="Dashboard > Applications > APIs > Settings > Access Settings" data-og-width="1976" width="1976" data-og-height="1046" height="1046" data-path="images/cdy7uua7fh8z/3gr8Sf98gh8CUkjnlodNk/cf33985b1e5b62082d46e4f5c8bbed6f/Screenshot_2025-03-31_at_8.22.45_PM.png" data-optimize="true" data-opv="3" srcset="https://mintcdn.com/docs-staging-quickstart-revamp/d9I4PO9-WombE4fE/images/cdy7uua7fh8z/3gr8Sf98gh8CUkjnlodNk/cf33985b1e5b62082d46e4f5c8bbed6f/Screenshot_2025-03-31_at_8.22.45_PM.png?w=280&fit=max&auto=format&n=d9I4PO9-WombE4fE&q=85&s=3af4109ca8b961cbd618e8c8f0e6d3eb 280w, https://mintcdn.com/docs-staging-quickstart-revamp/d9I4PO9-WombE4fE/images/cdy7uua7fh8z/3gr8Sf98gh8CUkjnlodNk/cf33985b1e5b62082d46e4f5c8bbed6f/Screenshot_2025-03-31_at_8.22.45_PM.png?w=560&fit=max&auto=format&n=d9I4PO9-WombE4fE&q=85&s=b41b2d2e6a7dc1cdfaea13bc045b74fc 560w, https://mintcdn.com/docs-staging-quickstart-revamp/d9I4PO9-WombE4fE/images/cdy7uua7fh8z/3gr8Sf98gh8CUkjnlodNk/cf33985b1e5b62082d46e4f5c8bbed6f/Screenshot_2025-03-31_at_8.22.45_PM.png?w=840&fit=max&auto=format&n=d9I4PO9-WombE4fE&q=85&s=1fc7237dea17539a7770bd42de69205f 840w, https://mintcdn.com/docs-staging-quickstart-revamp/d9I4PO9-WombE4fE/images/cdy7uua7fh8z/3gr8Sf98gh8CUkjnlodNk/cf33985b1e5b62082d46e4f5c8bbed6f/Screenshot_2025-03-31_at_8.22.45_PM.png?w=1100&fit=max&auto=format&n=d9I4PO9-WombE4fE&q=85&s=cc66105e8acc3f5873e681bdd6146fd7 1100w, https://mintcdn.com/docs-staging-quickstart-revamp/d9I4PO9-WombE4fE/images/cdy7uua7fh8z/3gr8Sf98gh8CUkjnlodNk/cf33985b1e5b62082d46e4f5c8bbed6f/Screenshot_2025-03-31_at_8.22.45_PM.png?w=1650&fit=max&auto=format&n=d9I4PO9-WombE4fE&q=85&s=4cc3826b81197a2582f9f8cf2a85ff1f 1650w, https://mintcdn.com/docs-staging-quickstart-revamp/d9I4PO9-WombE4fE/images/cdy7uua7fh8z/3gr8Sf98gh8CUkjnlodNk/cf33985b1e5b62082d46e4f5c8bbed6f/Screenshot_2025-03-31_at_8.22.45_PM.png?w=2500&fit=max&auto=format&n=d9I4PO9-WombE4fE&q=85&s=fbb7b9515efe5eee1c11fa18218aa126 2500w" />
    </Frame>
  </Tab>

  <Tab title="Management API">
    To set the consent policy for a resource server or API using the Management API, send a `PATCH` request to the [Update a resource server](https://auth0.com/docs/api/management/v2/resource-servers/patch-resource-servers-by-id) endpoint. In the `PATCH` request, set the `consent_policy` to `standard`:

    ```bash wrap lines
    curl --location --request PATCH 'https://$tenant/api/v2/resource-servers/$resource-server-id' \ --header 'Authorization: Bearer $management_access_token' \ --header 'Content-Type: application/json' \ --data-raw '{ "consent_policy": "standard" }'
    ```
  </Tab>
</Tabs>

### Register authorization\_details types

The `type` field determines the customizable object fields. An `authorization_details` array may contain multiple entries of the same `type`.

You must register `authorization_details` types for a resource server, which is similar to registering allowed scopes. The `authorization_details` types must follow these requirements:

* Maximum 5Kb
* Must be valid JSON
* Must be an array of objects
* Maximum of 5 entries in the array
* Every object must have a `type` property (that is pre-registered on the API)
* Maximum of 10 properties per object
* Maximum character length of property names is 255
* Maximum character length of property value is 255
* Maximum of 5 levels of nested objects
* Property names can only contain the following characters: `a-zA-Z0-9_.-`

You can register `authorization_details` types with the [Auth0 Dashboard](https://manage.auth0.com/) or [Management API](https://auth0.com/docs/api/management/v2).

<Tabs>
  <Tab title="Auth0 Dashboard">
    You can add `authorization_details` in the Auth0 Dashboard.

    1. Navigate to [Auth0 Dashboard > Applications > APIs](https://manage.auth0.com/#/apis).
    2. Select the **Permissions** tab.
    3. Under **Add an Authorization Details type**, you can add multiple `authorization_details` types for your resource server. Enter an `authorization_details` type and then select the **+Add** option.

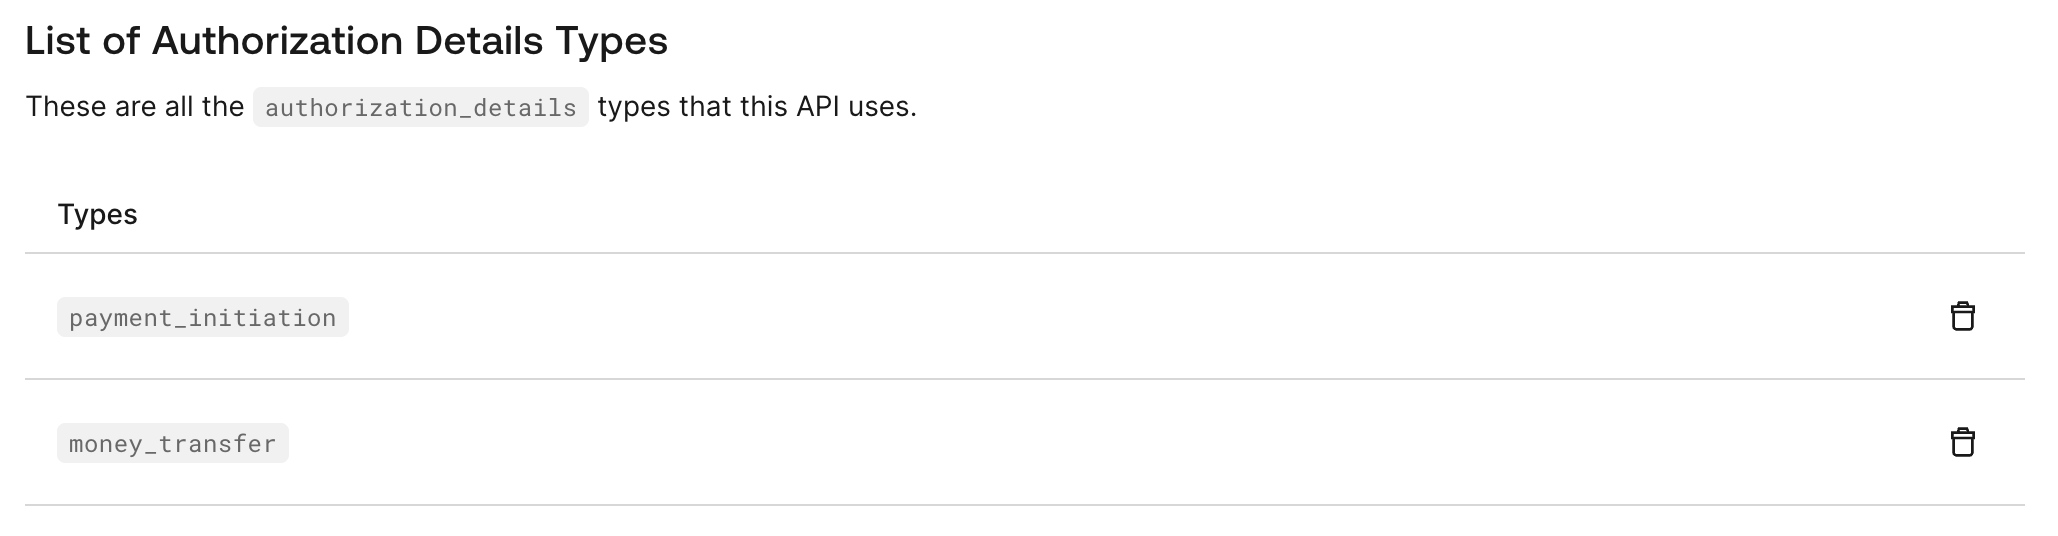
    You can see the `authorization_details` types for your resource server under **List of Authorization Details Types**:

    <Frame>
      <img src="https://mintcdn.com/docs-staging-quickstart-revamp/KCEsvkqT5-VRQ297/images/cdy7uua7fh8z/6qRpmbZiqaU8pSFDuWzUAy/951c827a307791de8df9cecd8f817351/Screenshot_2025-04-07_at_3.45.36_PM.png?fit=max&auto=format&n=KCEsvkqT5-VRQ297&q=85&s=6099fd6a72b7f51f11ae181f1ec3ac84" alt="" width="2058" height="536" data-path="images/cdy7uua7fh8z/6qRpmbZiqaU8pSFDuWzUAy/951c827a307791de8df9cecd8f817351/Screenshot_2025-04-07_at_3.45.36_PM.png" />
    </Frame>
  </Tab>

  <Tab title="Management API">
    To register  `authorization_details` types with the Management API, you need to send a `PATCH` request to the [Update a resource server](https://auth0.com/docs/api/management/v2/resource-servers/patch-resource-servers-by-id) endpoint.

    The following code sample adds the `payment_initiation` and `money_transfer` types under `authorization_details` for a resource server:

    ```bash lines
    curl --location --request PATCH 'https://$tenant/api/v2/resource-servers/$resource-server-id' \
      --header 'Authorization: Bearer $management_access_token' \
      --header 'Content-Type: application/json' \
      --data-raw '{
      "authorization_details": [{"type": "payment_initiation"}, {"type": "money_transfer"}]
      }'
    ```
  </Tab>
</Tabs>

### Create a new resource server with authorization\_details types

The following POST request creates a new resource server with `authorization_details` type `payment_initiation`:

```bash lines
curl --location --request POST 'https://$tenant/api/v2/resource-servers' \
  --header 'Authorization: Bearer $management_access_token' \
  --header 'Content-Type: application/json' \
  --data-raw '{
  "name": "Payments API",
  "identifier": "https://payments.api/",
  "consent_policy": "standard",
  "authorization_details": [{"type": "payment_initiation"}]
  }'
```