> ## Documentation Index
> Fetch the complete documentation index at: https://docs-staging-quickstart-revamp.mintlify.site/llms.txt
> Use this file to discover all available pages before exploring further.
> Guide to implement ACUL for the ID First Login flow
# Build Identifier First Login with Password
You need:
* An Auth0 development tenant configured with [Universal Login](/docs/authenticate/login/auth0-universal-login) and [custom domain](/docs/customize/custom-domains).
* Enable [Identifier First Authentication](/docs/authenticate/login/auth0-universal-login/identifier-first) on your tenant to render the ACUL Login ID screen.
* A development application or an [Auth0 SDK sample application](/docs/quickstart/spa/react/interactive) on `localhost` for Auth0 authentication.
* A [database connection](/docs/authenticate/database-connections) to authenticate users.
* An [Auth0 ACUL sample application](https://github.com/auth0-samples/auth0-acul-samples) to render the ACUL screens.
By the end of this guide, you'll have an identity-first flow with customized Login ID and Login Password screens. To learn more, read the [Getting Started guide](/docs/customize/login-pages/advanced-customizations/getting-started) and visit the [SDK reference guide](/docs/customize/login-pages/advanced-customizations/getting-started/sdk-quickstart).
## Setup
In your Auth0 Dashboard, set up [Universal Login](/docs/authenticate/login/auth0-universal-login/universal-login-vs-classic-login/universal-experience), [Identifier First Authentication](/docs/authenticate/login/auth0-universal-login/identifier-first), and a [Database Connection](/docs/get-started/applications/set-up-database-connections) that uses passwords.
Run a single-page application to build custom login screens. To understand the context for Advanced Customizations interfaces, clone our boilerplate app: `git clone https://github.com/auth0/auth0-acul-react-boilerplate`
Install the [ACUL SDK](/docs/customize/login-pages/advanced-customizations/getting-started/sdk-quickstart). After cloning the react boilerplate, change the directory to the `auth0-acul-react-boilerplate` folder and install the SDK.
```bash lines
# Clone the ACUL sample application into the root folder of your project
git clone https://github.com/auth0-samples/auth0-acul-samples.git
# Change directory to install the ACUL sample application
cd auth0-acul-samples && npm i
```
This example uses [Shadcn components](https://ui.shadcn.com/docs/installation/vite#edit-tsconfigjson-file). Run the `shadcn` init command to set up your project. After answering a few questions to configure `components.json`, begin adding components to your project. Your completed Build Identifier First Login with Password flow will use `button`, l`abel`, `input`, `text`, `link`, `CardHeader`, `CardTitle`, `CardDescription`, and `CardContent` components.
```bash lines
npx shadcn@latest init
npx shadcn@latest add button input label text link card
```
## Step 1. Build the login-id screen
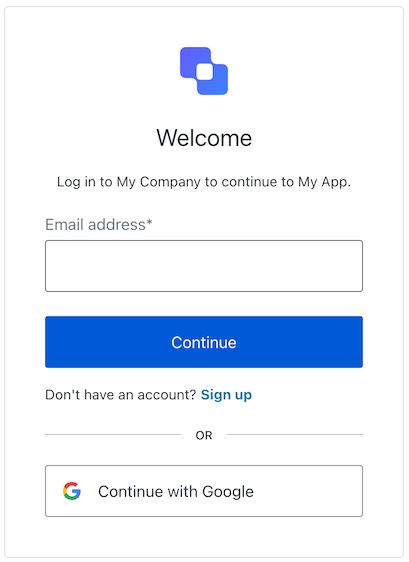
Below is a full sample of the Screen. This example uses [Shadcn components](https://ui.shadcn.com/docs/installation/vite#edit-tsconfigjson-file).
```jsx lines expandable
import { ChangeEvent } from "react";
import { LoginId as ScreenProvider } from "@auth0/auth0-acul-js";
// UI Components
import { Label } from "@/components/ui/label";
import { Input } from "@/components/ui/input";
import { Button } from "@/components/ui/button";
import { Text } from "@/components/ui/text";
import { Link } from "@/components/ui/link";
import {
CardHeader,
CardTitle,
CardDescription,
CardContent,
} from "@/components/ui/card";
export default function LoginId() {
// Initialize the SDK for this screen
const screenProvider = new ScreenProvider();
// Handle the submit action
const formSubmitHandler = (event: ChangeEvent) => {
event.preventDefault();
// grab the value from the form
const identifierInput = event.target.querySelector(
"input#identifier"
) as HTMLInputElement;
// Call the SDK
screenProvider.login({ username: identifierInput?.value });
};
// Render the form
return (
);
}
```
### Import and initialize the SDK
In the `auth0-acul-react-boilerplate/src` folder, create a folder called `screens` and a file called `Login.tsx`. Import the SDK and in the React component initialize the SDK for the screen.
```jsx lines
import { LoginId as ScreenProvider } from "@auth0/auth0-acul-js";
export default function LoginId() {
// Initialize the SDK for this screen
const screenProvider = new ScreenProvider();
...
}
```
### Use the SDK to access properties and methods on the screen
Using the SDK you can access the properties and methods of the screen. The [Auth0 ACUL JS SDK](/docs/customize/login-pages/advanced-customizations/getting-started/sdk-quickstart) provides properties and methods to access the data.
For more information about context data, read Universal Login Context Data.
```jsx lines
...
```
### Call the submit action
Using the SDK, submit the data captured in the screen to the server. The server process this data and will route the user to the next step in the flow. If there are errors, this screen is reloaded, allowing you to display them to the user. Errors are accessed from the SDK.
```javascript lines
const formSubmitHandler = (event: ChangeEvent) => {
event.preventDefault();
// grab the value from the form
const identifierInput = event.target.querySelector(
"input#identifier"
) as HTMLInputElement;
// Call the SDK
screenProvider.loginid({ username: identifierInput?.value });
};
```
## Step 2. Build the login-password screen
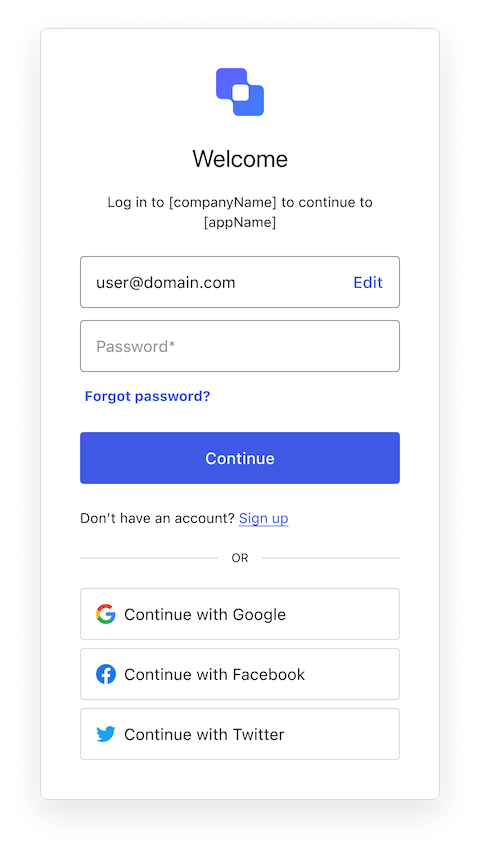
Below is a full sample of the screen.
```jsx lines expandable
import { ChangeEvent } from "react";
import { LoginPassword as ScreenProvider } from "@auth0/auth0-acul-js";
// UI Components
import { Label } from "@/components/ui/label";
import { Input } from "@/components/ui/input";
import { Button } from "@/components/ui/button";
import { Text } from "@/components/ui/text";
import { Link } from "@/components/ui/link";
import {
CardHeader,
CardTitle,
CardDescription,
CardContent,
} from "@/components/ui/card";
export default function LoginPassword() {
// Initialize the SDK for this screen
const screenProvider = new ScreenProvider();
// Handle the submit action
const formSubmitHandler = (event: ChangeEvent) => {
event.preventDefault();
// grab the values from the form
const identifierInput = event.target.querySelector(
"input#identifier"
) as HTMLInputElement;
const passwordInput = event.target.querySelector(
"input#password"
) as HTMLInputElement;
// Call the SDK
screenProvider.login({
username: identifierInput?.value,
password: passwordInput?.value,
});
};
// Render the form
return (
);
}
```
### Import and initialize the SDK
In the `auth0-acul-react-boilerplate/src` folder, create a folder called `screens` and a file called `Login.tsx`. Import the SDK and in the React component initialize the SDK for the screen.
```js lines
import { LoginPassword as ScreenProvider } from "@auth0/auth0-acul-js";
export default function LoginPassword() {
// Initialize the SDK
const [SDK] = useState(() => new ScreenProvider());\
...
}
```
### Use the SDK to access properties and methods on the screen
Using the SDK you can access the properties and methods of the screen. The [Auth0 ACUL JS SDK](/docs/customize/login-pages/advanced-customizations/getting-started/sdk-quickstart) provides properties and methods to access the data.
```jsx lines expandable
Log in as
{screenProvider.screen.data?.username}.
{screenProvider.screen.texts?.editEmailText ?? "Edit Email"}
...
```
### Call the submit action
Using the SDK, submit the data captured in the screen to the server. The server process this data and will route the user to the next step in the flow. If there are errors, this screen is reloaded, allowing you to display them to the user. Errors are accessed from the SDK.
```javascript lines
const formSubmitHandler = (event: ChangeEvent) => {
event.preventDefault();
// grab the values from the form
const identifierInput = event.target.querySelector(
"input#identifier"
) as HTMLInputElement;
const passwordInput = event.target.querySelector(
"input#password"
) as HTMLInputElement;
// Call the SDK
screenProvider.login({
username: identifierInput?.value,
password: passwordInput?.value,
});
};
```
## Step 3. Configure ACUL to use local assets
Use Auth0 CLI, Terraform, or the Management API to enable ACUL. For details about what can be configured, read [Configure ACUL Screens](/docs/customize/login-pages/advanced-customizations/getting-started/configure-acul-screens).
In the root directory of your project, create a `settings` folder and include in it a `{SCREENNAME}.json` file.
```json lines expandable
//settings.json
{
"rendering_mode": "advanced",
"context_configuration": [
"screen.texts"
],
"head_tags": [
{
"attributes": {
"async": true,
"defer": true,
"integrity": [
"ASSET_SHA"
],
"src": "http://127.0.0.1:8080/index.js"
},
"tag": "script"
},
{
"attributes": {
"href": "http://127.0.0.1:8080/index.css",
"rel": "stylesheet"
},
"tag": "link"
}
]
}
```
Enable ACUL with Auth0 CLI:
```bash wrap lines
auth0 ul customize --rendering-mode advanced --prompt {SCREENNAME} --screen {SCREENNAME} --settings-file ./settings/{SCREENNAME}.json
```
In the root directory of your project, create a `login-id.json` file:
```json lines expandable
//login-id.json
{
"rendering_mode": "advanced",
"context_configuration": [
"screen.texts"
],
"head_tags": [
{
"attributes": {
"async": true,
"defer": true,
"integrity": [
"ASSET_SHA"
],
"src": "http://127.0.0.1:8080/index.js"
},
"tag": "script"
},
{
"attributes": {
"href": "http://127.0.0.1:8080/index.css",
"rel": "stylesheet"
},
"tag": "link"
}
]
}
```
Enable ACUL with Auth0 Terraform
```yaml lines
prompts:
identifier_first: true
universal_login_experience: classic
mfa-login-options:
pageTitle: 'Log in to ${clientName}'
authenticatorNamesSMS: 'SMS'
screenRenderers:
- login-id:
login-id: ./prompts/screenRenderSettings/login-id.json
```
You can use Auth0 Management API to enable ACUL
```bash lines expandable
curl --location --request PATCH 'https://{YOUR-CUSTOM-DOMAIN}/api/v2/prompts/{YOUR-PROMPT}/screen/{YOUR-SCREEN}/rendering' \
--header 'Content-Type: application/json' \
--header 'Authorization: Bearer ' \
--data '{
"rendering_mode": "advanced",
"context_configuration": [
"branding.settings",
"organization.branding",
"screen.texts",
"tenant.name",
"tenant.friendly_name",
"tenant.enabled_locales",
"untrusted_data.submitted_form_data",
"untrusted_data.authorization_params.ui_locales",
"untrusted_data.authorization_params.login_hint",
"untrusted_data.authorization_params.screen_hint"
],
"head_tags": [
{
"tag": "script",
"attributes": {
"src": "http://127.0.0.1:8080/index.js",
"defer": true
}
},
{
"tag": "link",
"attributes": {
"rel": "stylesheet",
"href": "http://127.0.0.1:8080/index.css"
}
},
{
"tag": "meta",
"attributes": {
"name": "viewport",
"content": "width=device-width, initial-scale=1"
}
}
]
}'
```
### Test your configuration on a local server
ACUL requires assets to be hosted on a public URL. Run a local server and test your assets before deploying them.
```bash lines
# Creates the local assets
npm run build
cd dist
# Serves the assets from localhost
npx serve -p 8080 --cors
```
## Step 4: Deploy the assets and update your tenant configuration
Advanced Customization for Universal Login works with all modern Javascript bundlers. like Vite and Webpack. For more information, read [Deploy and Host Advanced Customizations](/docs/customize/login-pages/advanced-customizations/getting-started/deploy-and-host-advanced-customizations).
For more information about deploying ACUL to your tenant, read [Configure ACUL Screens.](/docs/customize/login-pages/advanced-customizations/getting-started/configure-acul-screens)
## Related content
 Below is a full sample of the Screen. This example uses [Shadcn components](https://ui.shadcn.com/docs/installation/vite#edit-tsconfigjson-file).
 Below is a full sample of the screen.