> ## Documentation Index
> Fetch the complete documentation index at: https://docs-staging-quickstart-revamp.mintlify.site/llms.txt
> Use this file to discover all available pages before exploring further.

> Learn how to install the Auth0 Single Sign-On (SSO) Dashboard Extension to enable SSO login for your applications.

# Install Single Sign-On Dashboard Extension

<Card title="Before you start">
  1. [Create an SSO Dashboard application](/docs/customize/extensions/single-sign-on-dashboard-extension/create-sso-dashboard-application) in Auth0.
  2. Copy the **Client ID** value of your SSO Dashboard application.
</Card>

Use the <Tooltip tip="Single Sign-On (SSO): Service that, after a user logs into one applicaton, automatically logs that user in to other applications." cta="View Glossary" href="/docs/glossary?term=Single+Sign-On">Single Sign-On</Tooltip> (SSO) Dashboard Extension to manage SSO login for your users on multiple enterprise applications. To learn more, [view this extension on GitHub](https://github.com/auth0-extensions/auth0-sso-dashboard-extension).

## Install extension

You can install the SSO Dashboard extension through the <Tooltip tip="Auth0 Dashboard: Auth0's main product to configure your services." cta="View Glossary" href="/docs/glossary?term=Auth0+Dashboard">Auth0 Dashboard</Tooltip>:

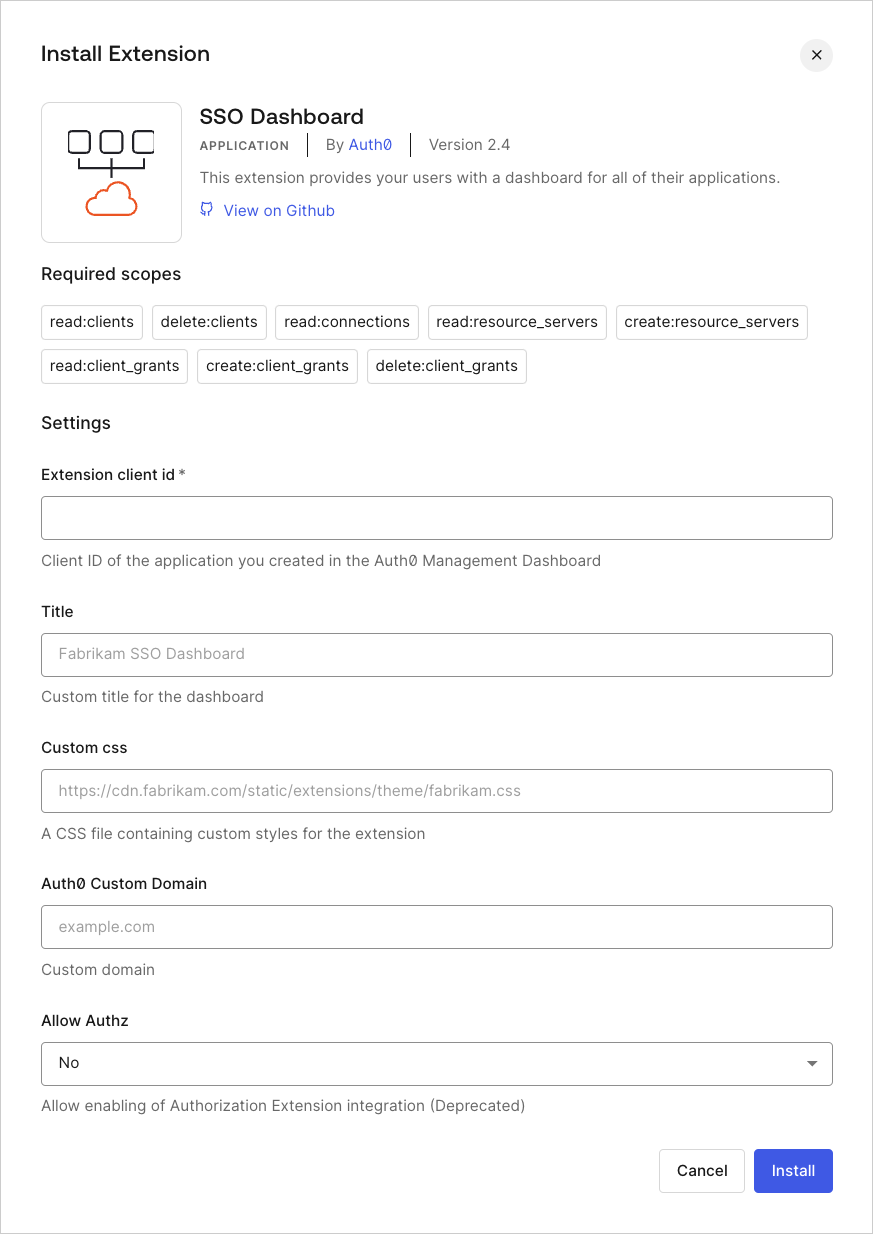
1. Go to [Auth0 Dashboard > Extensions](https://manage.auth0.com/#/extensions), and select **SSO Dashboard** from the list of provided extensions. The **Install Extension** window will open:

   <Frame>
     <img src="https://mintcdn.com/docs-staging-quickstart-revamp/KCEsvkqT5-VRQ297/images/cdy7uua7fh8z/75heEyuJAN6FGSszXx06Hm/1cf10550c770beb56731285709442afb/SSO_Extension_-_EN.png?fit=max&auto=format&n=KCEsvkqT5-VRQ297&q=85&s=eb116677496333aaf79e9d36a5d0ac1b" alt="Dashboard - Extensions - SSO Dashboard - Install Extension" width="873" height="1234" data-path="images/cdy7uua7fh8z/75heEyuJAN6FGSszXx06Hm/1cf10550c770beb56731285709442afb/SSO_Extension_-_EN.png" />
   </Frame>
2. Set the following configuration variables:

   <table class="table">
     <thead>
       <tr>
         <th><strong>Variable</strong></th>
         <th><strong>Required</strong></th>
         <th><strong>Description</strong></th>
       </tr>
     </thead>

     <tbody>
       <tr>
         <td><code>EXTENSION\_CLIENT\_ID</code></td>
         <td>Required</td>
         <td><strong>Client ID</strong> of the Auth0 application you created for the extension.</td>
       </tr>

       <tr>
         <td><code>TITLE</code></td>
         <td>Optional</td>
         <td>Custom title that will appear at the top of the SSO Dashboard page.</td>
       </tr>

       <tr>
         <td><code>CUSTOM\_CSS</code></td>
         <td>Optional</td>
         <td>Path to a custom CSS file to style the look of your SSO Dashboard page.</td>
       </tr>

       <tr>
         <td><code>FAVICON\_PATH</code></td>
         <td>Optional</td>
         <td>Path to a custom favicon.</td>
       </tr>

       <tr>
         <td><code>AUTH0\_CUSTOM\_DOMAIN</code></td>
         <td>Optional</td>
         <td><a href="/docs/customize/custom-domains">Custom domain</a> configured with Auth0.</td>
       </tr>
     </tbody>
   </table>

   <Callout icon="file-lines" color="#0EA5E9" iconType="regular">
     Setting the `AUTH0_CUSTOM_DOMAIN` variable does not affect the extension URL, it only changes the URL of the Authorization Endpoint used by the extension. When a custom domain is used, users that log in to the extension will be redirected to `https://{yourAuth0CustomDomain}/login` instead of the default `https://{yourTenant}.{yourRegion}.auth0.com/login`.
   </Callout>
3. Select **Install**.

If you navigate to [Auth0 Dashboard > Applications > Applications](https://manage.auth0.com/#/applications), you'll notice that an application named `auth0-sso-dashboard` was created automatically. This application is used by the extension to authorize access to the <Tooltip tip="Management API: A product to allow customers to perform administrative tasks." cta="View Glossary" href="/docs/glossary?term=Management+API">Management API</Tooltip>, and you must not modify it.

## Use extension

1. Go to [Auth0 Dashboard > Extensions](https://manage.auth0.com/#/extensions), and select the **Installed Extensions** view.
2. Select **SSO Dashboard**. When you first select your installed extension, you will be asked to grant it the required permissions. Once you agree, you will be directed to your custom **SSO Dashboard**, which will display the **Title** you provided at the top of the page. If you provided a custom CSS file, that styling will also be applied.
3. To log in to the SSO Dashboard:

   1. For **Admins,** use:
      `https://{yourTenant}.YOUR_REGION_KEY.webtask.io/auth0-sso-dashboard/admins/login`
   2. For **Users,** use:
      `https://{yourTenant}.YOUR_REGION_KEY.webtask.io/auth0-sso-dashboard/login`

      <table class="table">
        <thead>
          <tr>
            <th><strong>Region</strong></th>
            <th><strong>Region Domain</strong></th>
          </tr>
        </thead>

        <tbody>
          <tr>
            <td>US-1</td>
            <td>us.webtask.io</td>
          </tr>

          <tr>
            <td>US-3</td>
            <td>us.webtask.run</td>
          </tr>

          <tr>
            <td>US-4</td>
            <td>us.webtask.run</td>
          </tr>

          <tr>
            <td>US-5</td>
            <td>us.webtask.run</td>
          </tr>

          <tr>
            <td>EU</td>
            <td>eu.webtask.io</td>
          </tr>

          <tr>
            <td>EU-2</td>
            <td>eu.webtask.run</td>
          </tr>

          <tr>
            <td>AU</td>
            <td>au.webtask.io</td>
          </tr>

          <tr>
            <td>JP-1</td>
            <td>jp.webtask.run</td>
          </tr>

          <tr>
            <td>UK-1</td>
            <td>uk.webtask.run</td>
          </tr>

          <tr>
            <td>CA-1</td>
            <td>ca.webtask.run</td>
          </tr>
        </tbody>
      </table>

## Learn more

* [Create Single Sign-on (SSO) Dashboard Application](/docs/customize/extensions/single-sign-on-dashboard-extension/create-sso-dashboard-application)
* [Add Applications to Single Sign-On Dashboard](/docs/customize/extensions/single-sign-on-dashboard-extension/add-applications-to-the-sso-dashboard)
* [Update Applications in the SSO Dashboard](/docs/customize/extensions/single-sign-on-dashboard-extension/update-applications-on-the-sso-dashboard)
* [Troubleshoot Extensions](/docs/troubleshoot/integration-extensibility-issues/troubleshoot-extensions)
* [Configure Session Lifetime Settings](/docs/manage-users/sessions/configure-session-lifetime-settings)
* [Logout](/docs/authenticate/login/logout)
