> ## Documentation Index
> Fetch the complete documentation index at: https://docs-staging-quickstart-revamp.mintlify.site/llms.txt
> Use this file to discover all available pages before exploring further.
> Learn how to set up a code-based custom email provider.
# Configure a Custom Email Provider
You can set up any email provider using a custom email provider. It leverages our [Actions Code Editor](/docs/customize/actions/actions-overview) to deliver messages to email providers that are not supported by the default email provider. It also gives you full control over the email delivery process, such as for the following use cases:
* Retrying failures
* Changing recipient(s)
* Changing message payload
* Creating Organization-specific logic
You can configure a custom email provider using the Auth0 Dashboard.
## Configure Custom Email Provider with the Auth0 Dashboard
1. Go to [Auth0 Dashboard > Branding > Email Provider](https://manage.auth0.com/#/templates/provider).
2. Enable the **Use my own email provider** toggle.
3. In the **Email Provider** Section, select **Custom Provider**.
4. In the **From** field, enter the default email address from which emails are sent.
5. In the code editor, add the appropriate Action code to deliver messages to your custom email provider. Consult with your provider's documentation to understand how to deliver messages to their API. Like other Actions, use the [Management API](https://auth0.com/docs/api/management/v2/actions/get-actions) to manage the Action and its [versions](/docs/customize/actions/manage-versions).
6. On the left-hand menu, click the key to add any required [secrets](/docs/customize/actions/write-your-first-action) to authenticate with the API.
7. On the left-hand menu, click the box to add any dependencies.
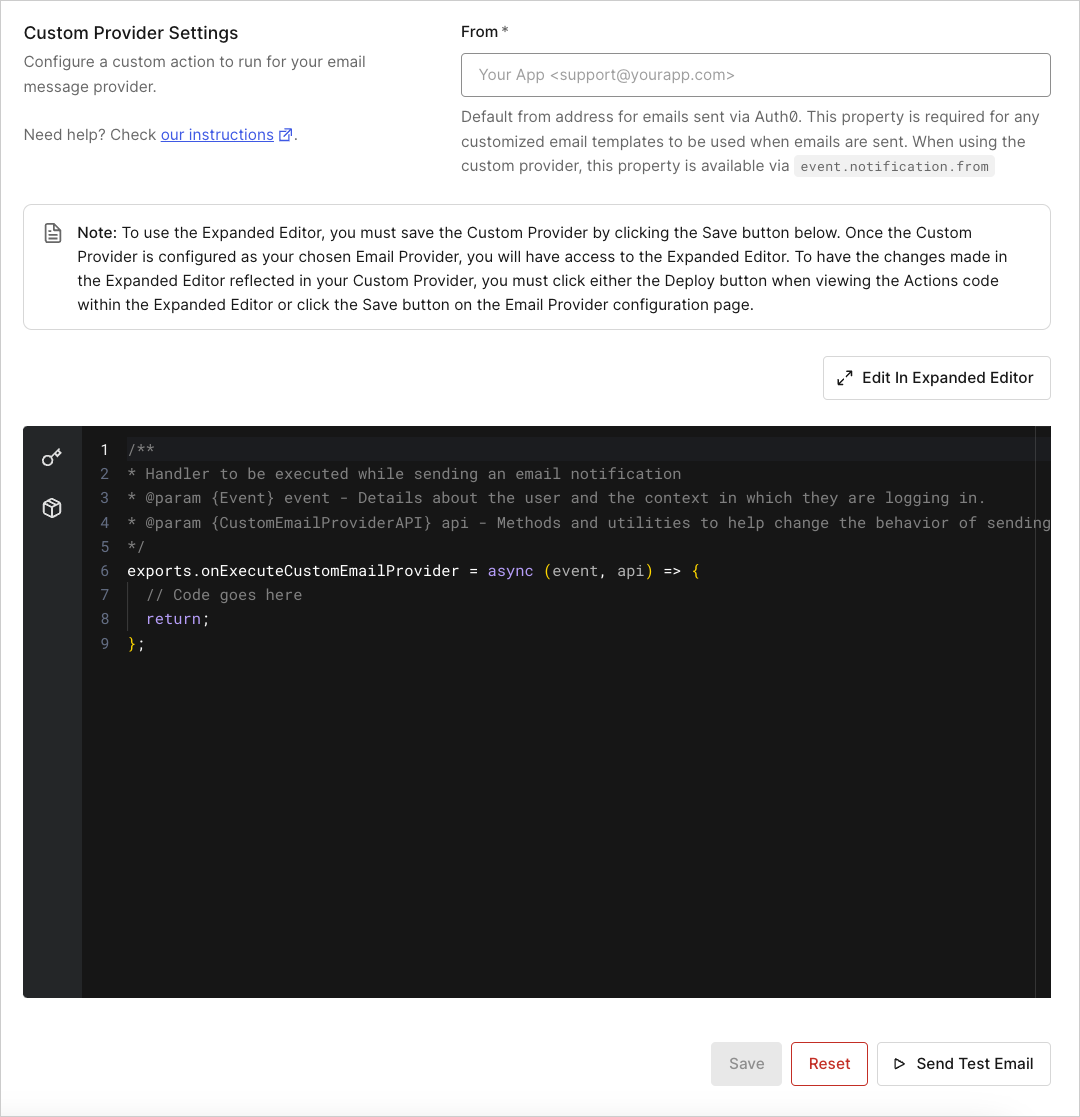 To use the Expanded Editor, you must first save your custom email provider configuration.
8. Click **Edit in Expanded Editor**. In the Expanded Editor, you can add secrets, dependencies, and test your Action. You can also access the Version History of previously deployed Actions. To learn more about how to write a `custom-email-provider` Action, read [Example custom-email-provider Action](#example-custom-email-provider-action).
To use the Expanded Editor, you must first save your custom email provider configuration.
8. Click **Edit in Expanded Editor**. In the Expanded Editor, you can add secrets, dependencies, and test your Action. You can also access the Version History of previously deployed Actions. To learn more about how to write a `custom-email-provider` Action, read [Example custom-email-provider Action](#example-custom-email-provider-action).
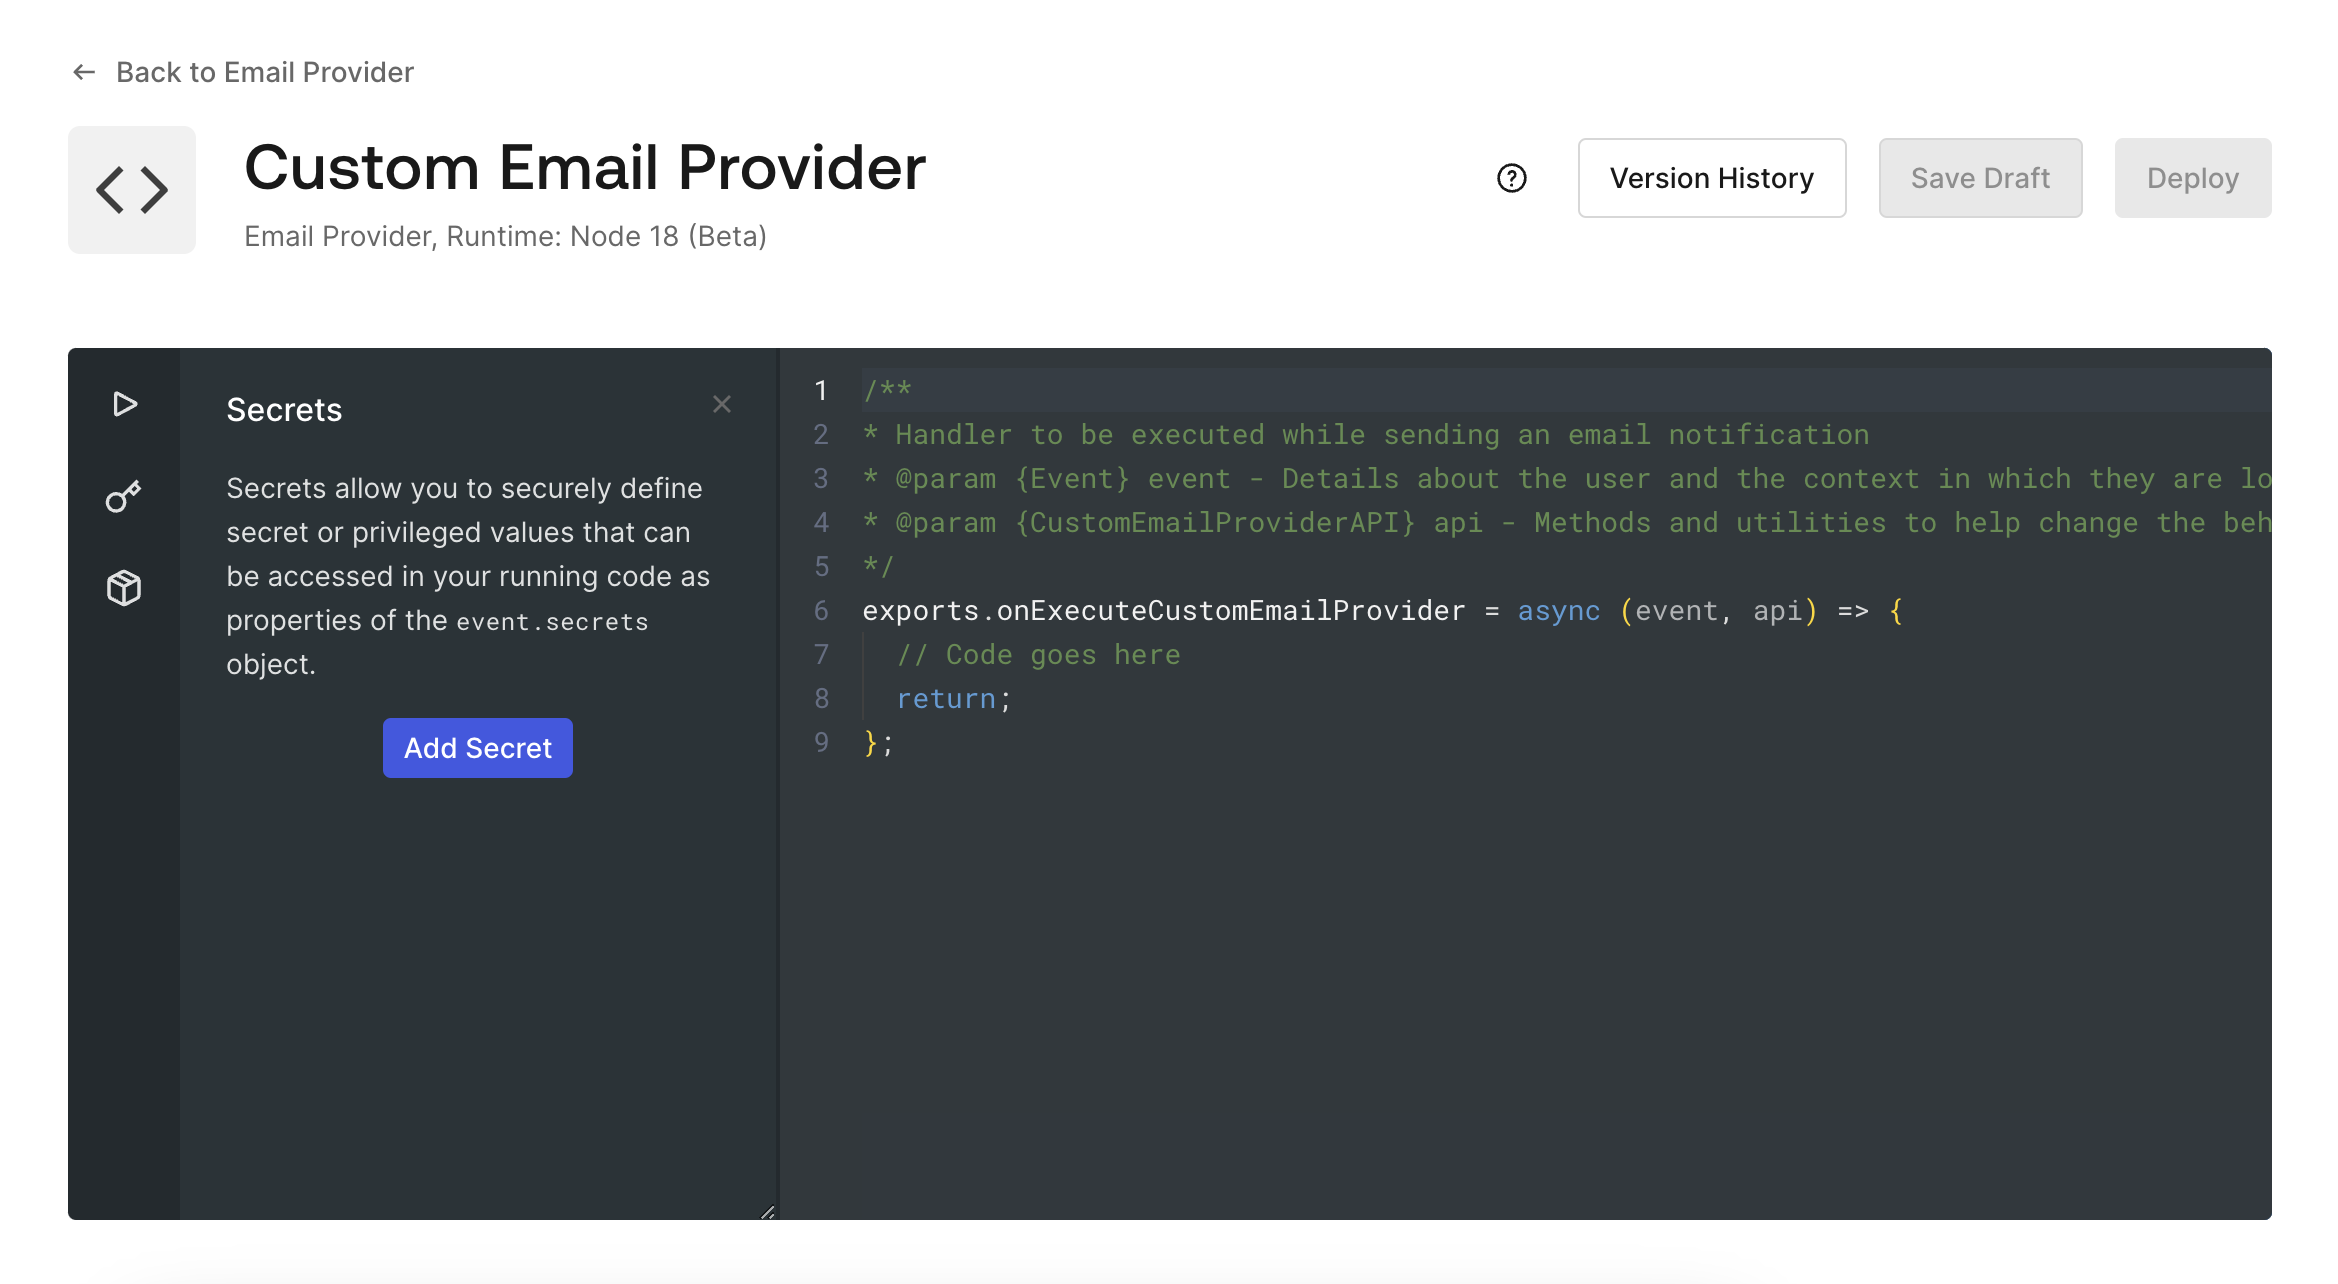 9. To deploy your action, click **Deploy** in the top right corner of the Expanded Editor.
10. Click **Back to Email Provider** in the top left corner of the Expanded Editor. You should see a green check and **Enabled** in the **Provider Configuration** section.
11. Click **Save** to finalize your custom email provider configuration. When you click **Save**, your Action is automatically saved and deployed.
12. To test your custom email provider configuration before using it in a production environment, click **Send Test Email**. You cannot send a test email until after you save your custom email provider configuration.
All Actions are subject to the same [limitations](/docs/customize/actions/limitations).
## Remove the Action
If you want to remove the Action, first disable **Custom Email Provider** in [Auth0 Dashboard > Branding > Email Provider](https://manage.auth0.com/#/templates/provider) before deleting the Action to prevent accidental email delivery failures.
## Example custom-email-provider Action
In the following code sample, when the `onExecuteCustomEmailProvider` function is triggered to send an email notification, it takes in two arguments:
1. `event`: contains information about the user and the context of the notification. To learn more, read [Action Triggers: custom-email-provider Event Object](/docs/customize/email/configure-a-custom-email-provider/action-triggers-custom-email-provider-event-object).
2. `api`: provides helper methods for custom behavior while sending notifications. To learn more, read [Action Triggers: custom-email-provider API Object](/docs/customize/email/configure-a-custom-email-provider/action-triggers-custom-email-provider-api-object).
In the code editor, use the left-hand menu to add an `api_key` secret and `event` dependency.
```javascript lines expandable
/**
* Handler to be executed while sending an email notification.
* @param {Event} event - Details about the user and the context in which they are logging in.
* @param {CustomEmailProviderAPI} api - Methods and utilities to help change the behavior of sending an email notification.
*/
exports.onExecuteCustomEmailProvider = async (event, api) => {
// Define the email payload
const emailPayload = {
from: {
name: "Test Sender",
email: "sender@example.com"
},
to: [{ email: event.user.email }],
subject: event.notification.message_type,
html: event.notification.html,
text: event.notification.text,
};
try {
// Make the API call to send the email
const response = await fetch('https://api.example.com/send-email', {
method: 'POST',
headers: {
'Authorization': `Bearer ${event.secrets.api_key}`,
'Content-Type': 'application/json',
},
body: JSON.stringify(emailPayload),
});
if (response.ok) {
console.log('Email sent successfully');
} else if (response.status >= 500) {
api.notification.retry(
`Internal Server Error received from Messaging Proxy. Status code: ${response.status}.`
);
return;
}
} catch (error) {
console.error(`Error sending email: ${error.message}`);
api.notification.drop(`An unexpected error occurred. Error: ${error.message}`);
}
return;
};
```
To learn more about writing and deploying Actions, read [Write Your First Action](/docs/customize/actions/write-your-first-action).
9. To deploy your action, click **Deploy** in the top right corner of the Expanded Editor.
10. Click **Back to Email Provider** in the top left corner of the Expanded Editor. You should see a green check and **Enabled** in the **Provider Configuration** section.
11. Click **Save** to finalize your custom email provider configuration. When you click **Save**, your Action is automatically saved and deployed.
12. To test your custom email provider configuration before using it in a production environment, click **Send Test Email**. You cannot send a test email until after you save your custom email provider configuration.
All Actions are subject to the same [limitations](/docs/customize/actions/limitations).
## Remove the Action
If you want to remove the Action, first disable **Custom Email Provider** in [Auth0 Dashboard > Branding > Email Provider](https://manage.auth0.com/#/templates/provider) before deleting the Action to prevent accidental email delivery failures.
## Example custom-email-provider Action
In the following code sample, when the `onExecuteCustomEmailProvider` function is triggered to send an email notification, it takes in two arguments:
1. `event`: contains information about the user and the context of the notification. To learn more, read [Action Triggers: custom-email-provider Event Object](/docs/customize/email/configure-a-custom-email-provider/action-triggers-custom-email-provider-event-object).
2. `api`: provides helper methods for custom behavior while sending notifications. To learn more, read [Action Triggers: custom-email-provider API Object](/docs/customize/email/configure-a-custom-email-provider/action-triggers-custom-email-provider-api-object).
In the code editor, use the left-hand menu to add an `api_key` secret and `event` dependency.
```javascript lines expandable
/**
* Handler to be executed while sending an email notification.
* @param {Event} event - Details about the user and the context in which they are logging in.
* @param {CustomEmailProviderAPI} api - Methods and utilities to help change the behavior of sending an email notification.
*/
exports.onExecuteCustomEmailProvider = async (event, api) => {
// Define the email payload
const emailPayload = {
from: {
name: "Test Sender",
email: "sender@example.com"
},
to: [{ email: event.user.email }],
subject: event.notification.message_type,
html: event.notification.html,
text: event.notification.text,
};
try {
// Make the API call to send the email
const response = await fetch('https://api.example.com/send-email', {
method: 'POST',
headers: {
'Authorization': `Bearer ${event.secrets.api_key}`,
'Content-Type': 'application/json',
},
body: JSON.stringify(emailPayload),
});
if (response.ok) {
console.log('Email sent successfully');
} else if (response.status >= 500) {
api.notification.retry(
`Internal Server Error received from Messaging Proxy. Status code: ${response.status}.`
);
return;
}
} catch (error) {
console.error(`Error sending email: ${error.message}`);
api.notification.drop(`An unexpected error occurred. Error: ${error.message}`);
}
return;
};
```
To learn more about writing and deploying Actions, read [Write Your First Action](/docs/customize/actions/write-your-first-action).