> ## Documentation Index
> Fetch the complete documentation index at: https://docs-staging-quickstart-revamp.mintlify.site/llms.txt
> Use this file to discover all available pages before exploring further.

> Walkthrough for Okta WIC Connection Setup via SAML SCIM

# Inbound SCIM for Okta Workforce SAML Connections

<Card title="Before you start">
  Create a [SAML Connection](/docs/authenticate/identity-providers/enterprise-identity-providers/saml) in your Auth0 tenant and [connect it to a corresponding custom SAML application](https://help.okta.com/en-us/content/topics/apps/apps_app_integration_wizard_saml.htm) in your Okta Workforce Identity Dashboard.
</Card>

This section describes how to configure a custom <Tooltip tip="Security Assertion Markup Language (SAML): Standardized protocol allowing two parties to exchange authentication information without a password." cta="View Glossary" href="/docs/glossary?term=SAML">SAML</Tooltip> and SCIM app integration in an Okta Workforce Identity tenant, which can be used to provision users to your Auth0 SCIM endpoint.

### Configure SCIM settings in Auth0

1. Launch the [Auth0 Dashboard](https://manage.auth0.com/#/) and go to **Authentication > Enterprise > SAML > \[Connection] > Provisioning.**

2. Disable **Sync user profile attributes at each login** unless you want to [sync additional attributes at login](/docs/authenticate/protocols/scim/configure-inbound-scim).

3. In the same section, enable **Sync user profiles using SCIM**.

4. Under the **Mapping** tab, ensure the **SCIM attribute containing the User ID** setting is set to **userName**.

5. Review the **Additional Mappings** to ensure the extended SCIM attributes are mapped to your preferred Auth0 attributes, reviewing [attribute mapping](/docs/authenticate/protocols/scim/configure-inbound-scim#attribute-mapping) for details. If you receive phone numbers and physical addresses, note that Okta Workforce sends these as `phoneNumbers[primary eq true].value` and `addresses[primary eq true].*` by default.

6. Map the SCIM `userName` attribute to the Auth0 `email` attribute so Okta can [find and match existing users](https://developer.okta.com/docs/reference/scim/scim-20/#create-users) if this connection has already been deployed to production using the email address as the login ID and no Auth0 `username` attribute is set on the existing user profiles. In **Additional Mappings** find the following attribute pair:

   ```json lines
   {
       "scim": "userName",
       "auth0": "username"
     }
   ```

   Replace it with the one below, then remove the mapping to `emails[primary eq true].value`.

   ```json lines
   {
       "scim": "userName",
       "auth0": "email"
     }
   ```

7. Choose **Save Changes.**

### Retrieve SCIM endpoint URL and token

1. In the Auth0 dashboard, browse to the SCIM **Setup** tab and copy the **SCIM Endpoint URL,** then paste it somewhere safe.
2. Select **Generate New Token** and set an optional expiration date for the token. You can optionally select the scopes you want to grant to Okta Workforce; the default scopes used by Okta Workforce are `get:users`, `post:users`, and `put:users`.

### Configure SCIM in Okta Workforce for SAML Apps

1. Go to your Okta Workforce Identity SAML application, select the **General** tab, then choose **Edit** for **App Settings.**

2. In the **Provisioning** section, select **SCIM** and then **Save**.

3. Under the **General** tab, also confirm that [Federation Broker Mode](https://help.okta.com/en-us/content/topics/apps/apps-fbm-main.htm) is disabled.

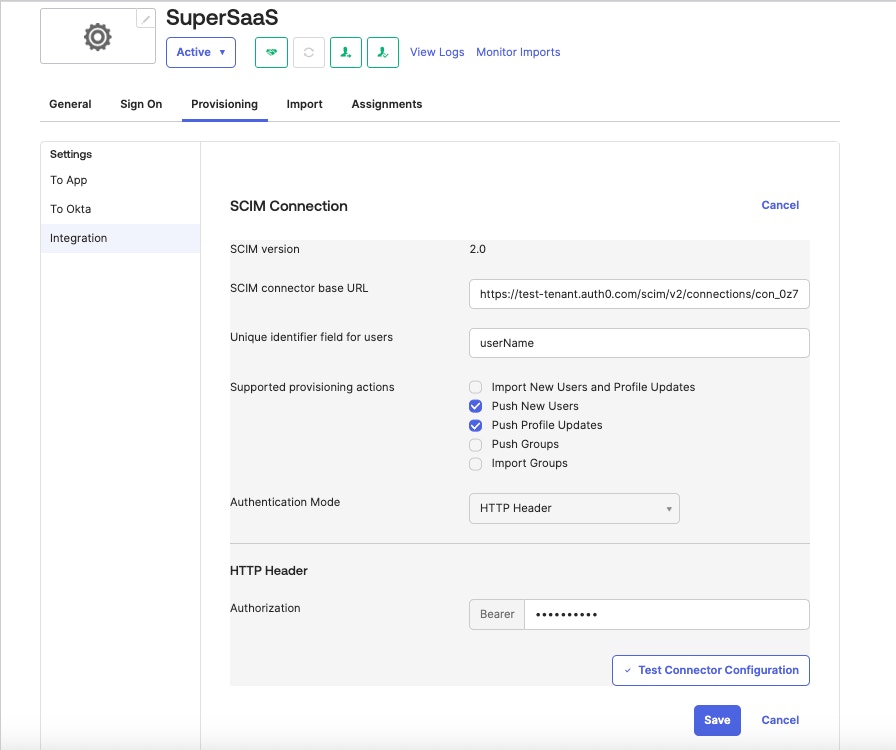
4. Select the **Provisioning** tab, then go to **Integration** tab and select **Edit**.

5. Enter the **SCIM Endpoint URL** value you copied earlier into the **SCIM connector base URL** section.

6. For **Unique identifier field for users**, enter **userName**.

7. Under **Supported provisioning actions**, select `Push New Users` and `Push Profile Updates`, then choose **HTTP Header** as the **Authentication Mode.**

8. Paste the SCIM token into the **Authorization** field, then choose **Test Connection Configuration** if you want to test the new connection. Select **Save**.

   <Frame>
     <img src="https://mintcdn.com/docs-staging-quickstart-revamp/TYcLtS8UbiQUCV_p/images/cdy7uua7fh8z/4kEFIeW8qbRqGb46KYuXJH/067213e99fbca35baab9bb104d1047f3/supersaas.jpg?fit=max&auto=format&n=TYcLtS8UbiQUCV_p&q=85&s=6bc3351ae5ae4682a9a49adb7560f47e" alt="Inbound SCIM WIC Configuration" width="896" height="750" data-path="images/cdy7uua7fh8z/4kEFIeW8qbRqGb46KYuXJH/067213e99fbca35baab9bb104d1047f3/supersaas.jpg" />
   </Frame>

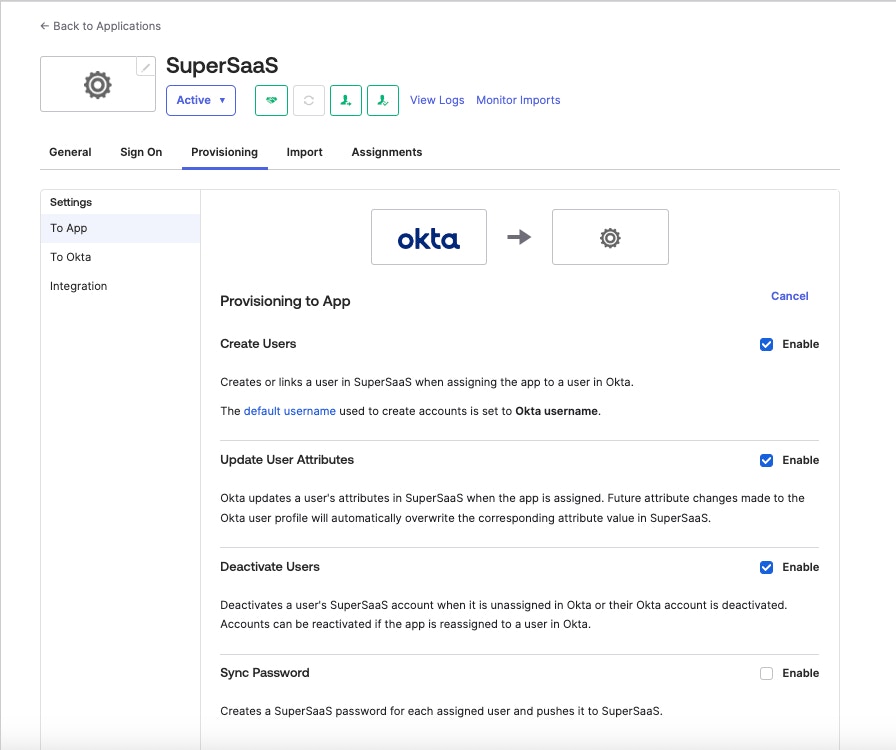
9. Browse to **Provisioning > Settings > To App** and choose **Edit,** then enable the **Create Users, Update User Attributes,** and **Deactivate users** operations. Select **Save**.
   <Frame>
     <img src="https://mintcdn.com/docs-staging-quickstart-revamp/R8rXfTj95YBIEuC2/images/cdy7uua7fh8z/4RXROJ4amD4TpY3ozDg6wV/03c11b7ea8354a033b64d2df4f6360be/supersaasprovisioning.jpg?fit=max&auto=format&n=R8rXfTj95YBIEuC2&q=85&s=8d5583c86dce8ca225e6e19c80ade4f6" alt="" width="896" height="750" data-path="images/cdy7uua7fh8z/4RXROJ4amD4TpY3ozDg6wV/03c11b7ea8354a033b64d2df4f6360be/supersaasprovisioning.jpg" />
   </Frame>

10. Under the **Attribute Mappings** section, use the **X** button to **delete** the following lines:

<table class="table">
  <thead>
    <tr>
      <th>Attribute</th>
      <th>Value</th>
    </tr>
  </thead>

  <tbody>
    <tr>
      <td>Primary email type</td>
      <td><code>(user.email != null && user.email != '') ? 'work' : ‘'</code></td>
    </tr>

    <tr>
      <td>Primary phone type</td>
      <td><code>(user.primaryPhone != null && user.primaryPhone != '') ? 'work' : ‘'</code></td>
    </tr>

    <tr>
      <td>Address type</td>
      <td><code>(user.streetAddress != null && user.streetAddress != '') ? 'work' : ‘'</code></td>
    </tr>
  </tbody>
</table>

Use the **Attribute Mappings** section to configure any additional SCIM attributes you want Okta WIC to send to your SCIM endpoint. If you add custom attributes, they must include a valid SCIM 2.0 external namespace property. For more information on external namespaces, read [Okta's help section](https://support.okta.com/help/s/article/Receiving-Invalid-externalNamespace-task-error-when-assigning-a-user-to-a-SCIMenabled-application).

You can now test user provisioning in the **Assignments** tab and test update operations by editing the user attributes in the **Directory > People** section of your Okta admin portal.
