> ## Documentation Index
> Fetch the complete documentation index at: https://docs-staging-quickstart-revamp.mintlify.site/llms.txt
> Use this file to discover all available pages before exploring further.

> Learn how to connect your app to Google Workspace using an enterprise connection.

# Connect Your App to Google Workspace

<Card title="Using Google Social and Enterprise Connections">
  If you have an existing [Google Social Connection](https://marketplace.auth0.com/integrations/google-social-connection) for your application and you create a new Google Workspace connection for the same domain, users affiliated with the social connection with now be logged in with the new enterprise connection. This will occur regardless of whether you enable the Google Workspace enterprise connection.
</Card>

## Prerequisites

Before you begin:

* [Register your Application with Auth0](/docs/get-started/auth0-overview/create-applications).

  * Select an appropriate **Application Type**.
  * Add an **Allowed Callback URL** of **`{https://yourApp/callback}`**.
  * Make sure your Application's [Grant Types](/docs/get-started/applications/update-grant-types) include the appropriate flows.

## Steps

To connect your application to Google Workspace, you must:

1. [Set up your app in Google](#set-up-your-app-in-google)
2. [Create an enterprise connection in Auth0](#create-an-enterprise-connection-in-auth0)
3. [Enable the enterprise connection for your Auth0 Application](#enable-the-enterprise-connection-for-your-auth0-application)
4. [Test the connection](#test-the-connection)

<Card title="Google Workspace account">
  Before proceeding, you will need a valid Google Workspace account and must have **your own** Google Workspace Organization for which you are an administrator.
</Card>

## Set up your app in Google

To allow users to log in using Google Workspace, you must register your application in the Google developer console.

<Warning>
  Before proceeding, you must have already set up **your own** Google Workspace Organization for which you are an administrator.
</Warning>

### Register a new application

To learn how to register a new application with Google, follow Google's [Setting up OAuth 2.0](https://support.google.com/googleapi/answer/6158849) doc. During this process, Google will generate a **<Tooltip tip="Client ID: Identification value given to your registered resource from Auth0." cta="View Glossary" href="/docs/glossary?term=Client+ID">Client ID</Tooltip>** and **<Tooltip tip="Client ID: Identification value given to your registered resource from Auth0." cta="View Glossary" href="/docs/glossary?term=Client+Secret">Client Secret</Tooltip>** for your application; make note of these.

While setting up your app, be sure to use these settings:

* On the **<Tooltip tip="OAuth 2.0: Authorization framework that defines authorization protocols and workflows." cta="View Glossary" href="/docs/glossary?term=OAuth">OAuth</Tooltip> consent screen**, under **Authorized domains**, add `auth0.com`.
* When asked to select an application type, choose **Web application** and set the following parameters:

<table class="table">
  <thead>
    <tr>
      <th>Field</th>
      <th>Description</th>
    </tr>
  </thead>

  <tbody>
    <tr>
      <td>Name</td>
      <td>The name of your application.</td>
    </tr>

    <tr>
      <td>Authorized JavaScript origins</td>
      <td>`https://{yourDomain}`</td>
    </tr>

    <tr>
      <td>Authorized redirect URIs</td>
      <td>`https://{yourDomain}/login/callback`</td>
    </tr>
  </tbody>
</table>

<Card title="Find your Auth0 domain name for redirects">
  If your Auth0 domain name is not shown above and you are not using our [custom domains](/docs/customize/custom-domains) feature, your domain name is a concatenation of your tenant name, your regional subdomain, and `auth0.com`, separated by the dot (`.`) symbol.

  For example, if your tenant name is `exampleco-enterprises`, and your tenant is in the US region, your Auth0 domain name would be `exampleco-enterprises.us.auth0.com` and your **Redirect URI** would be `https://exampleco-enterprises.us.auth0.com/login/callback`.

  However, if your tenant is in the US region and was created before June 2020, then your Auth0 domain name would be `exampleco-enterprises.auth0.com` and your **Redirect URI** would be `https://exampleco-enterprises.auth0.com/login/callback`.

  If you are using [custom domains](/docs/customize/custom-domains), your **Redirect URI** would be `https://<YOUR CUSTOM DOMAIN>/login/callback`.
</Card>

<Warning>
  If your application requests sensitive OAuth scopes, it may be [subject to review by Google](https://developers.google.com/apps-script/guides/client-verification).
</Warning>

### Enable the Admin SDK Service

If you plan to connect to Google Workspace enterprise domains, you need to enable the **Admin SDK Service**. To learn how, follow Google's [Enable and disable APIs](https://support.google.com/googleapi/answer/6158841) doc.

## Create an enterprise connection in Auth0

<Warning>
  The Google Enterprise connection allows Auth0 user profiles to have up to 200 groups. If a user profile has more than 200 groups, these results may not be shown.

  Google Workspace does not enforce group name uniqueness. To access extended group properties, such as unique IDs and email addresses, review the [Using Identity Provider Tokens from Google](#use-identity-provider-tokens-from-google) section below. If you use Google groups for authorization, you must secure the workspace to prevent unauthorized users from modifying groups.
</Warning>

Next, you will need to create and configure a Google Workspace Enterprise Connection in Auth0. Make sure you have the **Client ID** and **Client Secret** generated when you set up your app in the Google developer console.

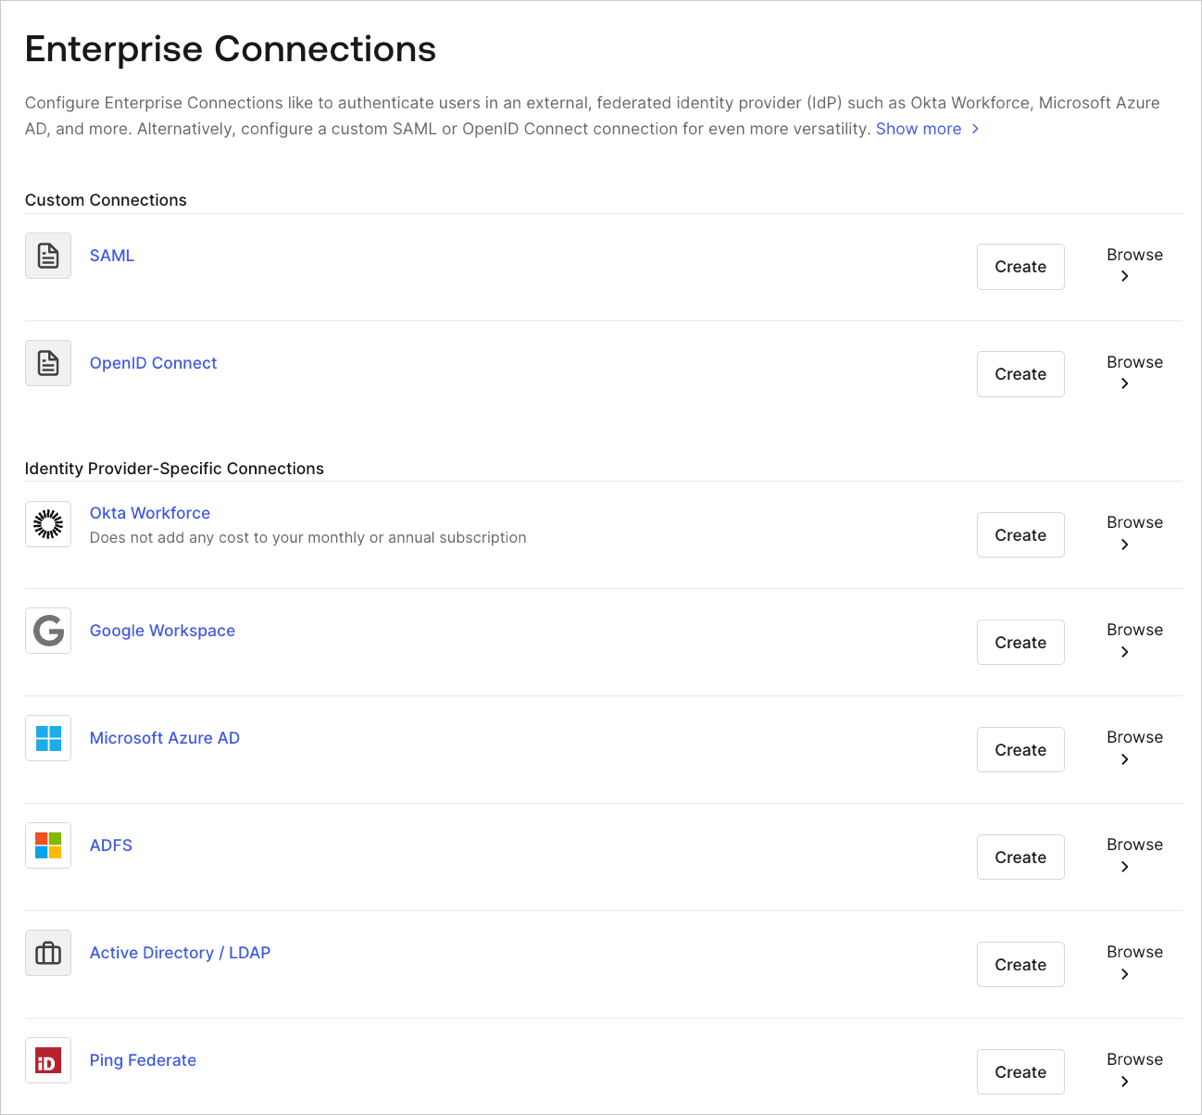
1. Navigate to [Auth0 Dashboard > Authentication > Enterprise](https://manage.auth0.com/#/connections/enterprise), locate **Google Workspace**, and click its `+`.

   <Frame>
     <img src="https://mintcdn.com/docs-staging-quickstart-revamp/fNPG21NgQLCA0axA/images/cdy7uua7fh8z/1fSTcrZpkgkPR64NnI1lr8/b3454e60a4463e99353603fd11a71983/Enterprise_Connections_-_EN.png?fit=max&auto=format&n=fNPG21NgQLCA0axA&q=85&s=db8c83a2958397e961ccc159fa09de58" alt="Dashboard - Connections - Enterprise" width="1202" height="1115" data-path="images/cdy7uua7fh8z/1fSTcrZpkgkPR64NnI1lr8/b3454e60a4463e99353603fd11a71983/Enterprise_Connections_-_EN.png" />
   </Frame>
2. Enter details for your connection, and select **Create:**
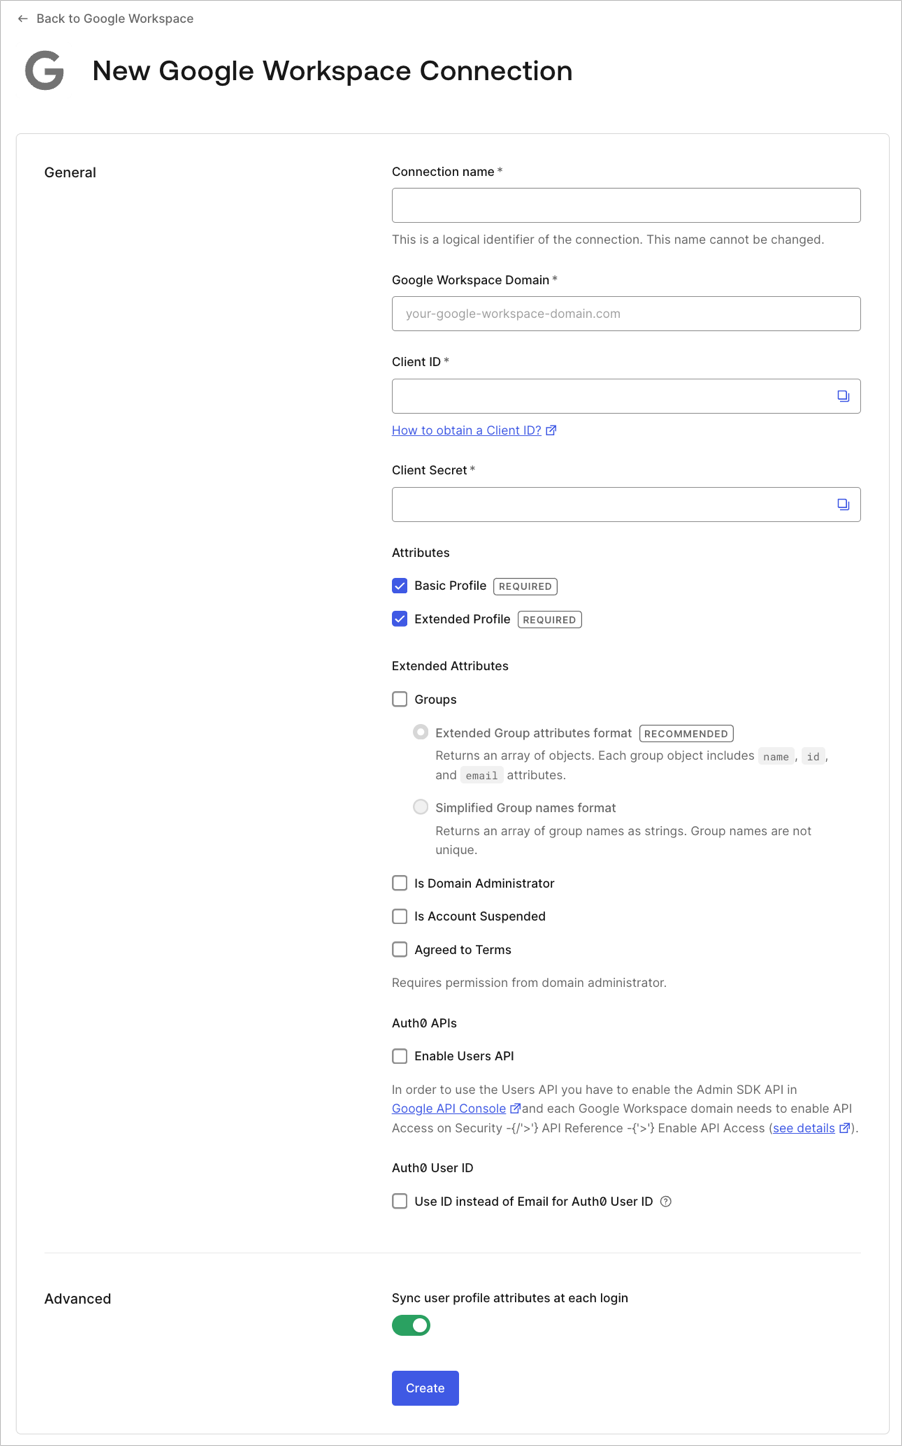
<table class="table">
  <thead>
    <tr>
      <th>Field</th>
      <th>Description</th>
    </tr>
  </thead>

  <tbody>
    <tr>
      <td><strong>Connection name</strong></td>
      <td>Logical identifier for your connection; it must be unique for your tenant. Once set, this name can't be changed.</td>
    </tr>

    <tr>
      <td><strong>Google Workspace Domain</strong></td>
      <td>Google Workspace domain name for your organization.</td>
    </tr>

    <tr>
      <td><strong>Client ID</strong></td>
      <td>Unique identifier for your registered Google application. Enter the saved value of the <strong>Client ID</strong> for the app you just registered in the Google developer console.</td>
    </tr>

    <tr>
      <td><strong>Client Secret</strong></td>
      <td>String used to gain access to your registered Google application. Enter the saved value of the <strong>Client Secret</strong> for the app you just registered in the Google developer console.</td>
    </tr>

    <tr>
      <td><strong>Attributes</strong></td>
      <td>Basic attributes for the signed-in user that your app can access. Indicates how much information you want stored in the Auth0 User Profile. Options include: <strong>Basic Profile</strong> (<code>email</code>, <code>email verified</code> flag) and <strong>Extended Profile</strong> (name, public profile URL, photo, gender, birthdate, country, language, and timezone).</td>
    </tr>

    <tr>
      <td><strong>Extended Attributes</strong> (optional)</td>
      <td>Extended attributes for the signed-in user that your app can access. Options include: <strong>Groups</strong> (distribution list(s) to which the user belongs, including the Extended Group Attributes Format option that retrieves the group name, group email address, and the unique group ID), <strong>Is Domain Administrator</strong> (indicates whether the user is a domain administrator), <strong>Is Account Suspended</strong> (indicates whether the user's account is suspended), and <strong>Agreed to Terms</strong> (indicates whether the user has agreed to the terms of service).</td>
    </tr>

    <tr>
      <td><strong>Auth0 APIs</strong> (optional)</td>
      <td>When <strong>Enable Users API</strong> is selected, indicates that you require the ability to make calls to the Google Directory API.</td>
    </tr>

    <tr>
      <td><strong>Auth0 User ID</strong> (optional)</td>
      <td>By default, the Auth0 <code>user\_id</code> maps to <code>email</code>. By enabling <strong>Use ID instead of Email for Auth0 User ID</strong>, <code>user\_id</code> instead maps to <code>id</code>. This can only be set for new connections and cannot be changed once configured.</td>
    </tr>

    <tr>
      <td><strong>Sync user profile attributes at each login</strong></td>
      <td>When enabled, Auth0 automatically syncs user profile data with each user login, thereby ensuring that changes made in the connection source are automatically updated in Auth0.</td>
    </tr>
  </tbody>
</table>

<Frame>
  <img src="https://mintcdn.com/docs-staging-quickstart-revamp/rHYM5iMy6d7A-FVR/images/cdy7uua7fh8z/5s3W98sar77mRxZ3F3s0Ol/2743ece52e85d378412b770344f7d3d5/Enterprise_Connection_-_Google_Work_-_English.png?fit=max&auto=format&n=rHYM5iMy6d7A-FVR&q=85&s=ce13592dbea9bfbed77c70cc8b034f85" alt="Create Google Workspace Connection" width="902" height="1446" data-path="images/cdy7uua7fh8z/5s3W98sar77mRxZ3F3s0Ol/2743ece52e85d378412b770344f7d3d5/Enterprise_Connection_-_Google_Work_-_English.png" />
</Frame>

3\. If you have appropriate administrative permissions to configure your Google Workspace settings so you can use Google's Admin APIs, then click **Continue**. Otherwise, provide the given URL to your administrator so that they can adjust the required settings.
4\. On the **Login Experience** tab, you can configure how users log in with this connection.

<table class="table">
  <thead>
    <tr>
      <th><strong>Field</strong></th>
      <th><strong>Description</strong></th>
    </tr>
  </thead>

  <tbody>
    <tr>
      <td><strong>Home Realm Discovery</strong></td>
      <td>Compares a user's email domain with the provided identity provider domains. For more information, read <a href="/docs/authenticate/login/auth0-universal-login/identifier-first">Configure Identifier First Authentication</a></td>
    </tr>

    <tr>
      <td><strong>Display connection button</strong></td>
      <td>This option displays the following choices to customize your application's connection button.</td>
    </tr>

    <tr>
      <td><strong>Button display name</strong> (Optional)</td>
      <td>Text used to customize the login button for Universal Login. When set the button reads: "Continue with \{Button display name}".</td>
    </tr>

    <tr>
      <td><strong>Button logo URL</strong> (Optional)</td>
      <td>URL of image used to customize the login button for Universal Login. When set, the Universal Login login button displays the image as a 20px by 20px square.</td>
    </tr>
  </tbody>
</table>

<Callout icon="file-lines" color="#0EA5E9" iconType="regular">
  Optional fields are available with Universal Login only. Customers using Classic Login will not see the Add button, Button display name, or Button logo URL.
</Callout>

## Work with the connection

### Enable the enterprise connection for your Auth0 application

To use your new AD connection, you must first [enable the connection](/docs/authenticate/identity-providers/enterprise-identity-providers/enable-enterprise-connections) for your Auth0 Applications.

### Test the connection

Now you're ready to [test your connection](/docs/authenticate/identity-providers/enterprise-identity-providers/test-enterprise-connections).

### Request Refresh Tokens from Google

Google always returns an <Tooltip tip="Access Token: Authorization credential, in the form of an opaque string or JWT, used to access an API." cta="View Glossary" href="/docs/glossary?term=Access+Token">Access Token</Tooltip>, which is stored in the user profile. If you add `access_type=offline&approval_prompt=force` to the authorization request, Auth0 will forward these parameters to Google. Google will then return a <Tooltip tip="Refresh Token: Token used to obtain a renewed Access Token without forcing users to log in again." cta="View Glossary" href="/docs/glossary?term=Refresh+Token">Refresh Token</Tooltip>, which will also be stored in the user profile.

### Use Identity Provider Tokens from Google

To retrieve additional user and group details beyond what Auth0 retrieves by default, you can use the access tokens returned from Google to call Google's APIs. To securely access these tokens, follow the guidelines provided in [Identity Provider Access Tokens](/docs/secure/tokens/access-tokens/identity-provider-access-tokens).

For Google Workspace, Auth0 stores access tokens and refresh tokens on the `user` object for individual users and on the `connection` object for workspace admins.

To retrieve all extended group properties for a user with Google's Directory Admin API, navigate to the Goolgle Workspace connection in your [Auth0 Dashboard](https://manage.auth0.com/#/connections/enterprise) and enable the **Groups** extended attribute. Then, complete administrator consent using the **Setup** tab.

After these steps are complete, use the [Get a connection](https://auth0.com/docs/api/management/v2/connections/get-connections-by-id) endpoint of the Auth0 <Tooltip tip="Management API: A product to allow customers to perform administrative tasks." cta="View Glossary" href="/docs/glossary?term=Management+API">Management API</Tooltip> to retrieve the admin access token stored on the `connection` object. You can then use this token to call Google's [Manage Groups](https://developers.google.com/admin-sdk/directory/v1/guides/manage-groups#get_all_member_groups) endpoint.

**Example call**:

```bash wrap lines
curl -H "Authorization: OAuth {admin_access_token}" https://admin.googleapis.com/admin/directory/v1/groups\?userKey={user_key}
```

### Validate authentication with Actions

You can use `post-login` [Actions](/docs/customize/actions/explore-triggers/signup-and-login-triggers/login-trigger) to validate whether authentication events are coming from legitimate users who are members of a Google organization. This can help mitigate potential vulnerability by preventing unauthorized access to your applications after users are no longer part of your organization.

To verify legitimate Google authentications, use `post-login` Actions to validate the `idp_tenant_domain` claim associated with the user and ensure the value matches the expected organization for that user.

You can only verify `idp_tenant_domain` for users who authenticate with the following connection types:

* Google Social
* Google Workspace
* Google OIDC

#### Example

The following example demonstrates how you can validate the `idp_tenant_domain` using `post-login` Actions.

```js lines
exports.onExecutePostLogin = async (event, api) => {

 // Example to block social accounts
 if (event.connection.strategy === 'google-oauth2' 
 && !event.user.idp_tenant_domain) // Non-organization Accounts
 {
   api.access.deny('Account not allowed for login');
 }

 // Example to only permit allowlisted organization accounts
 if (event.connection.strategy === 'google-oauth2' 
 && event.user.idp_tenant_domain != "allowedOrganization.com") 
 {
   api.access.deny('Your Google Organization is not allowed to login');
 }

};
```

### Reauthorize existing connections

If a Google Workspace admin is deleted, any Google Workspace Enterprise connections they have set up and authorized will need to be reauthorized by a new Google Workspace admin to avoid login failures. This can be done by having the new admin use the link in the **Setup** tab for the Google Workspace Enterprise connection.

## Next Steps

* [Integrate with Auth0 using one of our libraries](/docs/libraries)
* [Integrate with Auth0 using our Authentication API](https://auth0.com/docs/api/authentication)
* [Read more about the authentication flow](/docs/get-started/authentication-and-authorization-flow)
* [Pass additional parameters to the Identity Provider](/docs/authenticate/identity-providers/pass-parameters-to-idps)
* [Re-prompt users for permissions](/docs/authenticate/identity-providers/social-identity-providers/reprompt-permissions)