> ## Documentation Index
> Fetch the complete documentation index at: https://docs-staging-quickstart-revamp.mintlify.site/llms.txt
> Use this file to discover all available pages before exploring further.

> Learn about Custom Token Exchange Early Access features.

# Custom Token Exchange

<Callout icon="file-lines" color="#0EA5E9" iconType="regular">
  Custom Token Exchange is currently in Early Access for Enterprise customers only. Reach out to your Auth0 contact to request access. To learn more about Auth0's product release cycle, read [Product Release Stages](/docs/troubleshoot/product-lifecycle/product-release-stages).
</Callout>

As defined in [RFC 8693](https://datatracker.ietf.org/doc/html/rfc8693), Custom Token Exchange allows you to enable applications to exchange their existing tokens for Auth0 tokens when calling the `/oauth/token` endpoint. This is useful for advanced integration use cases, such as:

* Get Auth0 tokens for another <Tooltip tip="Audience: Unique identifier of the audience for an issued token. Named aud in a token, its value contains the ID of either an application (Client ID) for an ID Token or an API (API Identifier) for an Access Token." cta="View Glossary" href="/docs/glossary?term=audience">audience</Tooltip>
* Integrate an external <Tooltip tip="Identity Provider (IdP): Service that stores and manages digital identities." cta="View Glossary" href="/docs/glossary?term=identity+provider">identity provider</Tooltip>
* Migrate to Auth0

To learn more, read [Example Use Cases and Code Samples](#example-use-cases-and-code-samples).

To govern the token exchange and adjust it to the specific needs of your use case, you can define one or more [Custom Token Exchange Profiles](#custom-token-exchange-profile). Each profile establishes a one-to-one mapping between a `subject_token_type`, which provides information about the user for the transaction, and an [Action](/docs/customize/actions/actions-overview). In that Action, you can write custom code to decode and validate subject tokens passed to the `/oauth/token` endpoint.

You can use Custom Token Exchange to authenticate users. For example, in an Action, you can apply the authorization logic for your use case and set the user for the transaction. Auth0 will then issue access, ID, and <Tooltip tip="Refresh Token: Token used to obtain a renewed Access Token without forcing users to log in again." cta="View Glossary" href="/docs/glossary?term=refresh+tokens">refresh tokens</Tooltip> for the user.

<Callout icon="file-lines" color="#0EA5E9" iconType="regular">
  Custom Token Exchange gives you the added flexibility to set the user for the transaction by taking on the additional responsibility of securely validating the corresponding subject token that identifies the user for the transaction.

  Remember that subject tokens used with Custom Token Exchange can be any token format or type you require, as long as your Action code can interpret them. **You must implement strong validation of the tokens you receive and accept.** If you fail to do so, you open yourself up to different attack vectors, such as spoofing or replay attacks, resulting in bad actors being able to authenticate with someone else’s user ID.

  To learn about different options for implementing secure validation of your subject tokens, read and apply the recommendations included in [Example Use Cases and Code Samples](#example-use-cases-and-code-samples). Make sure you also take into consideration and apply [Attack Protection](#attack-protection) capabilities.
</Callout>

## Setup

### Application

To use Custom Token Exchange, you must [create a new application](/docs/get-started/auth0-overview/create-applications) with the <Tooltip tip="Auth0 Dashboard: Auth0's main product to configure your services." cta="View Glossary" href="/docs/glossary?term=Auth0+Dashboard">Auth0 Dashboard</Tooltip> or the <Tooltip tip="Management API: A product to allow customers to perform administrative tasks." cta="View Glossary" href="/docs/glossary?term=Management+API">Management API</Tooltip>. You can create multiple applications to use Custom Token Exchange.

When you create a new application:

1. By default, Custom Token Exchange is disabled. To enable Custom Token Exchange, use the Management API to make a POST call to [Create a Client](https://auth0.com/docs/api/management/v2/clients/post-clients) or a PATCH call to [Update a Client](https://auth0.com/docs/api/management/v2/clients/patch-clients-by-id). Set the `allow_any_profile_of_type` attribute under `token_exchange` to `["custom_authentication"]`:

```json lines
{
  "token_exchange": {
    "allow_any_profile_of_type": ["custom_authentication"]
  }
}
```

2. Enable the [database connection](/docs/authenticate/database-connections) or [enterprise connection](/docs/authenticate/enterprise-connections) you want to use with Custom Token Exchange for the application.

3. Make sure your application is flagged as [First-Party](/docs/get-started/applications/confidential-and-public-applications/first-party-and-third-party-applications) and it is configured as [OIDC Conformant in Dashboard > Applications > Advanced Settings > OAuth](/docs/get-started/applications/application-settings#oauth).

<Callout icon="file-lines" color="#0EA5E9" iconType="regular">
  Custom DBs with [Import Users to Auth0](/docs/manage-users/user-migration/configure-automatic-migration-from-your-database) enabled are only supported for `setUserById` operations.
</Callout>

Once you create the application, note the `client_id` and `client_secret` for later use when calling the `/oauth/token` endpoint.

### Custom Token Exchange Profile

Each Custom Token Exchange Profile maps to a `subject_token_type` and is associated with an Action that contains the code logic for that use case.

Custom Token Exchange requests sent to the `/oauth/token` endpoint with a specific `subject_token_type` value map to the corresponding Custom Token Profile and route to the associated Action for processing.

To create a Custom Token Exchange Profile, first create an Action for the profile.

#### Create Action

In the Auth0 Dashboard:

1. Navigate to [**Actions > Library**](https://manage.auth0.com/#/actions/library).

2. Select **Create Action** > **Build from Scratch**.

3. In the **Create Action** dialog, enter a name and select the **Custom Token Exchange** trigger from the drop-down.

<Frame>
  <img src="https://mintcdn.com/docs-staging-quickstart-revamp/95MUIRU4PPeO3xcE/images/cdy7uua7fh8z/22vz9dsCFj5Ruot7U0HIVx/1c3dc4b562334dab9d6ac415028ea76e/Screenshot_2025-02-05_at_8.48.34_AM.png?fit=max&auto=format&n=95MUIRU4PPeO3xcE&q=85&s=f97faab90088c18dbda6bf69aab3228e" alt="" width="400" height="440" data-path="images/cdy7uua7fh8z/22vz9dsCFj5Ruot7U0HIVx/1c3dc4b562334dab9d6ac415028ea76e/Screenshot_2025-02-05_at_8.48.34_AM.png" />
</Frame>

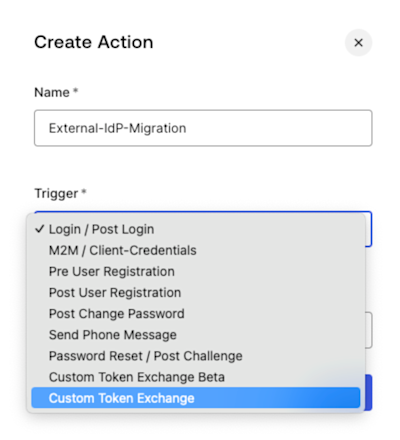
4. Select **Create**.

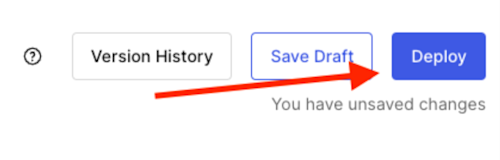
5. **Deploy** the Action.

<Frame>
  <img src="https://mintcdn.com/docs-staging-quickstart-revamp/A1o6LcInzX_m5Dvq/images/cdy7uua7fh8z/56NZA69Gmzha167xfgRD0W/302e59276815d2e2644ab2da3b9b5f1f/Screenshot_2025-02-03_at_10.29.17_AM.png?fit=max&auto=format&n=A1o6LcInzX_m5Dvq&q=85&s=a4fc22e907f65a44b2153ef494a444e9" alt="" width="1244" height="574" data-path="images/cdy7uua7fh8z/56NZA69Gmzha167xfgRD0W/302e59276815d2e2644ab2da3b9b5f1f/Screenshot_2025-02-03_at_10.29.17_AM.png" />
</Frame>

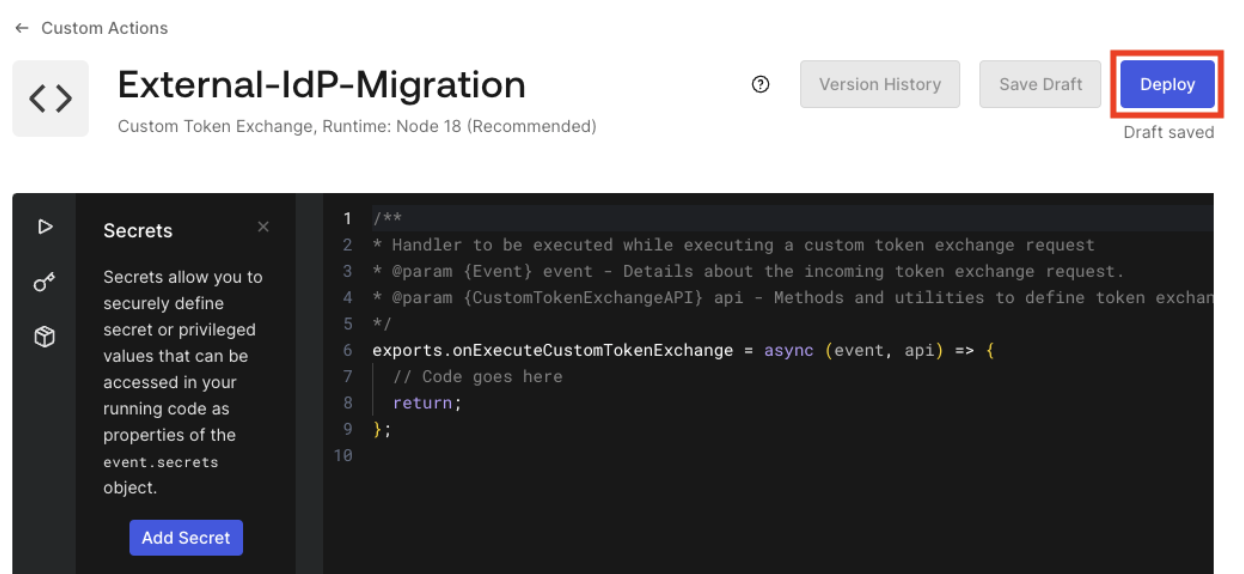
When you deploy the Action, Auth0 assigns it an Action ID. You still need to add your custom logic to the Action, but first, get the Action ID to create the Custom Token Exchange Profile.

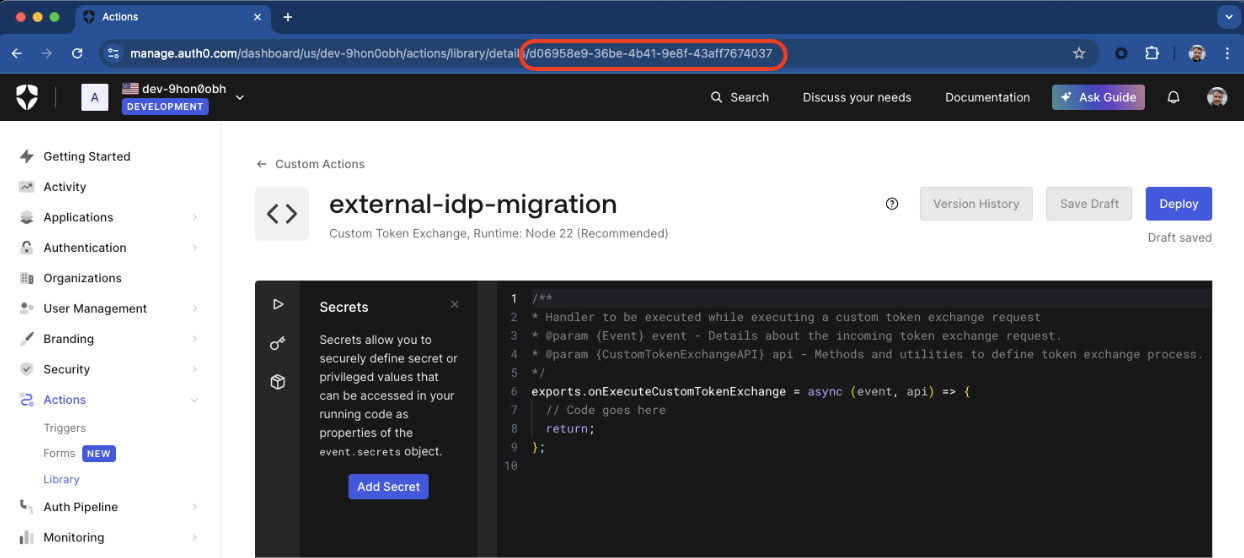
6. To get the Action ID in the Auth0 Dashboard, navigate to the URL of the browser window. The Action ID should be the last part of the URL, as shown in the following image:

<Frame>
  <img src="https://mintcdn.com/docs-staging-quickstart-revamp/AmyDKn5Na0kFZtbL/images/cdy7uua7fh8z/1Xx4UbgZR0FIuLC1KVvhKG/bde4469d770c2ff8d37c19895a0c8e66/Screenshot_2025-02-03_at_10.31.18_AM.png?fit=max&auto=format&n=AmyDKn5Na0kFZtbL&q=85&s=d2e187f1768fbe36bd3d14fa48ff3435" alt="" width="1244" height="558" data-path="images/cdy7uua7fh8z/1Xx4UbgZR0FIuLC1KVvhKG/bde4469d770c2ff8d37c19895a0c8e66/Screenshot_2025-02-03_at_10.31.18_AM.png" />
</Frame>

You can also get the Action ID via the Management API. First, [get a Management API token](/docs/secure/tokens/access-tokens/management-api-access-tokens#get-management-api-tokens) to consume the API. Then, make the following GET request to the `/actions` endpoint:

```bash lines
curl --location 'https://{{YOUR _TENANT}}/api/v2/actions/actions?actionName={{ACTION_NAME}}' \
--header 'Authorization: Bearer {{MANAGEMENT_API_TOKEN}}' \
```

You should receive the Action ID in the response body within `actions[0].id`. You need the Action ID to create the Custom Token Exchange Profile.

#### Create the Custom Token Exchange Profile

To create the Custom Token Exchange Profile, use the Management API to make a POST request with the following parameters to the `/token-exchange-profiles` endpoint:

```bash lines
curl --location 'https://{{YOUR _TENANT}}/api/v2/token-exchange-profiles' \
--header 'Content-Type: application/json' \
--header 'Authorization: Bearer {{MANAGEMENT_API_TOKEN}}' \
--data '{
    "name": "{{PROFILE_NAME}}",
    "subject_token_type": "{{UNIQUE_PROFILE_TOKEN_TYPE_URI}}",
    "action_id": "{{ACTION_ID}}",
    "type": "custom_authentication"
}'
```

<table class="table">
  <thead>
    <tr>
      <th><strong>Parameter</strong></th>
      <th><strong>Description</strong></th>
    </tr>
  </thead>

  <tbody>
    <tr>
      <td><code>subject\_token\_type</code></td>
      <td>Unique profile token type URI starting with `https://` or <code>urn</code><br /><br />The following namespaces are reserved and you can’t use them:<br /><br /><ul><li>`http://auth0.com`</li><li>`https://auth0.com`</li><li>`http://okta.com`</li><li>`https://okta.com`</li><li><code>urn:ietf</code></li><li><code>urn:auth0</code></li><li><code>urn:okta</code></li></ul></td>
    </tr>

    <tr>
      <td><code>action\_id</code></td>
      <td>Action ID of Action associated with the Custom Token Profile.</td>
    </tr>

    <tr>
      <td><code>type</code></td>
      <td>Should be set to <code>custom\_authentication</code>.</td>
    </tr>
  </tbody>
</table>

If you've successfully created a Custom Token Exchange Profile, you should receive a response like the following:

```json lines
{
  "id":"tep_9xqewuejpa2RTltf",
  "name":"{{PROFILE_NAME}}",
  "type":"custom_authentication",
  "subject_token_type":"{{UNIQUE_PROFILE_TOKEN_TYPE_URI}}",
  "action_id":"{{ACTION_ID}}",
  "created_at":"2025-01-30T13:19:00.616Z",
  "updated_at":"2025-01-30T13:19:00.616Z"
}
```

You are ready to start coding and testing your Custom Token Exchange to implement your use case.

### Manage Custom Token Exchange Profile

To manage your Custom Token Exchange Profile, use the Management API to make requests to the `/token-exchange-profiles` endpoint.

To get all your Custom Token Exchange Profiles, make the following request. This endpoint supports [checkpoint pagination](https://auth0.com/docs/api/management/v2/introduction#checkpoint-based-pagination) in case you have several profiles.

```bash lines
curl --location 'https://{{YOUR _TENANT}}/api/v2/token-exchange-profiles' \
--header 'Authorization: Bearer {{MANAGEMENT_API_TOKEN}}' \
```

To update the `name` or `subject_token_type` of a Custom Token Exchange Profile, use the following PATCH request. You cannot modify the Action ID, although you can change the custom code it executes with the Actions editor:

```bash lines
curl --location --request PATCH 'https://{{YOUR _TENANT}}/api/v2/token-exchange-profiles/{{PROFILE_ID}}' \
--header 'Content-Type: application/json' \
--header 'Authorization: Bearer {{MANAGEMENT_API_TOKEN}}' \
--data '{
    "name": "external-idp-migration",
    "subject_token_type": "urn:partner0:external-idp-migration"
}'
```

To delete a Custom Token Exchange Profile, make the following DELETE request:

```bash lines
curl --location --request DELETE 'https://{{YOUR _TENANT}}/api/v2/token-exchange-profiles/{{PROFILE_ID}}' \
--header 'Authorization: Bearer {{MANAGEMENT_API_TOKEN}}' \
--data ''
```

## Actions API

### Custom Token Exchange vs Post Login Action

The Custom Token Exchange Action, available as a part of Custom Token Exchange Early Access, can use the new API methods listed in [Use the Actions API](#use-the-actions-api).

For other needs, such as adding custom claims to <Tooltip tip="Access Token: Authorization credential, in the form of an opaque string or JWT, used to access an API." cta="View Glossary" href="/docs/glossary?term=access+tokens">access tokens</Tooltip>, your [Post Login Actions trigger](/docs/customize/actions/explore-triggers/signup-and-login-triggers/login-trigger) executes after the Custom Token Exchange Action runs for the user that you set for the transaction, thus giving you the same functionality as other login flows.

To identify a transaction that uses the token exchange grant type, look for an `event.transaction.protocol` value equal to `oauth2-token-exchange` in your [Post Login Action](/docs/customize/actions/explore-triggers/signup-and-login-triggers/login-trigger). Because the token exchange grant type is used by both the Custom Token Exchange and Native Social Login transactions, you can use the value of the `subject_token_type` to distinguish between the two, where the `subject_token_type` corresponds to one of your Custom Token Exchange Profiles.

<Callout icon="file-lines" color="#0EA5E9" iconType="regular">
  Custom Token Exchange Early Access does not support [multi-factor authentication](/docs/secure/multi-factor-authentication). Enabling MFA as a tenant policy or using `api.multifactor.enable()`, `api.authentication.challengeWith(),` or `api.authentication.enrollWith()` is not yet supported for Custom Token Exchange and, within your Post-Login Action trigger, will result in the transaction failing with a non-recoverable error. Make sure you skip enabling MFA when `event.transaction.protocol==oauth2-token-exchange` depending on the `subject_token_type` value.

  MFA support will be added in next iterations of Custom Token Exchange EA.
</Callout>

### Use the Actions API

Auth0 provides a number of API methods to use with your Token Exchange Action. You should implement an Action that decodes and validates the subject token based on the `subject_token_type`. This will provide you with information about the user for the transaction. With this information, your code should also enforce the authorization policy needed for the transaction. Once you are sure the transaction can proceed, you can confirm it by setting the corresponding user. Auth0 will then issue access, ID, and refresh tokens for this user. You can think of this as a way to authenticate users.

Each Custom Token Exchange transaction generates a tenant event log. Successful transactions generate event logs of type `secte`, while failed transactions generate event logs of type `fecte`. Use these log types to help you understand any errors you may receive. Errors from the `/oauth/token` endpoint reveal less details.

<Callout icon="file-lines" color="#0EA5E9" iconType="regular">
  Custom Token Exchange gives you the added flexibility to set the user for the transaction by taking on the additional responsibility of securely validating the corresponding subject token that identifies the user for the transaction.

  Remember that subject tokens used with Custom Token Exchange can be any token format or type you require, as long as your Action code can interpret them. **You must implement strong validation of the tokens you receive and accept.** If you fail to do so, you open yourself up to different attack vectors, such as spoofing or replay attacks, resulting in bad actors being able to authenticate with someone else’s user ID.

  To learn about different options for implementing secure validation of your subject tokens, read and apply the recommendations included in [Example Use Cases and Code Samples](#example-use-cases-and-code-samples). Make sure you also take into consideration and apply [Attack Protection](#attack-protection) capabilities.
</Callout>

#### api.authentication.setUserById(user\_id)

Sets user attributes based on a specified user ID for any connection type. This allows you to specify an existing user without updating the profile. This method fails if the user does not exist or is blocked.

<table class="table">
  <thead>
    <tr>
      <th><strong>Parameter</strong></th>
      <th><strong>Description</strong></th>
    </tr>
  </thead>

  <tbody>
    <tr>
      <td><code>user\_id</code></td>
      <td>The user ID, such as <code>auth0\&#124;55562040asf0aef</code>.</td>
    </tr>
  </tbody>
</table>

```js lines
exports.onExecuteCustomTokenExchange = async (event, api) => {

  // 1. Validate subject_token
  const subject_token = await validateToken(event.transaction.subject_token, jwksUri);

  // 2.  Apply your authorization policy on the user
  const isAuthorized = await authorizeAccess(subject_token.sub);
  if (!isAuthorized) {
    api.access.deny('Unauthorized_login', 'User cannot login due to reason: X');
  }

  // 3. Set the user for the transaction
  api.authentication.setUserById(subject_token.sub);

  return;
};
```

#### api.authentication.setUserByConnection(connection\_name, user\_profile, options)

Sets a user and their associated profile attributes in a specified connection. This is equivalent to returning the specified user profile from the federated IdP (or the corresponding Custom DB with [Import Users to Auth0](/docs/manage-users/user-migration/configure-automatic-migration-from-your-database) disabled) when a user logs into this connection. You can configure whether this operation should create the user if it does not exist, and whether it should update the profile using the provided user profile attributes.

The login count will be incremented for each user that is logged in via `setUserByConnection()`. This method always fails for blocked users.

<Callout icon="file-lines" color="#0EA5E9" iconType="regular">
  Custom Token Exchange EA currently supports `setUserByConnection()` for Auth0 database connections, Enterprise and Social connections, and Custom DBs with [Import Users to Auth0](/docs/manage-users/user-migration/configure-automatic-migration-from-your-database) disabled.
</Callout>

<table class="table">
  <thead>
    <tr>
      <th><strong>Parameter</strong></th>
      <th><strong>Description</strong></th>
    </tr>
  </thead>

  <tbody>
    <tr>
      <td><code>connection\_name</code></td>
      <td>The name of the connection where the user profile will be set. Limited to 512 characters.</td>
    </tr>

    <tr>
      <td><code>user\_profile</code></td>
      <td>An object containing the user profile attributes to be set. Limited to 24 properties.</td>
    </tr>

    <tr>
      <td><code>options</code></td>
      <td>An object specifying update and creation behavior.<br /><br /><code>\{updateBehavior: 'replace' | 'none',creationBehavior: 'create\_if\_not\_exists' | 'none',}</code><br /><br />If the user exists, <code>updateBahaviour</code> does the following:<br /><ul><li> <code>replace</code>: the user attributes and the <code>user\_id</code> for the provided connection are replaced (existing user attributes that are not provided will be removed from the user. Partial updates are not supported).</li><li><code>none</code>: if the user exists, the profile is not updated. If the user does not exist, it will be created with the provided profile attributes depending on <code>creationBehavior</code> configuration.</li><li>If the user does not exist, <code>creationBehavior</code> does the following:</li><ul><li><code>create\_if\_not\_exists</code>: create the user</li><li><code>none</code>: does not create the user and return with an error</li></ul></ul></td>
    </tr>
  </tbody>
</table>

```js lines expandable
exports.onExecuteCustomTokenExchange = async (event, api) => {

  // 1. Validate subject_token
  const subject_token = await validateToken(event.transaction.subject_token, jwksUri);

  // 2.  Apply your authorization policy on the user
  const isAuthorized = await authorizeAccess(subject_token.sub);
  if (!isAuthorized) {
    api.access.deny('Unauthorized_login', 'User cannot login due to reason: X');
  }

  // 3. Set the user for the transaction
  api.authentication.setUserByConnection(
    'My Connection',
    {
      user_id: subject_token.sub,
      email: subject_token.email,
      email_verified: subject_token.email_verified,
      phone_number: subject_token.phone_number,
      phone_verified: subject_token.phone_number_verified,
      username: subject_token.preferred_username,
      name: subject_token.name,
      given_name: subject_token.given_name,
      family_name: subject_token.family_name,
      nickname: subject_token.nickname,
      verify_email: false
    },
    {
      creationBehavior: 'create_if_not_exists',
      updateBehavior: 'none'
    }
  );

  return;
};
```

##### Supported user profile attributes

The `setUserByConnection()` method allows you to set profile attributes supported by the [Update a User](https://auth0.com/docs/api/management/v2/users/patch-users-by-id) endpoint:

* `user_id` (required): user's unique identifier for this connection/provider. It is typically the user ID provided by the external identity provider for the connection. This is the only required parameter when both `creationBehaviour` and `updateBehaviour` are set to `none`.
* `email`
* `email_verified`. Defaults to `false`.
* `username`
* `phone_number`
* `phone_verified`. Defaults to `false`.
* `name`
* `given_name`
* `family_name`
* `nickname`
* `picture`

Use metadata fields if you need to set attributes not considered in the above list.

##### Supported connection strategies

The current version provides support for the following connection strategies. The `setUserByConnection()` method fails for other strategies. Please contact Auth0 support to request adding support for other strategies.

Auth0 database connections:

* Custom database connections with  [Import Users to Auth0](/docs/manage-users/user-migration/configure-automatic-migration-from-your-database) disabled

Enterprise connections:

* [Active Directory](/docs/authenticate/identity-providers/enterprise-identity-providers/active-directory-ldap)
* [SAML IdPs](/docs/authenticate/identity-providers/enterprise-identity-providers/saml)
* [OIDC IdPs](/docs/authenticate/identity-providers/enterprise-identity-providers/oidc)
* [Okta](/docs/authenticate/identity-providers/enterprise-identity-providers/okta)
* [ADFS](/docs/authenticate/identity-providers/enterprise-identity-providers/adfs)

Social connections:

* Custom Social Connections
* Google
* Apple
* Facebook
* Github
* Windowslive

##### Creation behavior

Users are dynamically created only when `creationBehavior` is set to `create_if_not_exists`.

When creating users:

* You must provide an identifier as configured by your connection. By default, an email is required.
* For connections that use [Flexible Identifiers and Attributes](/docs/authenticate/database-connections/flexible-identifiers-and-attributes), you may provide a username and phone number if the corresponding attribute is enabled for the connection.
* For connections that don’t use Flexible Identifiers and Attributes:

  * You must provide an email address.

  * You may provide a username when the connection’s **Require Username** is set to `true`. To learn more, read [Adding Username for Database Connections](/docs/authenticate/database-connections/require-username).

  * You cannot provide a `phone_number`.

  - You may specify `email_verified` and `phone_verified.`

A random password is generated for users dynamically created in Auth0 database connections. There are different options to trigger a [password reset flow](/docs/authenticate/database-connections/password-change) when needed after user creation.

<Callout icon="file-lines" color="#0EA5E9" iconType="regular">
  Set `creationBehavior` to `none` when you want to log the user in but don’t want to create the user if they do not already exist in the connection.

  Future iterations of Custom Token Exchange will make the email attribute optional dependent on the connection configuration.
</Callout>

##### Update behavior

User profile is updated only when `updateBehavior` is set to `replace`.

The following attributes cannot be modified and Auth0 returns an error when trying to change its value:

* `email`
* `username`
* `phone_number`
* `email_verified`
* `phone_verified`

<Callout icon="file-lines" color="#0EA5E9" iconType="regular">
  If you want to use `setUserByConnection()` to update a user profile that already contains `email`, `username`, or `phone_number` attributes, you must pass these attributes with the same value they already have. Otherwise, the method returns an error. Additionally, this action does not update the upstream Enterprise/Social IdP or the Custom DB, so make your updates match the latest version of the profile on the IdP/Custom DB if you want them to be in sync.
</Callout>

<Callout icon="file-lines" color="#0EA5E9" iconType="regular">
  Set `updateBehavior` to `none` when you want to log the user in but don’t want to change any profile attributes if they already exist in the connection.
</Callout>

##### Email verification

Auth0 automatically sends verification emails when you create a user with `email_verified=false`. You can override this behavior by specifying `verify_email=false` as a user profile attribute. It won’t be stored as part of the user profile.

```js lines
exports.onExecuteCustomTokenExchange = async (event, api) => {

  // Validate subject_token
  const subject_token = await validateToken(event.transaction.subject_token, jwksUri);

  // Create a user but don't verify email
  api.authentication.setUserByConnection(
    'My Connection',
    {
      user_id: subject_token.sub,
      email: subject_token.email,
      email_verified: false,
      verify_email: false
    },
    {
      creationBehavior: 'create_if_not_exists',
      updateBehavior: 'none'
    }
  );

  return;
};
```

If you have [configured and enabled a welcome email template](/docs/customize/email/email-templates), Auth0 automatically sends a welcome email to newly created users when no email verification is sent.

##### Set metadata

Unlike the [Update a User](https://auth0.com/docs/api/management/v2/users/patch-users-by-id) endpoint, the `setUserByConnection()` method does not allow you to set user or application metadata. Instead, you can use `api.user.setAppMetadata`. To learn how to correctly use metadata, read [How Metadata Works in User Profiles](/docs/manage-users/user-accounts/metadata). For metadata best practices, read [How to Manage User Metadata with the Post-login Trigger](/docs/manage-users/user-accounts/metadata/manage-user-metadata#best-practices).

#### api.user.setAppMetadata(name, value)

Sets application metadata for the user that is logging in.

This method follows a merge behavior, so you can indicate the new attributes to add or the ones to be updated without affecting the existing ones. To remove an attribute, set its value to `null`.

<table class="table">
  <thead>
    <tr>
      <th><strong>Parameters</strong></th>
      <th><strong>Description</strong></th>
    </tr>
  </thead>

  <tbody>
    <tr>
      <td><code>name</code></td>
      <td>String. The name of the metadata property.</td>
    </tr>

    <tr>
      <td><code>value</code></td>
      <td>String, object or array. The name of the metadata property.</td>
    </tr>
  </tbody>
</table>

```js lines
exports.onExecuteCustomTokenExchange = async (event, api) => {
  // Validate subject_token
  const subject_token = await validateToken(event.transaction.subject_token, jwksUri);

  // set the user for the transaction
  api.authentication.setUserById(subject_token.id);

  // set user group based on info contaiened in subject_token
  api.user.setAppMetadata('group', subject_token.group);

  return;
};
```

#### api.user.setUserMetadata(name, value)

Sets general metadata for the user that is logging in.

This method follows a merge behavior, so you can indicate the new attributes to add or the ones to be updated without affecting the already existing ones. To remove an attribute, set its value to `null`.

<table class="table">
  <thead>
    <tr>
      <th><strong>Parameters</strong></th>
      <th><strong>Description</strong></th>
    </tr>
  </thead>

  <tbody>
    <tr>
      <td><code>name</code></td>
      <td>String. The name of the metadata property.</td>
    </tr>

    <tr>
      <td><code>value</code></td>
      <td>String, object or array. The name of the metadata property.</td>
    </tr>
  </tbody>
</table>

```js lines
exports.onExecuteCustomTokenExchange = async (event, api) => {
  // Validate subject_token
  const subject_token = await validateToken(event.transaction.subject_token, jwksUri);

  // set the user for the transaction
  api.authentication.setUserById(subject_token.id);

  // set user preferred_locale based on info contaiened in subject_token
  api.user.setUserMetadata('preferred_locale', subject_token.locale);

  return;
};
```

#### api.access.deny(code, reason)

Denies the login transaction and returns an error to the caller.

<table class="table">
  <thead>
    <tr>
      <th><strong>Parameter</strong></th>
      <th><strong>Description</strong></th>
    </tr>
  </thead>

  <tbody>
    <tr>
      <td><code>code</code></td>
      <td>A string returned in the error property in the response.<br /><br />Two standard error codes can be used:<ul><li><code>invalid\_request</code>: Returns a <code>400</code> status code</li><li><code>server\_error</code>: Returns <code>500</code> status code</li></ul><br />If you use your own error code, it returns a <code>400</code> status code.</td>
    </tr>

    <tr>
      <td><code>reason</code></td>
      <td>A string returned in the <code>error\_description</code> property in the response.</td>
    </tr>
  </tbody>
</table>

```js lines
exports.onExecuteCustomTokenExchange = async (event, api) => {

  // 1. Validate subject_token
  const subject_token = await validateToken(event.transaction.subject_token, jwksUri);

  // 2.  Apply your authorization policy on the user
  const isAuthorized = await authorizeAccess(subject_token.sub);
  if (!isAuthorized) {
    api.access.deny('Unauthorized_login', 'User cannot login due to reason: X');
  }

  // if user is authorized, go on as indicated here

};
```

#### api.access.rejectInvalidSubjectToken(reason)

Denies the transaction and increments the counter of failed attempts for the external IP from which the request is coming. The Custom Token Exchange request is rejected with a `400 Bad Request` error response with the error code `invalid_request`.

When the maximum number of failed attempts is reached, Auth0 blocks traffic for a period of time for all Custom Token Exchange requests coming from that IP with a `429 Too Many Requests` error response with error code `too_many_attempts`. To learn more read [Attack Protection](#attack-protection).

Use this method whenever you receive a Custom Token Exchange request with a subject token that is not properly signed/encrypted or expired, or under any circumstance that points to any non-legitimate usage such as in a spoofing or replay attack. This allows Auth0 to activate <Tooltip tip="Suspicious IP Throttling: Form of attack protection that protects your tenant against suspicious logins targeting too many accounts from a single IP address." cta="View Glossary" href="/docs/glossary?term=Suspicious+IP+Throttling">Suspicious IP Throttling</Tooltip> protection as per your configuration.

By default, Suspicious IP Throttling allows for 10 max attempts at a rate of 6 attempts/hour. To learn more, read [Attack Protection](#attack-protection).

<table class="table">
  <thead>
    <tr>
      <th><strong>Parameter</strong></th>
      <th><strong>Description</strong></th>
    </tr>
  </thead>

  <tbody>
    <tr>
      <td><code>reason</code></td>
      <td>A string returned in the <code>error\_description</code> property in the response</td>
    </tr>
  </tbody>
</table>

```js lines
exports.onExecuteCustomTokenExchange = async (event, api) => {

  try {
    // Validate subject_token
    const subject_token = await validateToken(event.transaction.subject_token, jwksUri);
    // set the user for the transaction
    api.authentication.setUserById(subject_token.id);

  } catch (error) {
    if (error.message === 'Invalid Token') {
      // If specifically the problem is the subject_token is invalid
      console.error('Invalid Token error');
      api.access.rejectInvalidSubjectToken('Invalid subject_token');
    } else {
      // if there is any other unexpected error, throw a server error
      throw error;
    }
  }

};
```

#### api.cache

Store and retrieve data that persists across executions.

These methods are useful for caching data used for subject token validation, such as public keys for signature validation. This can help improve performance when fetching the keys from a `jwks-uri`.

##### api.cache.delete(key)

Delete a record describing a cached value at the supplied `key` if it exists.

Returns a `CacheWriteResult` object with `type: "success"` if a value was removed from the cache. A failed operation returns `type: "error"`. For errors, the returned object will have a `code` property that indicates the nature of the failure.

<table class="table">
  <thead>
    <tr>
      <th><strong>Parameter</strong></th>
      <th><strong>Description</strong></th>
    </tr>
  </thead>

  <tbody>
    <tr>
      <td><code>key</code></td>
      <td>String. The key of the record stored in the cache.</td>
    </tr>
  </tbody>
</table>

##### api.cache.get(key)

Retrieve a record describing a cached value at the supplied `key`, if it exists. If a record is found, the cached value can be found at the `value` property of the returned object.

Returns a cache record if an item is found in the cache for the supplied `key`. Cache records are objects with a `value` property holding the cached value as well as an `expires_at` property indicating the maximum expiry of the record in milliseconds since the Unix epoch.

**Important:** This cache is designed for short-lived, ephemeral data. Items may not be available in later transactions even if they are within their supplied lifetime.

<table class="table">
  <thead>
    <tr>
      <th><strong>Parameter</strong></th>
      <th><strong>Description</strong></th>
    </tr>
  </thead>

  <tbody>
    <tr>
      <td><code>key</code></td>
      <td>String. The key of the record stored in the cache.</td>
    </tr>
  </tbody>
</table>

##### api.cache.set(key, value, \[options])

Store or update a string value in the cache at the specified key.

Values stored in this cache are scoped to the Trigger in which they are set. They are subject to the [Actions Cache Limits](/docs/customize/actions/limitations).

Values stored in this way will have lifetimes of up to the specified `ttl` or `expires_at` values. If no lifetime is specified, a default lifetime of 15 minutes will be used. Lifetimes may not exceed the maximum duration listed at [Actions Cache Limits](/docs/customize/actions/limitations).

Returns `CacheWriteSuccess` if the values are stored successfully. Otherwise, you will receive `CacheWriteError`.

<table class="table">
  <thead>
    <tr>
      <th><strong>Parameter</strong></th>
      <th><strong>Description</strong></th>
    </tr>
  </thead>

  <tbody>
    <tr>
      <td><code>key</code></td>
      <td>String. The key of the record stored in the cache.</td>
    </tr>

    <tr>
      <td><code>value</code></td>
      <td>String. The value of the record to be stored.</td>
    </tr>

    <tr>
      <td><code>options</code></td>
      <td>Optional object. Options for adjusting cache behavior.</td>
    </tr>

    <tr>
      <td><code>options.expires\_at</code></td>
      <td>Optional number. The absolute expiry time in milliseconds since the unix epoch. While cached records may be evicted earlier, they will never remain beyond the supplied <code>expires\_at</code>.<br /><br /><strong>Note:</strong> This value should not be supplied if a value was also provided for <code>ttl</code>. If both options are supplied, the earlier expiry of the two will be used.</td>
    </tr>

    <tr>
      <td><code>options.ttl</code></td>
      <td>Optional number. The time-to-live value of this cache entry in milliseconds. While cached values may be evicted earlier, they will never remain beyond the supplied <code>ttl</code>.<br /><br /><strong>Note:</strong> This value should not be supplied if a value was also provided for expires\_at. If both options are supplied, the earlier expiry of the two will be used.</td>
    </tr>
  </tbody>
</table>

## Actions Event

In addition to new Actions API methods, you can use data in the Actions Event to learn about the context of the Token Exchange request, such as the subject token, IP address, client, and more.

<table class="table">
  <thead>
    <tr>
      <th><strong>Property</strong></th>
      <th><strong>Type</strong></th>
      <th><strong>Example</strong></th>
    </tr>
  </thead>

  <tbody>
    <tr>
      <td><em>client</em></td>

      <td />

      <td />
    </tr>

    <tr>
      <td><code>client\_id</code></td>
      <td>string</td>
      <td><code>HOVc2PDFTH7eahimN4yNCo8mOtjfNjLV</code></td>
    </tr>

    <tr>
      <td><code>name</code></td>
      <td>string</td>
      <td><code>My Web App</code></td>
    </tr>

    <tr>
      <td><code>metadata</code></td>
      <td>object</td>
      <td><code>\{“foo”: “bar” }</code></td>
    </tr>

    <tr>
      <td><em>tenant</em></td>

      <td />

      <td />
    </tr>

    <tr>
      <td><code>id</code></td>
      <td>string</td>
      <td><code>dev\_1234</code></td>
    </tr>

    <tr>
      <td>request</td>

      <td />

      <td />
    </tr>

    <tr>
      <td><code>geoip</code></td>
      <td>object</td>
      <td><code>\{ … geoip object}</code></td>
    </tr>

    <tr>
      <td><code>hostname</code></td>
      <td>string</td>
      <td><code>dev\_1234.us.auth0.com</code></td>
    </tr>

    <tr>
      <td><code>ip</code></td>
      <td>string</td>
      <td><code>123.42.42.34</code></td>
    </tr>

    <tr>
      <td><code>user\_agent</code></td>
      <td>string</td>
      <td><code>Mozilla/5.0</code></td>
    </tr>

    <tr>
      <td><code>language</code></td>
      <td>string</td>
      <td><code>en</code></td>
    </tr>

    <tr>
      <td><code>body</code></td>
      <td>object</td>
      <td><code>\{ // raw req.body }</code></td>
    </tr>

    <tr>
      <td><code>method</code></td>
      <td>string</td>
      <td><code>POST</code></td>
    </tr>

    <tr>
      <td><em>transaction</em></td>

      <td />

      <td />
    </tr>

    <tr>
      <td><code>subject\_token\_type</code></td>
      <td>string</td>
      <td><code>urn://cic-migration-token</code></td>
    </tr>

    <tr>
      <td><code>subject\_token</code></td>
      <td>string</td>
      <td><code>41598922a1745f7af70</code></td>
    </tr>

    <tr>
      <td><code>requested\_scopes</code></td>
      <td>string\[]</td>
      <td><code>\[“openid”, “email”]</code></td>
    </tr>

    <tr>
      <td><em>resource\_server</em></td>

      <td />

      <td />
    </tr>

    <tr>
      <td><code>id</code></td>
      <td>string</td>
      <td><code>[http://acme-api/v1/profile](http://acme-api/v1/profile)</code></td>
    </tr>
  </tbody>
</table>

## Deploy the Action

After you create your Token Exchange Action using the above API and Event objects, deploy the changes by clicking **Deploy** at the top of the page.

<Frame>
  <img src="https://mintcdn.com/docs-staging-quickstart-revamp/rHYM5iMy6d7A-FVR/images/cdy7uua7fh8z/61fgdh8VJEmfiYn0l7Tem0/3ceac5de5413373662e8b800d8f80210/Screenshot_2025-02-03_at_9.30.50_PM.png?fit=max&auto=format&n=rHYM5iMy6d7A-FVR&q=85&s=59c3244c948d60c97d9fde592193937a" alt="" width="500" height="160" data-path="images/cdy7uua7fh8z/61fgdh8VJEmfiYn0l7Tem0/3ceac5de5413373662e8b800d8f80210/Screenshot_2025-02-03_at_9.30.50_PM.png" />
</Frame>

## Call Token Exchange

To use Custom Token Exchange, make a `POST` request to the `/oauth/token` endpoint with the following parameters. Remember that:

* `subject_tokens` used with Custom Token Exchange can be any token format or type, as long as your Action code can interpret them.
* Each `subject_token_type` maps to a specific Custom Token Exchange Profile and is associated with a specific Action that will be executed to control that transaction.

<table class="table">
  <thead>
    <tr>
      <th><strong>Parameter</strong></th>
      <th><strong>Description</strong></th>
    </tr>
  </thead>

  <tbody>
    <tr>
      <td><code>grant\_type</code></td>
      <td>For Custom Token Exchange, use <code>urn:ietf:params:oauth:grant-type:token-exchange</code>.</td>
    </tr>

    <tr>
      <td><code>subject\_token\_type</code></td>
      <td>The type of the subject token. For Custom Token Exchange, this can be any URI scoped under your own ownership, such as `http://acme.com/legacy-token` or <code>urn:acme:legacy-token</code>.<br /><br />The following namespaces are reserved and cannot be used:<ul><li>`http://auth0.com`</li><li>`https://auth0.com`</li><li>`http://okta.com`</li><li>`https://okta.com`</li><li><code>urn:ietf</code></li><li><code>urn:auth0</code></li><li><code>urn:okta</code></li></ul></td>
    </tr>

    <tr>
      <td><code>subject\_token</code></td>
      <td>The subject token, which your action should validate and use to identify the user.</td>
    </tr>

    <tr>
      <td><code>client\_id</code></td>
      <td>The client ID of the application you are using for the Token Exchange. As for other grant types, you can also pass the client ID in the Authorization header using HTTP Basic Auth.</td>
    </tr>

    <tr>
      <td><code>client\_secret</code></td>
      <td>The client secret of the application you are using for the Token Exchange. As for other grant types, you can also pass the client secret in the Authorization header using HTTP Basic Auth.<br /><br />Other alternatives are also available as explained in <a href="https://auth0.com/docs/api/authentication#authentication-methods">Auth0 Authentication API reference docs</a>.<br /><br />Note Custom Token Exchange can be used by public Applications. Make sure to read <a href="#attack-protection">Attack Protection</a> in that case.</td>
    </tr>

    <tr>
      <td><code>audience</code></td>
      <td>The API identifier defined in Auth0.</td>
    </tr>

    <tr>
      <td><code>scope</code></td>
      <td>The OAuth2 scope parameter.</td>
    </tr>
  </tbody>
</table>

Other extension parameters are ignored, although they are included in the `event.request.body` in the corresponding Action.

<Callout icon="file-lines" color="#0EA5E9" iconType="regular">
  Organizations is not yet supported in Custom Token Exchange EA. Adding an organization parameter results in the request being rejected. Organizations support will be added in the next iterations of Custom Token Exchange.
</Callout>

### Sample request

```bash lines
curl --location 'https://{{YOUR_TENANT}}/oauth/token' \
--header 'Content-Type: application/x-www-form-urlencoded' \
--data-urlencode 'grant_type=urn:ietf:params:oauth:grant-type:token-exchange' \
--data-urlencode 'audience=https://api.acme.com' \
--data-urlencode 'scope=openid offline_access acme-scope1 acme-scope2' \
--data-urlencode 'subject_token_type=urn:acme:external-idp-migration' \
--data-urlencode 'subject_token=t8e7S2D9trQm73e .... iqBR3GjxDtbDVjpfQU' \
--data-urlencode 'client_id={{CLIENT_ID}}' \
--data-urlencode 'client_secret={{CLIENT_SECRET}}'
```

## Attack Protection

To protect against spoofing and replay attacks, in which a <Tooltip tip="Bad Actors: Entity (a person or group) that poses a threat to the business or environment with the intention to cause harm." cta="View Glossary" href="/docs/glossary?term=bad+actor">bad actor</Tooltip> tries to guess or reuse a subject token, Custom Token Exchange incorporates support for [Suspicious IP Throttling](/docs/secure/attack-protection/suspicious-ip-throttling). This enables you to specifically signal from your code in Actions when [a subject token is invalid](#api-access-rejectinvalidsubjecttoken-reason-), so Auth0 can count the failed attempts sent from that external IP.

When the number of failed attempts from an IP address reaches a pre-configured threshold, Auth0 blocks traffic for a Custom Token Exchange request coming from that IP with the following error:

```json lines
HTTP/1.1 429 Too Many Requests
Content-Type: application/json
{
    "error": "too_many_attempts",
    "error_description": "We have detected suspicious login behavior and further attempts will be blocked. Please contact the administrator."
}
```

The IP address can start making requests again after a configured period of time.

Although it is recommended for all cases, **it is especially important that you activate and properly configure Suspicious IP Throttling if you want to use Custom Token Exchange with Native Applications or Single Page Applications**. Because non-confidential applications like Native and SPAs can’t securely store secrets to authenticate themselves, it is easier for attackers to try to guess or re-use stolen or leaked subject tokens.

To properly use Suspicious IP Throttling protection, remember to use `api.access.rejectInvalidSubjectToken` in your Action code whenever the received subject token does not pass strong validation.

Suspicious IP Throttling is activated by default for Auth0 tenants. To learn more about how to (de)activate and configure it, read [Suspicious IP Throttling](/docs/secure/attack-protection/suspicious-ip-throttling). When activated, the default settings for Custom Token Exchange will be applied:

* Threshold: 10. Maximum number of failed attempts for an IP address.
* Throttling rate: 6 per hour. One additional attempt will become available after every 10 minutes until the threshold is refilled.

<Frame>
  <img src="https://mintcdn.com/docs-staging-quickstart-revamp/R8rXfTj95YBIEuC2/images/cdy7uua7fh8z/47PB3OAci9fotSHFrCNBVn/1bafbaacbeb22a4d94eb78506ab89bb8/Screenshot_2025-02-03_at_4.44.29_PM.png?fit=max&auto=format&n=R8rXfTj95YBIEuC2&q=85&s=75e7ab1ac20ead937760918fd2448185" alt="" width="1244" height="966" data-path="images/cdy7uua7fh8z/47PB3OAci9fotSHFrCNBVn/1bafbaacbeb22a4d94eb78506ab89bb8/Screenshot_2025-02-03_at_4.44.29_PM.png" />
</Frame>

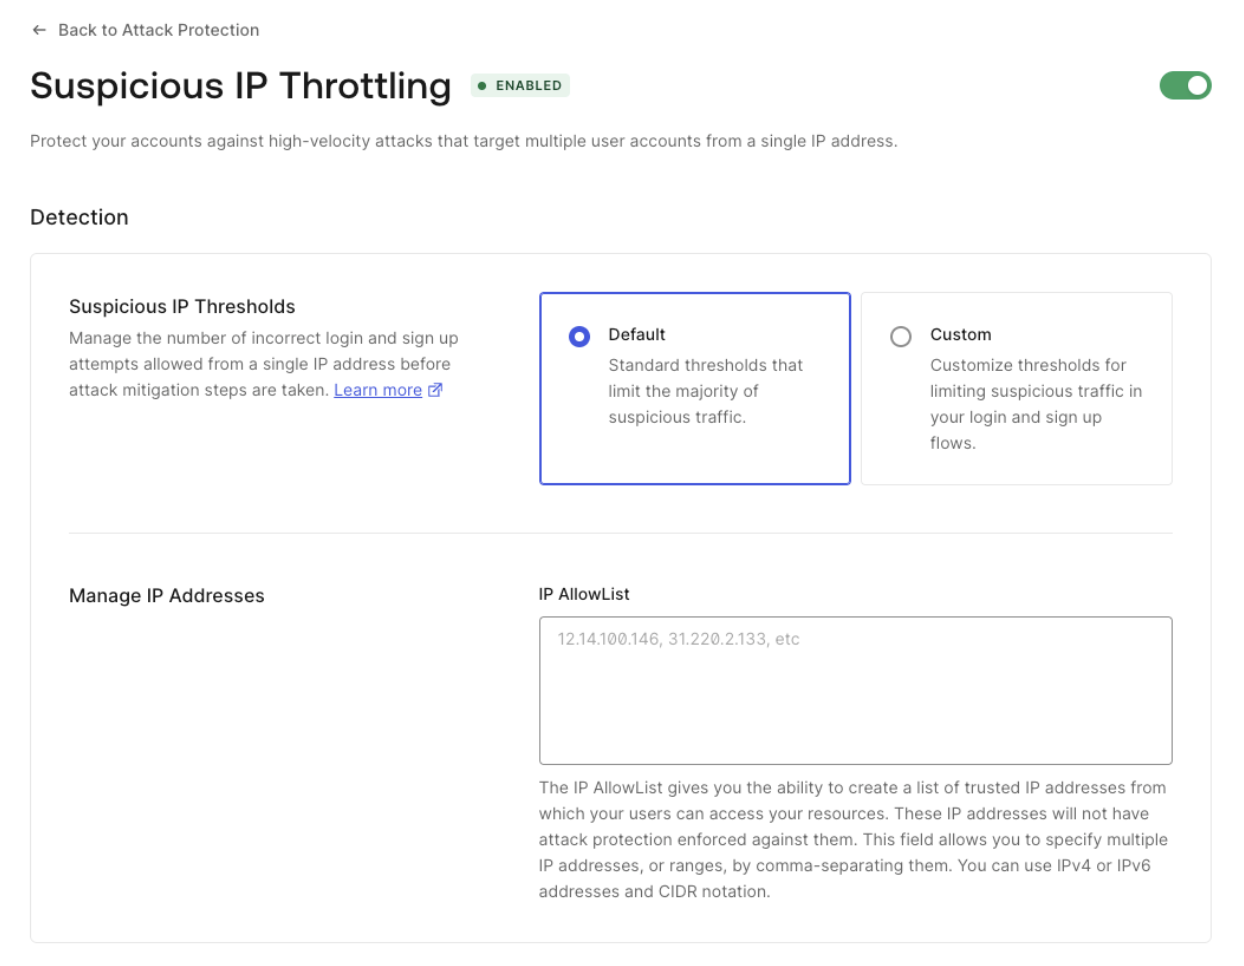
You can configure a custom threshold and throttling rate for Custom Token Exchange with the Management API.

First, [get a Management API token](/docs/secure/tokens/access-tokens/management-api-access-tokens#get-management-api-tokens) to consume the API. Then, send the following GET request to the [Get Suspicious IP Throttling settings endpoint](https://auth0.com/docs/api/management/v2/attack-protection/get-suspicious-ip-throttling):

```bash lines
curl --location 'https://{{YOUR _TENANT}}/api/v2/attack-protection/suspicious-ip-throttling' \
--header 'Authorization: Bearer {{MANAGEMENT_API_TOKEN}}' \
```

You will receive a response like the following:

```json lines
{
  "enabled": true,
  "shields": [
    "admin_notification",
    "block"
  ],
  "allowlist": [],
  "stage": {
    "pre-login": {
      "max_attempts": 100,
      "rate": 864000
    },
    "pre-user-registration": {
      "max_attempts": 50,
      "rate": 1200
    },
    "pre-custom-token-exchange": {
      "max_attempts": 10,
      "rate": 600000
    }
  }
}
```

Use the following `PATCH` request to update the `pre-custom-token-exchange` stage with the needed values. Note that the rate is the interval of time in milliseconds at which new attempts are granted.

```bash lines
curl --location --request PATCH 'https://{{YOUR _TENANT}}/api/v2//attack-protection/suspicious-ip-throttling' \
--header 'Content-Type: application/json' \
--header 'Authorization: Bearer {{MANAGEMENT_API_TOKEN}}' \
--data '{"stage":{"pre-custom-token-exchange":{"max_attempts":10,"rate":600000}}}'
```

## Example Use Cases and Code Samples

You can use Custom Token Exchange to solve advanced integration scenarios where normal federated login strategies based on redirecting the end user cannot be applied due to technical or user experience constraints. The code provided for the use cases is incomplete and only aims at showing the logical steps you can follow with your code to address the use case. Refer to [code samples](#code-samples) for more detailed code examples.

<Callout icon="file-lines" color="#0EA5E9" iconType="regular">
  Auth0 recommends using normal, out-of-the-box federated login whenever possible. By allowing you to set the user for the transaction, Custom Token Exchange gives you more flexibility by taking on the additional responsibility of securely validating and handling the transaction.
</Callout>

This section describes example use cases and specific code samples with recommendations for implementing your scenario. To illustrate the use cases, we will use GearUp, a fictional car rental service company.

### Use Case: Seamless migration into Auth0

GearUp has a mobile App used by millions of people and needs to modernize their Identity solution so they’ve decided to switch to Auth0. However, they want to avoid forcing users to re-authenticate as they migrate from their legacy identity provider, or IdP, as that adds friction to the user experience.

To solve this, and to limit risks, GearUp is migrating incrementally. For each user, they wish to exchange the refresh token from their legacy IdP for an Auth0 access token, refresh token and <Tooltip tip="ID Token: Credential meant for the client itself, rather than for accessing a resource." cta="View Glossary" href="/docs/glossary?term=ID+token">ID token</Tooltip> set. This allows their app to seamlessly start using Auth0 as the IdP for this user, as well as consume GearUp APIs using Auth0-issued tokens. Once the exchange is done for all users, the app will be fully migrated and the old IdP can be disconnected–all without impacting end users and GearUp’s business.

<Frame>
  <img src="https://mintcdn.com/docs-staging-quickstart-revamp/95MUIRU4PPeO3xcE/images/cdy7uua7fh8z/2Ke6p3yZl06KT4HHqtaVu9/5d9c5feb98d614d6d793fb01ccc03e92/Screenshot_2025-02-03_at_5.00.32_PM.png?fit=max&auto=format&n=95MUIRU4PPeO3xcE&q=85&s=dac5908b08cd0ee501a1c67b049cd734" alt="" width="1222" height="720" data-path="images/cdy7uua7fh8z/2Ke6p3yZl06KT4HHqtaVu9/5d9c5feb98d614d6d793fb01ccc03e92/Screenshot_2025-02-03_at_5.00.32_PM.png" />
</Frame>

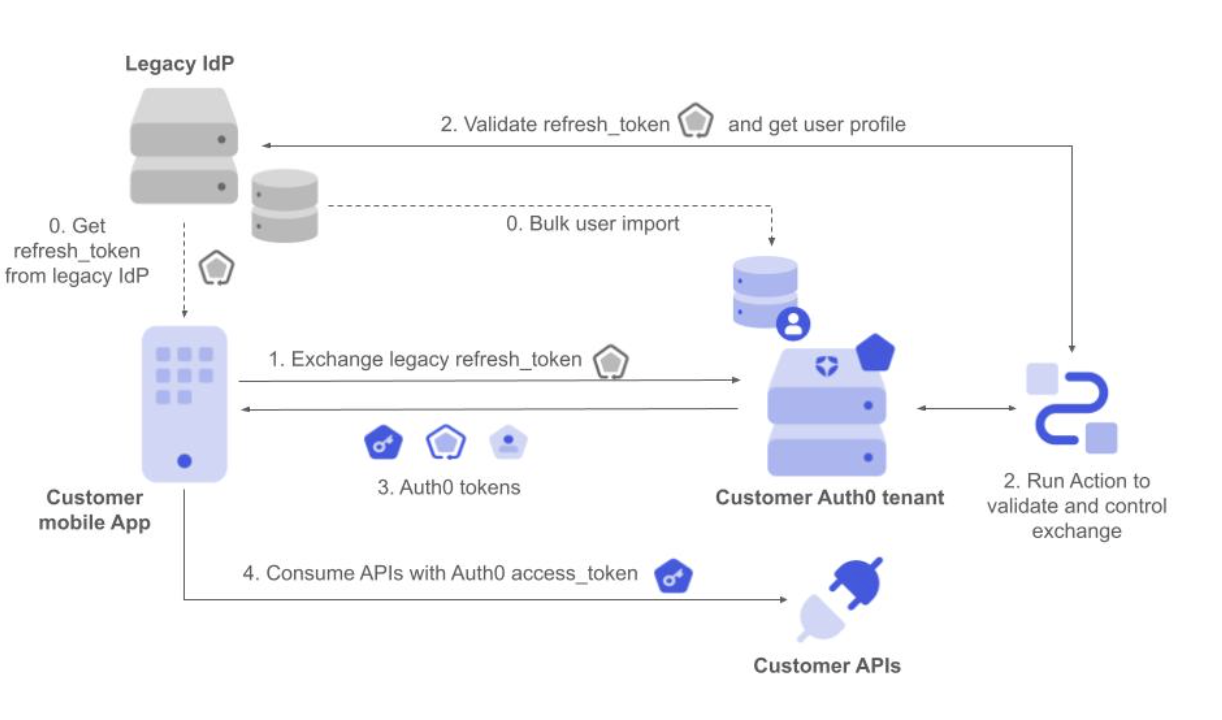
As a prerequisite, GearUp has done a [bulk user import](/docs/manage-users/user-migration/bulk-user-imports) into their Auth0 tenant and the mobile app has a valid legacy refresh token for each user to be migrated.

1. The mobile app makes a request to Auth0 to exchange the legacy refresh token, setting it as the subject token.
2. The corresponding Custom Token Exchange profile Action executes. It validates the refresh token with the legacy IdP and gets the external user ID from the user profile. It then applies the required authorization policy and finally sets the user.
3. Auth0 responds with Auth0 access token, ID token, and refresh token.
4. The mobile app can now use the Customer APIs using Auth0 tokens without the user having to re-authenticate.

The following code sample shows how to implement this in the Custom Token Exchange Action. In this case, since user profiles were already imported into an Auth0 database connection:

* We don’t want to create the user.
* We don’t want to update the user profile.

We use the external IdP user ID to set the user in the corresponding connection.

```javascript lines expandable
/**
* Handler to be executed while executing a custom token exchange request
* @param {Event} event - Details about the incoming token exchange request.
* @param {CustomTokenExchangeAPI} api - Methods and utilities to define token exchange process.
*/
exports.onExecuteCustomTokenExchange = async (event, api) => {

 // 1. VALIDATE the refresh_token received in the subject_token by using it to get
 // the UserProfile from the external IdP
 const { isValid, user } = await getUserProfile(
   event.transaction.subject_token,
   event.secrets.CLIENT_SECRET,
 );

 if (!isValid) {
   // Mark the subject token as invalid and fail the transaction.
   api.access.rejectInvalidSubjectToken("Invalid subject_token");
 } else {
   // 2. Apply your AUTHORIZATION POLICY as required to determine if the request is valid.
   // Use api.access.deny() to reject the transaction in those cases.

   // 3. When we have the profile, we SET THE USER in the target connection
   api.authentication.setUserByConnection(
     connectionName,
     {
       // only the user_id in the connection is needed, as we are not
       // creating nor updating the user
       user_id: user.sub,
     },
     {
       creationBehavior: "none",
       updateBehavior: "none",
     },
   );
 }
};

/**
* Exchange the refresh token and load the user profile from the legacy IdP
* @param {string} refreshToken
* @param {string} clientSecret
* @returns {Promise<{ isValid: boolean, user?: object }>} If the refresh token was exchanged successfully, returns the user profile
*/
async function getUserProfile(refreshToken, clientSecret) {
 // Add your code here. REFER TO CODE SAMPLES FOR DETAILED EXAMPLES
}
```

Read [code samples](#code-samples) for a more detailed example on how to validate opaque refresh token with the legacy IdP.

### Use Case: Re-use an external authentication provider

Another use case involves GearUp partnering with Air0, a leading travel provider, to offer their car rental services directly within the Air0 single-page application. GearUp offers a JavaScript library that encapsulates the use of their APIs. This way GearUp’s APIs can easily be consumed by Air0’s website where car rental services are being offered.

Once again, the solution needs to be invisible to end users by avoiding re-authentication to GearUp. To solve this problem, GearUp’s JavaScript library can perform a token exchange using the external Air0 ID token as the input. This results in an Auth0 access token that is generated and associated with the corresponding GearUp user based on their email address. Once the GearUp library gets the access token, it can start using GearUp’s APIs to offer car rental services directly within Air0’s website.

<Frame>
  <img src="https://mintcdn.com/docs-staging-quickstart-revamp/TO6FS4AgTzQGgpsU/images/cdy7uua7fh8z/34AVzwyYARK6fn2IEnLsQn/409082d736d8495b637626406977fb1f/Screenshot_2025-02-03_at_5.08.47_PM.png?fit=max&auto=format&n=TO6FS4AgTzQGgpsU&q=85&s=f36c9ca02fde97a6cca99dd5198f4e9c" alt="" width="1260" height="730" data-path="images/cdy7uua7fh8z/34AVzwyYARK6fn2IEnLsQn/409082d736d8495b637626406977fb1f/Screenshot_2025-02-03_at_5.08.47_PM.png" />
</Frame>

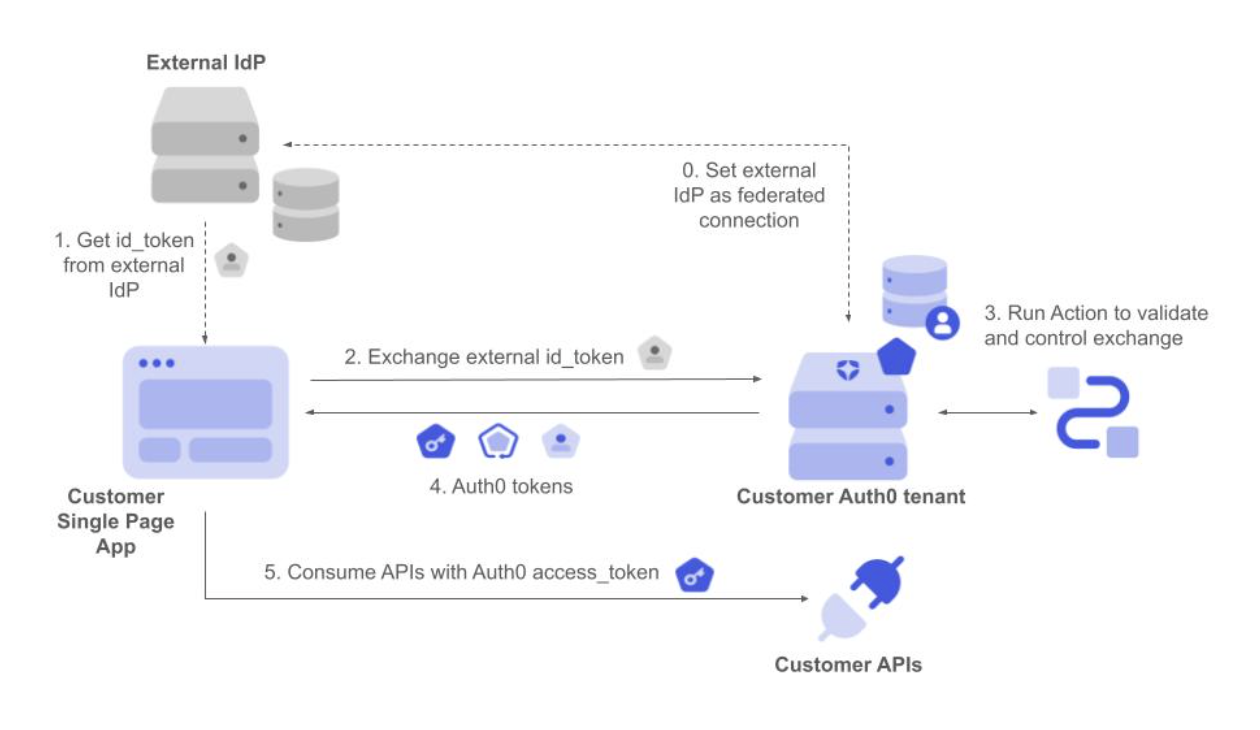
As a prerequisite, GearUp has set up Air0 IdP as a federated enterprise or social connection, so the user can authenticate via federate login or alternatively via Custom Token Exchange as follows:

1. The Single Page App gets the ID token from the external IdP once the user authenticates.
2. It then requests the exchanges of the ID token, setting it as the subject token.
3. The corresponding Custom Token Exchange profile Action executes. It validates the ID token and gets the user ID and other profile attributes from the token. It then applies the required authorization policy and finally sets the user.
4. Auth0 responds with Auth0 access token, ID token and refresh token.
5. The javascript code running in the SPA can now use the Customer APIs using Auth0 tokens without the user having to re-authenticate.

The following code exemplifies how to implement this in the Custom Token Exchange Action. In this case:

* We use the external IdP user ID to set the user in the corresponding connection.
* We want to create the user if they don’t yet exist.
* We don’t want to replace the user profile if a more complete set of attributes is obtained via federated login, in case the user already exists.
* We don't want to verify emails when users are created.

```javascript lines expandable
const jwksUri = "https://example.com/.well-known/jwks.json";

/**
 * Handler to be executed while executing a custom token exchange request
 * @param {Event} event - Details about the incoming token exchange request.
 * @param {CustomTokenExchangeAPI} api - Methods and utilities to define token exchange process.
 */
exports.onExecuteCustomTokenExchange = async (event, api) => {

  // 1. VALIDATE the id_token received in the subject_token
  const { isValid, payload } = await validateToken(
    event.transaction.subject_token,
  );

  if (!isValid) {
    // Mark the subject token as invalid and fail the transaction.
    api.access.rejectInvalidSubjectToken("Invalid subject_token");
  } else {
    // 2. Apply your AUTHORIZATION POLICY as required to determine if the request is valid.
    // Use api.access.deny() to reject the transaction in those cases.

    // 3. SET THE USER in the target connection.
    // We don't want to verify emails when users are created
    // This example assumes subject_token (id_token) contains standard OIDC claims. Other custom mappings
    // are also possible.
    api.authentication.setUserByConnection(
      'Enterprise-OIDC',
      {
          user_id: formattedUserId,
          email: subject_token.email,
          email_verified: subject_token.email_verified,
          phone_number: subject_token.phone_number,
          phone_verified: subject_token.phone_number_verified,
          username: subject_token.preferred_username,
          name: subject_token.name,
          given_name: subject_token.given_name,
          family_name: subject_token.family_name,
          nickname: subject_token.nickname,
          verify_email: false
      },
      {
          creationBehavior: 'create_if_not_exists',
          updateBehavior: 'none'
      }
    );
  }

  /**
   * Validate the subject token
   * @param {string} subjectToken
   * @returns {Promise<{ isValid: boolean, payload?: object }>} Payload of the token
   */
  async function validateToken(subjectToken) {
    // Add your code here. REFER TO CODE SAMPLES FOR DETAILED EXAMPLES
  }
};
```

Read [code samples](#code-samples) for a more detailed example on how to securely validate <Tooltip tip="JSON Web Token (JWT): Standard ID Token format (and often Access Token format) used to represent claims securely between two parties." cta="View Glossary" href="/docs/glossary?term=JWTs">JWTs</Tooltip>.

### Use Case: Get Auth0 tokens for another audience

GearUp wants to improve how it authorizes calls between its internal microservices to serve API requests. It wants a centralized policy controlling the resources that each service can consume. This can also be solved using Token Exchange.

When the API request first arrives at service A, it exchanges the received access token for a new one that allows it to consume service B as the new audience. If the authorization policy governing the token exchange allows it, service A gets the new token back and can now consume service B. The user ID is kept unchanged in the new token, so the proper user context is retained throughout the process.

<Frame>
  <img src="https://mintcdn.com/docs-staging-quickstart-revamp/OF4RJhPvadaf5sdD/images/cdy7uua7fh8z/5Zw7yaJGct9eHAl4rdf72D/42274a5896851a16bea402ac52037f52/Screenshot_2025-02-03_at_5.17.14_PM.png?fit=max&auto=format&n=OF4RJhPvadaf5sdD&q=85&s=c2cc986b194905d6050aa449baa10244" alt="" width="1240" height="694" data-path="images/cdy7uua7fh8z/5Zw7yaJGct9eHAl4rdf72D/42274a5896851a16bea402ac52037f52/Screenshot_2025-02-03_at_5.17.14_PM.png" />
</Frame>

The GearUp application has initially obtained an access token to consume API A on behalf of a user:

1. The app sends the request with the initial access token to API A.
2. API A backend service validates the access token and requests to exchange by setting it as the subject token for a new access token to consume API B.
3. The corresponding Custom Token Exchange profile Action executes. It validates the access token and gets the Auth0 user ID from the token. It then applies the required authorization policy and finally sets the user.
4. Auth0 responds with an Auth0 access token to consume the API B audience.
5. API A backend service calls API B using the new access token, which is still associated with the same user.

The following code exemplifies how to implement this in the Custom Token Exchange Action. In this case:

* We use the Auth0 user ID to set the user, so there is no need to set this in the scope of any connection.
* We don’t want to create or update the user.

Refer to [Validate JWTs signed with asymmetric keys](#validate-jwts-signed-with-asymmetric-keys) for expanded code samples on this use case.

```javascript lines expandable
const jwksUri = "https://example.com/.well-known/jwks.json";

/**
 * Handler to be executed while executing a custom token exchange request
 * @param {Event} event - Details about the incoming token exchange request.
 * @param {CustomTokenExchangeAPI} api - Methods and utilities to define token exchange process.
 */
exports.onExecuteCustomTokenExchange = async (event, api) => {
  // 1. VALIDATE the access_token received in the subject_token
  const { isValid, payload } = await validateToken(
    event.transaction.subject_token,
  );

  if (!isValid) {
    // Mark the subject token as invalid and fail the transaction.
    api.access.rejectInvalidSubjectToken("Invalid subject_token");
  } else {
    // 2. Apply your AUTHORIZATION POLICY as required to determine if the request is valid.
    // Use api.access.deny() to reject the transaction in those cases.

    // 3. SET THE USER
    api.authentication.setUserById(payload.sub);
  }

  /**
   * Validate the subject token
   * @param {string} subjectToken
   * @returns {Promise<{ isValid: boolean, payload?: object }>} Payload of the token
   */
  async function validateToken(subjectToken) {
    // Add your code here. REFER TO CODE SAMPLES FOR DETAILED EXAMPLES
  }
};
```

Read [code samples](#code-samples) for a more detailed example on how to securely validate JWTs.

### Code samples

The following code samples show best practices for common scenarios for validating incoming subject tokens in a secure and performant way.

Use asymmetric algorithms and keys whenever you can as you don’t need to share any secret with Auth0. This also simplifies key rotation, such as when exposing a JWKS URI endpoint to advertise applicable public keys.

<Callout icon="file-lines" color="#0EA5E9" iconType="regular">
  It is your responsibility to ensure that subject tokens are protected with a strong algorithm and keys/secrets with enough entropy.
</Callout>

#### Validate JWTs signed with asymmetric keys

Consider the following recommendations:

* Use Actions [api.cache](#api-cache) methods to avoid having to fetch the signing keys for each transaction.
* Adhere to [RFC8725](https://www.rfc-editor.org/rfc/rfc8725.txt) best practices
* Use RS\*, PS\*, ES\* or Ed25519 algorithms
* Do not use or accept the none algorithm
* Use RSA with a minimum length of 2048 bits.

```javascript lines expandable
const { jwtVerify } = require("jose");

const jwksUri = "https://example.com/.well-known/jwks.json";
const fetchTimeout = 5000; // 5 seconds

const validIssuer = "urn:my-issuer"; // Replace with your issuer

/**
 * Handler to be executed while executing a custom token exchange request
 * @param {Event} event - Details about the incoming token exchange request.
 * @param {CustomTokenExchangeAPI} api - Methods and utilities to define token exchange process.
 */
exports.onExecuteCustomTokenExchange = async (event, api) => {
  const { isValid, payload } = await validateToken(
    event.transaction.subject_token,
  );

  // Apply your authorization policy as required to determine if the request is valid.
  // Use api.access.deny() to reject the transaction in those cases.

  if (!isValid) {
    // Mark the subject token as invalid and fail the transaction.
    api.access.rejectInvalidSubjectToken("Invalid subject_token");
  } else {
    // Set the user in the current request as authenticated, using the user ID from the subject token.
    api.authentication.setUserById(payload.sub);
  }

  /**
   * Validate the subject token
   * @param {string} subjectToken
   * @returns {Promise<{ isValid: boolean, payload?: object }>} Payload of the token
   */
  async function validateToken(subjectToken) {
    try {
      const { payload, protectedHeader } = await jwtVerify(
        subjectToken,
        async (header) => await getPublicKey(header.kid),
        {
          issuer: validIssuer,
        },
      );

      // Perform additional validation on the token payload as required

      return { isValid: true, payload };
    } catch (/** @type {any} */ error) {
      if (error.message === "Error fetching JWKS") {
        throw new Error("Internal error - retry later");
      } else {
        console.log("Token validation failed:", error.message);
        return { isValid: false };
      }
    }
  }

  /**
   * Get the public key to use for key verification. Load from the actions cache if available, otherwise
   * fetch the key from the JWKS endpoint and store in the cache.
   * @param {string} kid - kid (Key ID) of the key to be used for verification
   * @returns {Promise<Object>}
   */
  async function getPublicKey(kid) {
    const cachedKey = api.cache.get(kid);
    if (!cachedKey) {
      console.log(`Key ${kid} not found in cache`);
      const key = await fetchKeyFromJWKS(kid);
      api.cache.set(kid, JSON.stringify(key), { ttl: 600000 });
      return key;
    } else {
      return JSON.parse(cachedKey.value);
    }
  }

  /**
   * Fetch public signing key from the provided JWKS endpoint, to use for token verification
   * @param {string} kid - kid (Key ID) of the key to be used for verification
   * @returns {Promise<object>}
   */
  async function fetchKeyFromJWKS(kid) {
    const controller = new AbortController();
    setTimeout(() => controller.abort(), fetchTimeout);

    /** @type {any} */
    const response = await fetch(jwksUri);

    if (!response.ok) {
      console.log(`Error fetching JWKS. Response status: ${response.status}`);
      throw new Error("Error fetching JWKS");
    }
    const jwks = await response.json();
    const key = jwks.keys.find((key) => key.kid === kid);
    if (!key) {
      throw new Error("Key not found in JWKS");
    }
    return key;
  }
};
```

#### Validate JWTs signed with symmetric keys

Consider the following recommendations:

* Use [Actions Secrets](/docs/customize/actions/write-your-first-action#add-a-secret) to securely store your symmetric secrets.
* Adhere to [RFC8725](https://www.rfc-editor.org/rfc/rfc8725.txt) best practices
* Use secure algorithms such as HS256, along with high entropy random secrets (e.g. of at least 256 bits long)

```javascript lines expandable
const { jwtVerify } = require("jose");

const validIssuer = "urn:my-issuer"; // Replace with your issuer

/**
 * Handler to be executed while executing a custom token exchange request
 * @param {Event} event - Details about the incoming token exchange request.
 * @param {CustomTokenExchangeAPI} api - Methods and utilities to define token exchange process.
 */
exports.onExecuteCustomTokenExchange = async (event, api) => {
  // Initialize the shared symmetric key from Actions Secrets
  const encoder = new TextEncoder();
  const symmetricKey = encoder.encode(event.secrets.SHARED_SECRET);

  const { isValid, payload } = await validateToken(
    event.transaction.subject_token,
    symmetricKey,
  );

  // Apply your authorization policy as required to determine if the request is valid.
  // Use api.access.deny() to reject the transaction in those cases.

  if (!isValid) {
    // Mark the subject token as invalid and fail the transaction.
    api.access.rejectInvalidSubjectToken("Invalid subject_token");
  } else {
    // Set the user in the current request as authenticated, using the user ID from the subject token.
    api.authentication.setUserById(payload.sub);
  }
};

/**
 * Validate the subject token
 * @param {string} subjectToken
 * @param {Uint8Array} symmetricKey
 * @returns {Promise<{ isValid: boolean, payload?: object }>} Payload of the token
 */
async function validateToken(subjectToken, symmetricKey) {
  try {
    // Validate token is correctly signed with the shared symmetric key
    // It also checks it is not expired as long as it includes an 'exp' attribute.
    const { payload, protectedHeader } = await jwtVerify(
      subjectToken,
      symmetricKey,
      {
        issuer: validIssuer,
      },
    );

    return { isValid: true, payload };
  } catch (/** @type {any} */ error) {
    console.log("Token validation failed:", error.message);
    return { isValid: false };
  }
}
```

#### Validate opaque token with an external service

Use [Action Secrets](/docs/customize/actions/write-your-first-action#add-a-secret) to securely store your external IdP <Tooltip tip="Client Secret: Secret used by a client (application) to authenticate with the Authorization Server; it should be known to only the client and the Authorization Server and must be sufficiently random to not be guessable." cta="View Glossary" href="/docs/glossary?term=client+secret">client secret</Tooltip>.

```javascript lines expandable
const tokenEndpoint = "EXTERNAL_TOKEN_ ENDPOINT";
const userInfoEndpoint = "EXTERNAL_USER_INFO_ENDPOINT";
const clientId = "EXTERNAL_CLIENT_ID";
const connectionName = "YOUR_CONNECTION_NAME";
const fetchTimeout = 5000; // 5 seconds

/**
 * Handler to be executed while executing a custom token exchange request
 * @param {Event} event - Details about the incoming token exchange request.
 * @param {CustomTokenExchangeAPI} api - Methods and utilities to define token exchange process.
 */
exports.onExecuteCustomTokenExchange = async (event, api) => {
  const { isValid, user } = await getUserProfile(
    event.transaction.subject_token,
    event.secrets.CLIENT_SECRET,
  );

  if (!isValid) {
    // Mark the subject token as invalid and fail the transaction.
    api.access.rejectInvalidSubjectToken("Invalid subject_token");
    return;
  }

  // Apply your authorization policy as required to determine if the request is valid.
  // Use api.access.deny() to reject the transaction in those cases.

  // When we have the profile, we set the user in the target connection
  api.authentication.setUserByConnection(
    connectionName,
    {
      // only the user_id in the connection is needed, as we are not
      // creating nor updating the user
      user_id: user.sub,
    },
    {
      creationBehavior: "none",
      updateBehavior: "none",
    },
  );
};

/**
 * Exchange the refresh token and load the user profile from the legacy IdP
 * @param {string} refreshToken
 * @param {string} clientSecret
 * @returns {Promise<{ isValid: boolean, user?: object }>} If the refresh token was exchanged successfully, returns the user profile
 */
async function getUserProfile(refreshToken, clientSecret) {
  const { isValid, accessToken } = await refreshAccessToken(
    refreshToken,
    clientSecret,
  );
  if (!isValid) {
    return { isValid: false };
  }

  const controller = new AbortController();
  setTimeout(() => controller.abort(), fetchTimeout);

  /** @type {any} */
  const response = await fetch(userInfoEndpoint, {
    method: "GET",
    headers: {
      Authorization: `Bearer ${accessToken}`,
      "Content-Type": "application/json",
    },
  });

  if (!response.ok) {
    console.log(`Failed to fetch user info. Status: ${response.status}`);
    throw new Error("Error fetching user info");
  }

  const userProfile = await response.json();

  return { isValid: true, user: userProfile };
}

/**
 * Use the Refresh Token with the legacy IdP to validate it and get an access token
 * @param {string} refreshToken
 * @param {string} clientSecret
 * @returns {Promise<{ isValid: boolean, accessToken?: string }>} If the refresh token was exchanged successfully, returns the access token
 */
async function refreshAccessToken(refreshToken, clientSecret) {
  const controller = new AbortController();
  setTimeout(() => controller.abort(), fetchTimeout);

  /** @type {any} */
  let response;

  try {
    response = await fetch(tokenEndpoint, {
      method: "POST",
      headers: {
        "Content-Type": "application/x-www-form-urlencoded",
      },
      body: new URLSearchParams({
        grant_type: "refresh_token",
        refresh_token: refreshToken,
        client_id: clientId,
        client_secret: clientSecret,
      }).toString(),
    });
  } catch (error) {
    console.error("Error refreshing token");
    throw error;
  }

  if (!response.ok) {
    const errorBody = await response.json();
    console.error("Error refreshing token:", errorBody.error);

    // If we receive an error indicating the refresh token is invalid (for example, an invalid_grant error),
    // then we should explicitly indicate an invalid token using api.access.rejectInvalidSubjectToken
    // to prevent against brute force attacks on the refresh token by activating Suspicious IP Throttling.
    // For other errors which indicate a generic error making the request to the IdP, we should throw
    // an error to indicate a transient failure.
    if (errorBody.error === "invalid_grant") {
      return { isValid: false };
    } else {
      throw new Error("Error refreshing token");
    }
  }

  // Parse the response, in the form { access_token: "...", expires_in: ..., }
  const data = await response.json();
  console.log("Successfully exchanged refresh token");
  return { isValid: true, accessToken: data.access_token };
}
```

## Limitations

This is an Early Access feature and thus comes with some limitations and incompatibility with other Auth0 features.

The following features are not supported (or will not work properly) with Custom Token Exchange EA:

* Organizations
* <Tooltip tip="Multi-factor authentication (MFA): User authentication process that uses a factor in addition to username and password such as a code via SMS." cta="View Glossary" href="/docs/glossary?term=MFA">MFA</Tooltip>: `api.authentication.challengeWith()` and `api.multifactor.enable()` commands in Post Login actions are not yet supported for Custom Token Exchange and will result in the transaction failing with a non-recoverable error; similarly, transactions will also fail when MFA is configured as a tenant policy
* Custom DB Connections with [Import Users to Auth0](/docs/manage-users/user-migration/configure-automatic-migration-from-your-database) enabled are not supported for `setUserByConnection()` operations
* Specific impersonation support (e.g. actor token and actor claim)
* Third-Party and Non-OIDC Conformant Clients

## Rate Limits

Custom Token Exchange requests to the `/oauth/token` endpoint are rate limited at 10% of the global Authentication API rate limit for the applicable performance tier.

<table class="table">
  <thead>
    <tr>
      <th><strong>Performance Tier</strong></th>
      <th><strong>Global Authentication API limit (RPS)</strong></th>
      <th><strong>Custom Token Exchange limit (RPS)</strong></th>
    </tr>
  </thead>

  <tbody>
    <tr>
      <td>Enterprise</td>
      <td>100</td>
      <td>10</td>
    </tr>

    <tr>
      <td>Private Cloud Basic (1x)</td>
      <td>100</td>
      <td>10</td>
    </tr>

    <tr>
      <td>Private Cloud Performance (5x)</td>
      <td>500</td>
      <td>50</td>
    </tr>

    <tr>
      <td>Private Cloud Performance (15x)</td>
      <td>1500</td>
      <td>150</td>
    </tr>

    <tr>
      <td>Private Cloud Performance (30x)</td>
      <td>3000</td>
      <td>300</td>
    </tr>

    <tr>
      <td>Private Cloud Performance (60x)</td>
      <td>6000</td>
      <td>600</td>
    </tr>

    <tr>
      <td>Private Cloud Performance (100x)</td>
      <td>10000</td>
      <td>1000</td>
    </tr>
  </tbody>
</table>

Read requests on `api/v2/token-exchange-profiles` endpoints are also rate limited as follows:

<table class="table">
  <thead>
    <tr>
      <th>Performance Tier</th>
      <th>Custom Token Exchange limit (RPS)</th>
      <th>Custom Token Exchange limit (RPM)</th>
    </tr>
  </thead>

  <tbody>
    <tr>
      <td>Enterprise</td>
      <td>20</td>
      <td>200</td>
    </tr>

    <tr>
      <td>Private Cloud Basic (1x)</td>
      <td>20</td>
      <td>200</td>
    </tr>

    <tr>
      <td>Private Cloud Performance (5x)</td>
      <td>100</td>
      <td>300</td>
    </tr>

    <tr>
      <td>Private Cloud Performance (15x)</td>
      <td>300</td>
      <td>3000</td>
    </tr>

    <tr>
      <td>Private Cloud Performance (30x)</td>
      <td>600</td>
      <td>6000</td>
    </tr>

    <tr>
      <td>Private Cloud Performance (60x)</td>
      <td>1200</td>
      <td>12000</td>
    </tr>

    <tr>
      <td>Private Cloud Performance (100x)</td>
      <td>2000</td>
      <td>20000</td>
    </tr>
  </tbody>
</table>

## Entity Limits

A maximum of 100 Custom Token Exchange profiles can be created per tenant.

The total number of Actions is also limited depending on your Auth0 plan. To learn more, read [Auth0's Pricing Page](https://auth0.com/pricing).

## Troubleshoot

### "Consent required" response

You may receive an `invalid_request` error with a `consent_required` error description when calling the `/oauth/token` endpoint.

To resolve this issue, enable the **Allow Skipping User Consent** option for your API in the Auth0 Dashboard.

<Frame>
  <img src="https://mintcdn.com/docs-staging-quickstart-revamp/TYcLtS8UbiQUCV_p/images/cdy7uua7fh8z/4eKWTJtCQwSHUZyKU81mWm/33c1966367d2b7c157b414fa1f04c026/Screenshot_2025-02-03_at_5.36.38_PM.png?fit=max&auto=format&n=TYcLtS8UbiQUCV_p&q=85&s=b0d983fbbe9c3a68413a746967c7b8ea" alt="" width="1094" height="260" data-path="images/cdy7uua7fh8z/4eKWTJtCQwSHUZyKU81mWm/33c1966367d2b7c157b414fa1f04c026/Screenshot_2025-02-03_at_5.36.38_PM.png" />
</Frame>
